
User guide


9
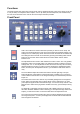
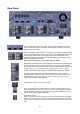
The Color Processor Adjustments allow colour saturation, brightness, contrast and
tint (NTSC only) to be adjusted for both the foreground (Cam-1 / Cam-2) and
background images. The selected parameter, which will be illuminated red, is
adjusted using the Adjustment Knob. Cam-1 and Cam-2 store separate values, so
different colour processor settings can be used on each.
The Still button enables you to grab a freeze frame image from either the background
or foreground inputs. This can be useful when setting up.
N.B. The colour processor adjustments will not function if you are holding a freeze frame.
The Reset button resets a foreground channel (Cam-1 or Cam-2) to factory default.
This will reset all characteristics of a channel (COLOR PROC. /GREEN / BLUE /
LUMA / LEVEL / WINDOW / SHRINK / DENSITY / SPILL)
The Chroma Key button switches the keying effect on or off. In the off position the
foreground channel (Cam-1 or Cam-2) will pass directly to the output monitor,
complete with backdrop. When switched on the button will be illuminated red together
with the chosen keying option (Green, Blue or Luma) see below.
Green, Blue and Luma are the three keying options available. With the Chroma Key
button switched on, you can select the keying option to suit your needs. The selected
option will be illuminated red. When the button is illuminated red you can adjust the
keying colour, to fine tune it for your studio; you can see the setting on the LED meter
above the adjustment knob(although what appears on your monitor is more
important).
If another adjustment has been selected, such as density or spill, the keying option
light will be illuminated 50% to indicate which option you have selected.
Level or Density adjusts the range of the keyer. The button will be illuminated red
when active. The value is adjusted using the adjustment knob, you will see the level
on the LED meter above the knob (although what appears on your monitor is more
important).
If the background is perfectly lit a low value will be adequate, if there are variances in
the background a higher value will allow you to remove them.
The subject density can also be adjusted. If you press and hold the button for two
seconds the button will flash, while the button is flashing you can adjust subject
density. In Green or Blue modes a low value makes the subject solid, the edges will
be sharper and any shadow noise will be higher, a higher value makes the subject
more transparent, the edges will be softer and the shadow noise lower.
In Luma mode the subject density will adjust the white gradient of the subject