ONYX USER MANUAL
Dateq ONYX Manual Safety instructions EN Safety instructions 1 All safety instructions, warnings and operating instructions must be read first. 2 All warnings on the equipment must be heeded. 3 The operating instructions must be followed. 4 Keep the operating instructions for future reference. 5 The equipment may never be used in the immediate vicinity of water; make sure that water and damp cannot get into the equipment.
EN Dateq ONYX Manual Introduction 3 Dateq Onyx The Onyx is a 6-channel mixer with a clear and uncluttered appearance. It is highly suitable for use in -among other situations- conference centres, catering establishments, small discotheques and hotels. A total of three microphones and nine line signals can be connected. Channels 1 and 2 both have gain and dual tone controls to improve speech intelligibility.
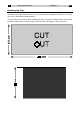
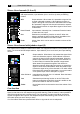
Dateq ONYX Manual Installation EN Installing the Onyx The Onyx has been designed to be installed in a standard 19" rack mounting. This is why all the connectors have been located on the rear. The cabinet fits into an opening of 445 x 217 x 105 mm (W x H x D). See also the drawings below. The front panel is 3 mm thick.
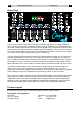
EN Dateq ONYX Manual Connecions 5 Onyx connector board On the underside of the Onyx you will find the connectors for all the audio inputs and outputs. Also located here are the Euro mains socket with built-in mains fuse and the jukebox input. These connectors were deliberately placed on the underside because, in many cases, the Onyx will be installed in a standard 19" rack mounting. This arrangement ensures that the connectors do not take up unnecessary space in the rack.
Dateq ONYX Manual 6 Connections EN Connections BALANCED MASTER L/ R (A) Electronically balanced master outputs on XLR connectors for the left and right channels of MASTER A. This type of output guarantees perfect signal transmission even if long audio cables are being used. These outputs are equipped with relays to prevent connected equipment from ‘plopping’ when the unit is being switched on and off. MASTER A/ B Unbalanced outputs on cinch connectors.
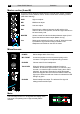
EN Dateq ONYX Manual Operation 7 Microphone channel with Talkover (1) A microphone can be connected to this channel. The channel is equipped with volume control, dual tone control, A/B output selection, input selection and a pre-listening function. GAIN Determines the volume preset for both the Mic Front and the Mic Rear input. HIGH High tone adjust. LOW Low tone adjust. A/ B Output selection. When button A is pressed the microphone signal of this channel runs to output A.
Dateq ONYX Manual Operation EN Stereo Line channels (3, 4 en 5) Use these channels to connect stereo sources. Each channel is equipped with A/B output selection, input selection (Line 1 and Line 2) and a pre-listening function. A/ B Output selection. When button A is pressed the signal of this channel is directed to output A. When talkover is active on output A the signal of this channel is attenuated. When button B is pressed the signal of this channel is directed to output B.
EN Dateq ONYX Manual Operation 9 Master section (A and B) The Onyx has two identical master sections (A and B). Each section consists of a triple tone control, balance control, volume control and a monitoring function (after-fader listening). HIGH High tone adjust. MID Middle tone adjust. LOW Low tone adjust. BAL Determines the balance between the left and the right channel. When in mid-position, the left and right channel can be heard evenly loud.
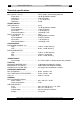
Dateq ONYX Manual Technical Specifications EN Technical specifications MONO INPUT MIC (channel 1 and 2) .................................... XLR-3 female, electronically balanced Signal level ............................................ -50 dB @ 600ohm variable Impedance............................................. 3 kohm nominal Input noise ............................................. < -117 dB (IHF-A) Headroom.............................................. 33 dB STEREO INPUTS LINE (channel 2)......