XTC II Gebruiksaanwijzing User manual DATEQ Audio Technologies B.V. De Paal 37 1351 JG Almere The Netherlands www.DATEQ.
EN DATEQ XTC II manual Safety instructions 1 Safety instructions 1. 2. 3. 4. 5. All safety instructions, warnings and operating instructions must be read first. All warnings on the equipment must be heeded. The operating instructions must be followed. Keep the operating instructions for future reference. The equipment may never be used in the immediate vicinity of water; make sure that water and damp cannot get into the equipment. 6.
2 Introduction DATEQ XTC II manual EN Introduction The DATEQ XTC II is a battle mixer with some unique additional functions. The XTC II has five channels: four fader channels, and one separate microphone channel. Various sources like CD-players, computers and turn-tables can be connected to the fader channels. The XTC II has four 60mm ALPS faders to make very fast mixes. All faders are VCA-controlled. The tone-controls are tuned for the DJ: sparkling high, a clear mid and a groovy bass.
EN DATEQ XTC II manual Introduction 3 DATEQ XTC II: A new version of the XTC a standard in the battle scene The new DATEQ XTC II is the perfect tool for the every DJ. Multifunctional, but still easy-to-use. This manual reveals all it's characteristics and secrets....
4 Installation DATEQ XTC II manual Installation The DATEQ XTC II can be mounted into a table, but it can also be use stand-alone. Optionally 19-inch brackets are available to mount the XTC II into a 19-inch rack. Don't forget to leave some space for the connectors at the back of the XTC II. The measurements can be found in the drawings below. 92mm M ad e b y A lmere/ T h e N eth erlan d s W W W .D A T EQ.
EN DATEQ XTC II manual Connecting 5 Connecting the XTC II All connections can be made at the rear and the front of the XTC II. Below we will explain the function of the connectors. M ad e b y A lmere/ T h e N eth erlan d s W W W .D A T EQ.N L Connecting Master left/ right The electronically balanced XLR outputs guarantee a perfect audio quality, even with long cable runs. The same signal is available at the unbalanced cinch connectors.
6 Connecting DATEQ XTC II manual Left/ right master outputs (XLR 3-pin male) Pin 1 2 3 Function Audio ground Audio + Audio - Type GND Output Output Master/ monitor/ record/ effect(FX)- send outputs (cinch) Pin Function Tip Audio + Shield Audio ground Type Output GND Sub out (6.3mm jack) Pin Function Tip Audio mono Ring Shield Audio ground Type Output GND Effect Effect(FX)- return/ line/ line 1/ line 2/ phono inputs (cinch) Pin Function Tip Audio + Shield Audio ground Type Input GND Chain in (6.
EN DATEQ XTC II manual Operation 7 Operation Microphone channel Besides the four fader channels the XTC II is equipped with a extra microphone channel. This DJ channel uses a volume potmeter (LVL) instead of a fader. The microphone input comes with a (low-voltage) phantome supply, controlled by a internal jumpersetting. To prevent from an acoustical feedback it is possible to filter out the microphones signal (Cleanfeed) from the monitor speakers. This controlled by internal jumpersettings.
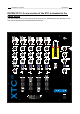
8 Operation DATEQ XTC II manual EN Master section The XTC II master section holds a 2x30 segmented VU-meter showing the master mix or cue level accurately. The master volume control can adjust the master-mix volume. The balance adjusts the master left-right balance. The monitor control adjusts the volume of the monitor speakers. This is completely independent of the master volume and balance settings. The Phones control adjusts the volume for the headphones.
EN DATEQ XTC II manual Setup 9 Software setup Because the XTC II is a digitally controlled mixer it is possible to adjust some user settings. Before settings can be adjusted, the setup-mode has to be accessed. In order to activate the setup-mode the setup-button has to be pressed together with the to be adjusted setting. The LED besides the setup-button will light-up solid. Some LEDs on the front will light up, or start to blink.
10 Setup DATEQ XTC II manual EN Jumper settings !! To be able to reach the internal jumpers the AC-cord has to be disconnected from the mains first. Then the 8 torx screws of the front panel can be unscrewed and the front panel can be flipped open gently . MIC Phantom voltage Inside left, at the back, on the top board the Mic-Phantom jumper is situated. This controls the phantom voltage: Phantom ON is top position, OFF is the bottom position.
EN DATEQ XTC II manual Technical specifications Technical specifications Microphone channel MIC Input.......................................... XLR-3 female; balanced Signal level............................. -50dB @ 600 ohm Impedance.............................. 3kOhm Input noise.............................. <-108dB Headroom............................... +36dB Phantom voltage.....................15V LINE Input......................................... Cinch Signal level.............................
EG-VERKLARING VAN OVEREENSTEMMING Wij, acc.to art.10.1 EMC directive 89/336/EEC DATEQ Audio Technologies b.v. de Paal 37, 1351 JG ALMERE, Nederland verklaren, uitsluitend op onze verantwoordelijkheid, dat dit produkt Type: XTC II Serienummers: 35-XXXX waarop deze verklaring betrekking heeft, in overeenstemming is met de volgende geharmoniseerde Europese normen EN 50081-1 en EN 50082-1 Volgens de bepalingen van de EMC-richtlijn 89/336/EEG, gewijzigd door de richtlijn 91/263/EEG, 92/31/EEG en 93/68/EEG.
EC-DECLARATION OF CONFORMITY We, acc.to art.10.1 EMC directive 89/336/EEC DATEQ Audio Technologies B.V. de Paal 37 1351 JG ALMERE THE NETHERLANDS hereby declare, exclusively to our responsibility, that this product Type: XTC II Serialnrs.: 35-XXXX to which this declaration applies, is in accordance with the following harmonized European norms EN 50081-1 and EN 50082-1 According to the regulations of the EMC-directive 89/336/EEG, amended by directive 91/263/EEG, 92/31/EEG and 93/68/EEG.
woonplaats / city / Wohnort / place: d m - handtekening / signature / Unterschrift d - m - aankoopdatum / purchase date / Kaufdatum / date d'achat: - aankoopdatum / purchase date / Kaufdatum / date d'achat: model / Geräte Typ / produit: GARANTIE / GUARANTEE bewaren met de aankoop-/kassa-bon keep this with original invoice/cash behalten mit der Originalrechnung conserver avec la facture originale serienummer / serial # / Seriennummer / no.
GARANTEE CONDITIONS: DATEQ guarantees this product to be free of defects in materials and workmanship at the time of its original purchase for the period of 12 months. If during this period of guarantee the product proves defective due to improper materials or workmanship, DATEQ will repair or this product or its defective parts on the condetions explained hereafter. 1.