
User Manual


3.
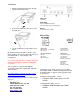
Installation
1. Pull the spring lock latch to open the tray
and slide in your hard drive.
2. Push the hard drive tray door in to secure
the hard drive.
3. Use the included keys to lock in the hard
drives.
By default T5_R5-eSUF mode is JBOD – Just a
Bunch of Drives. The inserted drive will show up as
an individual drives. It only changes after
reconfigured.
To see more than ONE drive in eSATA connection.
eSATA host port MUST supports Port-Multiplier
Technology
You can get these certified Port-Multiplier
Technology eSATA fully support MAC, Windows
and Linux here
http://www.datoptic.com/host-controllers/esata-
sata-raid-jbod-controller.html
For more information, questions or contact, please
visit us at
DAT Optic, Inc.
1815 E. Wilshire Ave., Ste. 906
Santa Ana, CA. 92705
Tel.: 714 558.1808
Fax.: 714.558.3229
www.datoptic.com
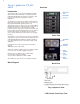
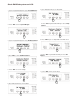
LCD Screen
1. Monitor
Status LEDs
2. Power/RAID/Host Status
3. Device Status (Error, Activity/Link)
Buttons
4. Up, Down, Enter, ESC
Status LEDs
Device Error
Blinking: Error or rebuilding
Off: Normal
Device Activity/Link
On: Link
Off: unlink
Blinking: Activity
Power Status
On: power is on
Off: power is off
RAID Status
On: RAID Degraded
or RAID Error
Off: Normal
Blinking: Rebuilding
Host Status
On: Link
Off: unlink
Blinking: Activity
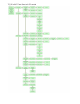
To manage T5_R5-eSUF, end user can use either
LCD control module or RAID GUI utility include in CD
or download-able at support section of product page
in our web site
Using LCD control module - refer to
- Configure RAID Subsystems via LCD
section
Using RAID GUI utility – refer to
- Hardware Raid Manager User Guide
section