
Instruction Manual

tRAID‐eSU3QuickGuide
eSATA / USB3.0 RAID/JBoD 5x bay for ANY OS
Content:
1) tRAID‐Txseries
2) 1xUSB3.0Cable‐Optional
3) 1xeSATAcable–Optional
4) 1xPowercable
5) 1xThunderboltcable‐Optional
6) CDManualandRAIDGUIutilityforMAC.Windows,andLinux
HardwareInstallation
1) RemovethetRAID‐Tfromitspackaging.
2) RemovethetoplitoftRAID,removethemetalbar
3) InsertHDD(s)intofiveslots,simple
droptheHDDverticallydown,putalittepresstothe
HDDtoensuretheHDDisfirmlysit,
4) Securethemetalbarback,putbackthetRAIDtopcover
5) ConnecttRAIDtodesirehostporttoyourcomputersystem(TB,eSATA,USB3.0orUSB2.0)
Note:tRAID‐TwithOptionofeSATA/USB3.0.
PleaseusetheshorteSATAcableconnect
eSATAmarkedasDandHtogethertoenabletheThunderboltport
6) ConnectPowercabletotRAID.
ConfiguretRAID‐eSU3
JBOD–justabunchofdriveisadefaultmode.Thereisnosetuprequired.
Note:eSATArequiresPortMultiplierprotocol
RAIDconfigure‐ThereaeTWOways:
a‐HardwareSetup:
Turnofftheenclosure,changetheswitchinthebackpertablebelow:
Note:BZS:Mutearlarm
‐BZS:MuteAlarm,whenONalarmis
disable
‐EZ:Manualrebuild,whenONrebulildis
inmanualmode
Hotsparedrivecanbeinsertbeforeor
afterRAIDvolume
created
Oncetheswitchessettoadesireraid
mode:RAID0,1,3,5…
1. WithapapercliporballpenPRESS&HOLDthe“SET”recessswitch,whileturnonthe
tRAID‐Tx
2. Waituntiltheenclosuresoundabeep,releasethe“ChangeMode”switch
3. Youshouldbeabletoseethedrive(s)indisk
management(windows)orDiskUtility(MAC)
4. PartitionandformatthevolumepertheOS,oneit'sdoneyouarereadytouseit.
Congratulation,youjustcreateaRAIDwithin1minute.
b–UsingRAIDGUIutility
OurRAIDGUIsupportsMAC,WindowandLinuxOS.
LoadincludedCDtoyoursystem
andinstallRAIDGUIutility.
ordownloaditfromhere:
MAC:http://www.datoptic.com/Download/Raid.GUI.09.58.MAC.zip
Windows:http://www.datoptic.com/Download/Raid.GUI.09.58.Win.zip
Linux:http://www.datoptic.com/Download/Raid.GUI.09.58.Linux.zip
RAIDGUIUserGuide:
http://www.datoptic.com/PDF/RAID5_GUI_User_Guide_v0%209.pdf
OtherFeatures:
FansandNoiseControl.
tRAID‐eSU3equipswithatouchscreenfancontrol,allowendusershavetotalcontrolthefanrpm,
thisultimatelycontrolthefannoise,butwithoutthethremalsafety.
Withbuilt‐inthermalprobe,tRAID‐eSU3monitortheinternalambientinreal‐time.Itcontrolsthe
fan
rpmtoaccordingtothetemperatuereported.Hightemperatue==>higherfanspeedandviaversus
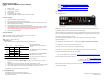
Touchfollowareainabovefiguretocontrol:
[A]Toadjustthresholdtemperature,whichthealarmwillgoesoff.HoldareaAtochange
↔TemperatuedisplayCF
↔[B]Change
fancontrolbetweenAUTOMANUAL.Fanspeedconlychangeinmanualmode
[C]Changefan–CurrentlyFan#istheonlyonebeinused
[D]Reset–Holdfor3sectorestebacktomanufacturesetting
[E]Poweroff‐ToturnofftheTouch
Screenbacklight(Controlfunctionsareremainactive)
[F]Adjustthethresholdtemperatue,after[A]pressed
FormoreinfoRAIDmodes–pleasereferto:http://en.wikipedia.org/wiki/RAID#Standard_levels
Ifthereisquestion,problempleasecontactsus:
Email:support@datoptic.com
Telephone:8669823658or7145581808(Int’l)
WebChat:http://www.datoptic.com/lchat/chat.php
Pleasechecktheproductwebpage,fromtimetotimetogetanewupdateonfirmware,utilityand
otherimportantupdates.
ThankyouforchoosingDATOpticInc.
DATOpticTeam
MO M1 M2 RAID Level
ON ON ON RAID 0 (Stripe)
ON ON OFF RAID1/10 (4drives)
ON OFF OFF RAID3
OFF ON OFF RAID5
OFF ON ON CLONE
ON OFF ON BIG/SPAN