uNAS – tNAS User Manual l Ver 1.0 DATOptic Inc www.datoptic.com uNAS/tNAS User Guide Version 1.
1 Before you get started 1.1 Content of this package 1.2 System requirements 1.3 Supported clients 1.4 Supported network protocols 1.5 Supported network file protocols 1.6 Required tools 1.7 Safety precautions 1.7.1 Personal safety 1.7.2 Safety for your data 1.7.3 ESD precautions 2 Features 2.1 What is NAS 2.2 Description of the functions 2.3 Why uNAS/tNAS? 2.4 RAID types 3 Hardware installation 3.1 Getting ready 3.2 Installing uNAS/tNAS 4 Configuration 4.
5.2.2.1 Volume manager 5.2.2.2 NAS settings 5.2.2.3 NAS resources 5.2.2.3.1 Shares 5.2.2.3.2 Users 5.2.2.3.3 Groups 5.2.3 MAINTENANCE 5.2.3.1 Shutdown 5.2.3.2 Connections 5.2.3.3 Snapshot 5.2.3.4 Backup 5.2.3.4.1 Backup devices 5.2.3.4.2 Backup tasks 5.2.3.4.3 Data replication 5.2.3.5 Antivirus 5.2.3.6 Miscellaneous 5.2.3.7 Software update 5.2.4 STATUS 5.2.4.1 Network 5.2.4.2 Logical volume 5.2.4.3 Connections 5.2.4.4 Hardware 5.2.4.5 Tasks 5.2.4.6 S.M.A.R.T. 5.2.5 HELP 5.2.5.1 Software License 5.2.5.
Disclaimer DATOptic Inc assumes no responsibility for errors or omissions in this document, and DATOptic Inc does not make any commitment to update the information contained herein. 1 Before you get started Congratulations on purchasing uNAS/tNAS, the ideal solution for network-based storage management. This manual will assist you as you install and configure the hardware. In order to quickly reach the desired configuration, please read the following pages thoroughly.
1.5.3 ESD precautions In order to avoid damage to uNAS/tNAS, please ensure you are grounded before opening the system or the ESD package that contains uNAS/tNAS. Using grounding straps or mats is the best way to ensure this safety. If you don’t have grounding equipment handy, please make sure you are grounded before working with uNAS/tNAS, for instance, by touching a heater. • Avoid unnecessary touching of the components inside the PC, • Please touch uNAS/tNAS only on the edges. 2 Features 2.
Stripe size is configurable roughly between 64 KB and 1 MB. The result is a lightning fast RAID, but with no added security. One failing drive may ruin the entire RAID. RAID 1 mirrors hard drives. By writing identical data onto more than one drive, security is enhanced. A completely defective drive does not cause any loss of data. The drawback is reduced performance and capacity. RAID 5 combines data striping from RAID 0 with parity checking, therefore combining speed and improved security.
If that is the case, you can proceed at 4.3. If your network does not have a DHCP server, uNAS/tNAS will start with the default settings: IP address 192.168.0.220 and subnet mask 255.255.255.0. You can change these values again by typing in the following key combination: left CTRL, left ALT and N. You can select a different IP address now. All other available functions on of the console will appear after pressing F1 key (see below).
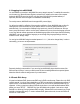
4.3 Logging into uNAS/tNAS You can establish a connection to uNAS/tNAS from every network computer. To establish this connection, use a browser (e.g. Microsoft Internet Explorer) and enter the IP address or the name of the computer hosting the NAS-R3 R server into the URL entry line: https://192.168.0.220 (standard address) or https://nas (this name can be changed in the installation of uNAS/tNAS). For security reasons, uNAS/tNAS uses the encrypted SSL protocol (https).
After clicking “create” button, the status will change to “in use” with additional information describing the kind of a disk array (e.g. MD0 is RAID 0) 4.5 Adding Disk Array - In the menu, please select the “CONFIGURATION” ”volume manager” and “Unit manager” function. You find a list of available drives/arrays (units) that can be used, While creating the “new volume group”, the system adds selected units only. You can use default volume group name or change it.
- You can possible to combine two (or more) units into one Volume Group. ext, by clicking on the right-hand side of the tree diagram on volume group name e.g. “vg00” and use function “Volume Manager” you can create new NAS volume. If you want to use snapshot feature you should create snapshot volume. uNAS/tNAS User Guide Version 1.
- Next, with use of function “Volume Manager” you can add disk volume to a new LV, or increase size of existing LV’s (you can’t decrease LV size). To set needed LV size just use scrollbar, next to which, on the right side is shown size available to use. This function can be also used to reserve disk space for swap, snapshots and system. 4.6 Creating uNAS/tNAS shares In the menu, please select “CONFIGURATION” followed by “NAS settings.” Here, you select the type of authentication.
Some examples how to use ACL (with ADS or PDC authentication): 1. Deny access to a Directory for every user (group): a. Create a new folder or select one of your existing folders (you must be the owner or super user to set ACL permissions)* b. Go to the “directory properties” (right mouse click on the directory then choose "Properties") c. Select a the “security” tab d. Choose the group "Everyone" e. Click the "Remove" button – only you and your group will have access to the selected directory ** f.
d. Enable Full Control in the Allow column e. Click the "Apply" button 6. Allow “read” access for a group "COMPANY" to this directory a. Make sure that the group "COMPANY" exists b. In security window click the "Add" button c. Select the group "COMPANY" (Advanced Find Now will show you all users and groups) and click OK d. Enable "Read & Execute" in the Allow column e. Click the "Apply" button 7.
9. UNIX Rights in Windows Folders permissions Example application of ACL permission in a small company. The company has 10 users uNAS/tNAS User Guide Version 1.
First create users and groups in Your Domain: 1. Run Menu Start Programs Administrative Tools Active Directory Users and Computers 2. Right mouse click on your domain name and select New User 3. Enter all necessary fields to create user Chris. 4. Create all users (back to point 2). 5. Click with right mouse click on your domain name and select New Group 6. Create groups: Developers, Graphics, and Company. 7. Add users to groups - right mouse click on group Developers. In Members tab click Add.
Subsequently do the same for your group and your user. Subdirectories created in this directory should have ACL permissions inherited from the parent. If permissions are inherited then the “ALLOW” column is grey. To disable permission just use the “Deny” column. If you change ACL permissions always check that a new set of permissions for one group does not interfere with permissions for the other user/groups or any connections between these accounts.
By pressing a combination of left CTRL key, left ALT key and t, you can run Console Tools. The menu will appear, with choice of following functions: Ping, DHCP Ping, Hardware info, Memory info, Time configuration and DNS configuration. CTRL+ALT+x By pressing the left CTRL key, left ALT key and x, it will display extended tools. CTRL+ALT+w By pressing the left CTRL key, left ALT key and w, it will display hardware configuration.
5.2 Functions of uNAS/tNAS via browser access On the following pages, we will thoroughly describe every function of uNAS/tNAS. The functions are divided by menu options, which are located at the top part of the screen. 5.2.1 SETUP In this place you can manage network interfaces, administrator settings, hardware RAID controllers, create disk array using software RAID, Fibre Channel, iSCSI initiator, hardware and GUI settings. 5.2.1.1 Network Here you can find tree containing network interfaces.
Function: Create new bond interface Bonding allows for load-balancing or fail-over for the incoming and outgoing connections. Here you can create or edit bonding network interface. In order to create bonding interface: • select network interfaces from which you want to create a new bonding interface. • select desired bonding mode from Create drop down menu. • select dynamic (DHCP) or static configuration of network interface. • if you want to dynamically get DNS address, select "get DNS".
• balance-xor: Transmit based on [(source MAC address XOR'd with destination MAC address) modulo slave count]. This selects the same slave for each destination MAC address. This mode provides load balancing and fault tolerance. This mode provides fault tolerance and load balancing. • broadcast: Transmits everything on all slave interfaces. This mode provides fault tolerance. • 802.3ad: IEEE 802.3ad Dynamic link aggregation. Creates aggregation groups that share the same speed and duplex settings.
Function: IP address Here you can set TCP/IP parameters for selected NIC. Activate - You can activate or deactivate network interface by setting this checkbox. DHCP / Static. You can use static or dynamic (DHCP) network interface configuration. Get DNS - If you want to dynamically get DNS address, select "get DNS". When using static configuration of network interface, enter: • address IP, • netmask, • broadcast, • gateway.
Function: Bond interface settings Here you can edit a bonding network interface. To remove network interface form bonding select it in field remove and click "apply" button. Bonding can be deactivated by setting of "Active" option. You can change bonding interface network configuration, you can use static or dynamic (DHCP) network configuration.
5.2.1.2 Administrator Function: Administrator access Use this function to restrict access to the server administration. Set port - You can change https port (default 443) IP address - You can assign IP addresses (separated by a semicolon) that are granted to access the Server Web administration. This field left blank means no restriction.
Enter password - Please enter your new password. Confirm password - Please retype your new password. Password cannot contain: • characters: ' " ` • spaces. The default password for each account is “admin”. Password-checking is case-sensitive. For security reasons, the password you enter will not be displayed. Please check the status of the Shift and Shift Lock keys.
Port - Port number for SMTP server. If you want to send a test message, please check option Send test message. If you want to have e-mail notifications encrypted, check option Encrypted. Function: SLL certificate authority To ensure the identity of the web administration tool by letting your web browser automatically check it whenever you connect for administration tasks, click the SSLCert.crt link to download and install the certificate into the certificate management system of your browser.
• http://www.mg-soft.com • http://www.adventnet.com Function: Remote access Using this function, you can administrate console tools remotely by ssh protocol (secure shell). Default user is 'cli' and you cannot change it, but password can be change. Allow IP - You can assign IP addresses (separated by a semicolon) that are granted to server remote access. The field left blank means no restriction. Set port - Default port is 22222 for security reasons, because high ports are invisible for port scanners.
Function: Create new S/W RAID unit In this function you can create software RAIDs from free (not used) units. If you want to create RAIDs from used units, you need first to delete content of units in console, be aware this would ERASE all data from units. To create a RAID select units, then from ListBox select what type of RAID it will be, then select desired Chunk size. After setting all demanded parameters press Create button.
- RAID 1: mirror array requires 2 units. Destination size will be equal: SINGLE) UNIT_SIZE, where (SINGLE) UNIT_SIZE is the size of the smallest unit in array. - RAID 5: stripe + parity algorithm array (required [minimum] 3 units - with the same capacity). You can choose from the ListBoxes: (layout) parityalgorithm [left/right] [symmetric/asymmetric]. DESTINATION SIZE: (NR_OF_UNITS-1)*(SINGLE)UNIT_SIZE, where (SINGLE) UNIT_SIZE is the size of the smallest unit in array.
RAID 6 (layout) parity-algorithm It is possible to set one from four algorithms of placement data blocks and parity blocks in matrix. Our default option is left-symmetric which the best is for large reads. Other recommended value is left-asymmetric. To remove RAID, if previously added to Volume Group please enter console Extended tools (press F1 on console to find out keyboard shortcuts) and first delete Volume Group of the RAID (Delete content of units function in Extended tools menu).
Include array status Information about the status of event-related array will be added every event. Function: Drive identifier This function helps find disks in the cage of your NAS server. In case of hardware RAID installed, the whole RAID array is shown as a single drive. In this case you may not be able to determine which drive unit is which disk when using S.M.A.R.T. tool or hardware RAID management tool (depends on manufacturer of RAID controller).
Function: Manager In this function you can manage the RAID array. Available operations: RAID 0: • construction of this RAID does not allow to manage it anyway. Every unit must not be Failed. If any would be the whole array would be destroyed. RAID 1: • To set unit as a Faulty one mark proper checkbox (in the column F) and click on Apply button. • To delete any unit from an array mark proper checkbox (in the column R) and click on Remove button.
to perform as few disk operations as possible. Status of syncing/rebuilding will be showed "live" - without need to refresh page manually. Function: Remove software RAID unit This function allows you to remove Software RAID unit (MD[nr]). This function is available only when no Logical Volume is created on appropriate MD[x] and unit is not resyncing.
Function: Portal manager This function displays available targets from selected iSCSI Portal Server. In order to connect to iSCSI target, select its name and click button "connect". If authentication for target is enabled, then also enter target name and its secret. Connected targets will be available in server -> disk manger as Units. You can manage them and do the same operations as it would be local Units.
Function: Target manager Here you can view connected targets name and its size. You can also disconnect target from Portal Server with function Disconnect. Function: Disconnect Here you can disconnect selected target from Portal Server. You can only disconnect target from a Portal Server if volume group or S/W RAID unit does not exist. In another case please first remove a volume group or S/W RAID unit in console tools(press F1 on console to find out keyboard shortcuts). 5.2.1.
Timeout - Battery Limit This option enables sub staining the system as long as battery holds(the system will shutdown when battery charge drops to 5% or when there are 3 minutes time to total discharge of battery) Turn off UPS after system shutdown This will turn off the UPS after time that is set by parameter Shutdown grace delay(SLEEP) in EEPROM of UPS. Function: Time zone settings This function allows to set NTP server settings. Please choose a NTP server (Network Time Protocol: for more info: www.ntp.
Function: Set time With this function you can set time and date: Manual Just type in time & date using following format: hh:mm:ss yyyy-mm-dd. Use this PC time It will pick up the time & date of the PC you run the web browser. NTP server It will pick up the time & date from NTP server. In this case please make sure you have Internet access and proper network setup, specially gateway and DNS.
Halt Power off computer. None No action. Function: S.M.A.R.T. e-mail notification This function allows you to check S.M.A.R.T. status of hard disks and send it to e-mail address. S.M.A.R.T. (Self-Monitoring, Analysis, and Reporting Technology) is a monitoring system for computer hard disks to detect and report on various indicators of reliability, in the hope of anticipating failures. In order to enable S.M.A.R.T.
Disk notations: • S0,S1, ..., S[x] - every disk with S notation is one of SATA / JBOD / RAID units. • H0,H1, ..., H[x] - units with H letter are IDE units. • MD0,MD1, ..., MD[x] - this way are softRAIDs denoted. If the unit is already added, it can not be removed it in Web management. Units that are already used in a volume group can be made available again by using function Delete content of units under console (Ctrl+alt+x).
When you click on "start" button then the appropriate disk will start reading and you can determine which disk is it by watching "disk-activity LEDs". For proper operation of this function there should be no other activity on hard drives. Identification will stop automatically after one minute if you will not stop it before (by unsetting appropriate checkbox and applying form). Using this function during normal operation is not highly recommended and will cause of your server to slow down.
Function: Snapshot definition This function allows you to define parameters of every snapshot. You can set: • Logical Volume, which the snapshot will be taken for. • Schedule the time of automatic creation of the snapshot, if inactive - only manual snapshot activation is possible. • RO - the snapshot will be visible as a write protected disk. The Snapshot function of the server enables the system administrator to freeze the data content of the volume at a certain time.
• Go to menu CONFIGURATION NAS settings and select on which network protocol snapshots will be accessible. This need to be done only once. When creating access to snapshot on second time, this action is not necessary. You can activate access to snapshots on following protocols:, • NFS, • SMB(Network neighborhood), • FTP, • AFP.
LDAP administrator DN you should set previously entered base DN with prefix like "cn=admin," (CN - Common Name). Users should be stored in Organization Unit (ou) "People", groups in "Groups", and computers in "Computers". Sample organization can look like showed below: Windows (PDC) In this case NAS server will use Windows Primary Domain Controller user database for user authentication. This method can be used for NT4/2000/2003 servers.
• The KDC IP address must be taken from the same system as the Realm. • Enter administrator login and password. • Click "apply" to connect to Windows (ADS) domain. • Workgroup (NIS server) • Please choose this option in case user wants to use user/group database from Network Information Service server. 1. Workgroup name cannot begin/end with space and can not contain special characters like: ~!@#$^&()+[]{}*;:'".,%|<>?/\=` 2.
To establish a connection, the FTP client needs several pieces of data: IP address: 192.168.0.220 (this is the standard address) Port: 21 User: anonymous Password: 123. The allocation of access rights is done via the IP address of the PC currently in the process of accessing. A read access is, therefore, granted with these generally typical and anonymous login data.
This function allows you to edit SMB protocol specific parameters. There are several options you can change: Wins server IP If you have a WINS server on your network then you should set this to the WINS server's IP. Superuser Superuser is a user, who has permission to take ownership of folder and files which belong to other users. It can be useful when administrator want to change access right (ACL) for folder or file established by other users.
(uses acls) and/or Preserve system file attributes (uses acls) files are not visible, user can use command that will remove hidden attribute from files : attrib -S -H x:\*.* /s /d ,where: x network drive. Any change in SMB settings will disconnect users that are currently connected. These also need to be accepted by user, acceptation form will only appear if any user is connected to SMB. If user click "cancel" button settings will be saved but connection to SMB will not be reseted.
e. By clicking on the "Remote Selections" branch, and next on "Unix Agents", a NAS server name will appear, f. After clicking the server "NAS_server/logical volume", a window "Logon Account Selection" will be displayed where you need to choose the same user name as in the point "1". In some settings, the window "Logon Account Selection" will not appear automatically. In this case you must right mouse click on the name "NAS_Server/share_volume", and then in the context menu choose "Connect As...".
a. b. c. d. e. f. From Quick start menu, select Backup. From branch Source, select Unix/Linux Systems and click on it with right mouse button Select Add Machine/Object. Add client form will appear. Enter host name and IP address of your NAS server. Click on button Add in order to add your NAS to the list. Click on Close to quit Add Machine/Object form Backup: a. From Quick start menu, select Backup. b. From branch Source, select your NAS server volumes that you want to backup. c.
3. Select destination NAS server volume. 4. Click on Ok button, then click on Replace to begin restore process. 5. Password for Dantz Retroclient is set to "admin". Function: Data replication agent This function enables the Data replication agent. This is necessary to replicate as destination share Function: Antivirus setup This function provides Antivirus protection for your data. Antivirus scans the following file types: • Archives and compressed files:, • Zip, • RAR (2.
The feature quarantine allows you to choose, whether you want to move the infected files to default folder (quarantine dir), automatically created in shares, or option manual which allows you to choose the place of quarantine, in previously created share (in example share named "Quarantine"). If there is no option "quarantine" you will be only informed about the infected file. To verify the information about the infected files look in logs.
Function: Create new share To create a share, enter the share name, comment (optional) and set the path. To use default path to share, leave the checkbox Default path checked. If you want to use specified path, please check the checkbox Specified path and select path to share. • Please do not use spaces and special characters like: ~!@#$^&()+[]{}*;:'".,%|<>?/\=`, • The workgroup/domain name that was configured in the NAS has to match with the network settings.
Function: Edit share Here you can edit the path for a share, add or delete directories. You can also view files in directories by click on button. Function “SMB Settings” This function allows you to change SMB protocol settings for this share. Please check Read only to restrict the access to read-only operation. Uncheck Visible to hide the share in the browse list. Select Guest to allow anonymous access to the share. Select Users with password to enforce user authentication.
uNAS/tNAS User Guide Version 1.
Function: “NFS share access” Using this function you activate access to particular share via NFS. In order activate NFS on uNAS/tNAS server, you must enable usage of NFS in menu “SETUP” ”NAS settings” in Function NFS settings. In order to mount this share via NFS, please use following syntax: • mount -t nfs IP_addr:/share/share_name /local_mount_point Word share is a key word and must be always added to the syntax.
If host has entry in DNS field but doest have reverse DNS entry then connection to nfs will not work. Function: AppleTalk (AFP) Settings Here you may activate the AppleTalk protocol in the network to access shares on the NAS Server. How to use AppleTalk with the NAS server: • In the “SETUP” “NAS settings” enable AppleTalk, • In “SETUP” “NAS resources” menu select a share that you want to be shared with AppleTalk, • Enable AppleTalk for this share.
Function: “FTP Settings” You can enable FTP services for every share separately. You can choose : • Anonymous, • SFTP (Secure FTP). • Selecting Anonymous mode will enable FTP sharing with anonymous user. For all IPs the access is set to READ+WRITE by default. To change that, activate Allow access IP and Write access IP options. Clicking apply will make the share available over FTP. • To connect to this share a FTP client software is required – i.e. Internet Explorer has the FTP support.
• CoreFTP (Windows), • FileZilla (Windows), • IgloFTP (Windows and Linux), • SSLFTP (Linux console client). When SFTP is enabled, the user has the access to the share through the authorized user name and password. If the NAS server uses Windows domain authorization then a short name of the domain must precede a user name – connected with a plus sign, i.e. “DOMAIN+Administrator”. To connect to a share via SFTP, in the selected encryption, type in SFTP client NAS support SSL and TLS explicit encryption.
Function: Create new user To create user, enter name, password, retype password and press create button. User name cannot: • contain characters: ~ ! @ # $ ^ & ( ) + [ ] { } * ; : ' " ., ; % | < > ? / \ = `, • begin or end with a space. Password cannot: • contain characters: ' " `, • spaces. If users forget their password, there is no way to retrieve it. You can only set a new password. Function: UID mappings (upload/download) This function allows you to upload and download UIDs (users IDs).
• If there will be some errors while importing uids please read uid_mappings_import.log file in settings share. Warning: current uid mappings will be overwritten. Press "download" button to download uid_mappings.csv. Function: Quota for users (upload/download) This function allows you to upload and download quota (users quota).Using this function you are able to change a lot of users quota at one time.
To change user password enter and confirm password, and press "apply" button. Password cannot: • contain characters: ' " `, • spaces. Function: Users share access Add the users access to the shares by selecting the users and clicking the button. To remove access for users to the specified shares select the users and click the appropriate arrow button to remove them from the Granted access users list.
• Home: jump to the first, • End: jump to the last, • Shift + arrow key: for multi-select, • letter key: jump to the first position starting with pressed key. Function: Quota You can assign quota (limit) on amount of space a user is allowed to allocate on shares the user has access to. To remove any limitation the user has set quota to 0. Function: Remove user Click "remove" button to remove the user from the system. All the files the user has ownership of will be preserved. 5.2.2.3.
Then by clicking on group name e.g. “administrators”, you will see all available functions helpful for setting the groups: Function: GID mappings (upload/download) This function allows you to upload and download GIDs (groups IDs). Using this function you are able to change a lot of groups IDs at one time. To upload gids: 1. In resources menu create share settings (on lv00), 2. Copy configuration file gid_mappings.csv (format:group_name;gid) into settings folder. This file should be in UTF-8 encoding, 3.
select the shares and click the button. You can use following keyboard keys in the lists (first set focus to desired list): • “Home”: jump to the first, • “End”: jump to the last, • “Shift” + arrow key: for multi-select, • “letter key”: jump to the first position starting with pressed key. Function: Users group membership While connected to local LDAP users and groups database this function allows you to view and change user groups membership.
Function: System restart This function allows you to restart your system. Function: Schedule for restart This control allows you to specify a time for a scheduled system 5.2.3.2 Connections Function: NAS connections reset This function forces an immediate broadcast of changes to shares or access rights you have made over your network. It is dedicate for SMB and FTP connections. You can check or uncheck corresponding check boxes. uNAS/tNAS User Guide Version 1.
This function disconnects all users connected to the shares on specified protocol, which may lead to data loss if any files are open. 5.2.3.3 Snapshot Function: Snapshot tasks This function enables you to manually activate (start) or deactivate (stop) snapshots. Activation of a snapshot is only possible for unscheduled snapshots (with inactive schedule setting).
Size Size of snapshot. Function: Create schedule for snapshot task Here you can create schedule for selected snapshot task. Comment You can enter comment for snapshot schedule. Time select You can start creating the snapshot immediately by selecting "Now" from Time select drop down list or add to schedule. Interval Select time period in which snapshot will be created. Function: Schedules for snapshot task Here you can see all schedules created for a snapshot task. 5.2.3.4 Backup 5.2.3.4.
Function: Create new virtual backup device Here you can create a new backup device, this device will be used as destination when making backups of your data. Please provide: • Name for device, • Select share for device, • Time retention of tape, • If you want to make one backup on one tape only, select option use each tape only once. Click "Create" button to create new backup device. uNAS/tNAS User Guide Version 1.
Function: Backup device settings Here you can set settings for selected backup device. Time retention of tape Time after the tape will be rewritten from the beginning. Use each tape only once Means that each backup will be made on one tape only. Function: Label new tape With this function you can label new tape that will be used to make backup. In order to label a new tape: • enter tape name, • select slot, • optionally you can limit tape size, • click "Apply".
Function provides following information: Name: Name of the tape. Status: Status of the tape. Status can be one of following: • Full - tape is full and will not be used for backup until retention time is over, • Append - new backups will be written at the and of the tape, • Recycle - the tape will be set to this state when tape status has been set to purged and there is no other appendable tapes available.
Function: Backup tasks Here you can view information on selected task Shares - List of shares that are used for backup Device - Backup device to which backup task is assigned LV - Logical volume that is used for backup device Snapshot - Snapshot that is used for backup task Level - Backup level used Compression - Compression info Function: Create new backup task Here you can create new backup task.
Incremental - This will backup only new data. Differential - This will backup all new data from last full backup. Function: Schedules for backup task Here you can see information on all schedules created for selected backup task. You can also delete any schedule by clicking "delete schedule" action button. Function: Restore from backup Here you can restore data from created backup.
Source share - In order to set share as source, select it from the drop down list and enter Destination IP, Where share will be replicated. Snapshot - Snapshot assigned for data replication. Destination share - Select destination share from the drop down list and enter destination agent login and password. Dest. agent login - Enter destination agent login. Dest. agent password - Destination agent password. Log replication errors - Turn it on, if you want to log replication errors.
Function: Data replication task Function shows information on selected data replication task. You can view: • Destination IP, • Source share, • Snapshot, • Destination share, • Log replication errors info, • Replicate whole files info. uNAS/tNAS User Guide Version 1.
Function: Create schedule for data replication task Here you can create schedule for selected data replication task. Comment You can enter comment for replication schedule. Time select - You can start replication immediately by selecting "Now" from Time select drop down list or add to schedule. Interval - Select time period that replication will be run. Function: Schedule for data replication task Here you can manage all schedules created for selected data replication task. 5.2.3.
Function: Antivirus tasks Here you can run, stop or delete desired antivirus task. All previously created tasks will be visible here. Function: Update virus definitions With this function you can update virus definitions. Select mirror from which definitions will be downloaded. Select when update should be made. If you select "now", update will be made instantly. In another case update will be made now and every selected time.
Function: Create new schedule for antivirus task Here you can create new schedule for selected antivirus task. Comment - You can enter comment for antivirus schedule. uNAS/tNAS User Guide Version 1.
Time select - You can start antivirus task immediately by selecting "Now" from Time select drop down list or add to schedule. Interval - Scan will be made every "selected time". E.g. if you choose interval 1 h. – each one hour share will be scanned. Weekly - Scan will be made in selected days at specified time. Function: Schedules for antivirus task Here you can manage all schedules created for selected antivirus task. 5.2.3.
Function: Restore settings With this function you can store the configuration settings. You can save such setting as: • Server setup, • Network settings, • Administrator setup, • Hardware setup, • Users. Select settings you want to store and click Apply. Settings can be saved locally on the server(it will be visible in function Restore setting) and/or downloadable file. Each time you save settings locally, new entry will be created and during restoring you can select witch settings to restore.
Function: Update downloader With this function you can check if there is new update available and download it. In order to download a new update you need to be registered at Open-e.com. You also have to remember to setup correct DNS and Gateway address in “SETUP” “network” menu. Function: System software update This function allows you to update the system software. When you upload update file you will see its name and size.
Here you can view network interfaces info. In table you can see network interface name and IP address, DHCP information, cable status. Function: DNS info Here you can view network interfaces DNS information. Function: HTTP proxy info With this function you can view HTTP proxy information. You can see if proxy is enabled and which HTTP proxy IP address is assigned to it. Function: Interfaces info This function shows information about selected network interface.
5.2.4.2 Logical volume Function: Share volume statistics This function contains statistical data on the share volume. Function: Dynamic volume statistics This function contains statistical data on the dynamic volume. Function: Logical volume statistic Here you can see information on selected share volume. Function provides following information: Usage - Percentage usage of space by share volume. Size - Size of share volume. Used - Current date usage of space on share volume.
5.2.4.3 Connections This function displays what user connections are currently active. 5.2.4.4 Hardware The “Hardware” option provides you with information on storage and network controllers and the drivers (e.g. network driver and RAID driver). uNAS/tNAS User Guide Version 1.
In addition, you may also download the latest uNAS/tNAS log files or view specified or all log files without downloading in compressed form. You can also check usage of memory (RAM) and (SWAP) and also hardware monitoring. uNAS/tNAS User Guide Version 1.
5.2.4.5 Tasks Here you can view statistical information on tasks from backup, restore from backup, data replication, antivirus and snapshots. uNAS/tNAS User Guide Version 1.
5.2.4.6 S.M.A.R.T. Through the S.M.A.R.T. (Self-Monitoring, Analysis, and Reporting Technology) system, modern hard disk drives incorporate a suite of advanced diagnostics that monitor the internal operations of a drive and provide an early warning for many types of potential problems. When a potential problem is detected, the drive can be repaired or replaced before any data is lost or damaged. Here you can find tree with hard drives for which you can view S.M.A.R.T. information.
will find an attribute name, in second - minimum threshold value of this parameter, then current value, next worst value and after the status. If value of attribute have ever exceeded worst of this value then the status will be "failed". If value of attribute is on the edge of worst value then the status can be "pre-failed". On some hard drives part of attributes can be displayed as "Unknown_Attribute" - this can happen when producer of that hard drive have done some modifications in S.M.A.R.T.
5.2.5.2 About uNAS/tNAS Function: Register In this function you can find link to our registration form. Note that registration is required to receive updates and new versions. Registration gives you also opportunity to receive e-mail notification about software news. Function: Manual You can download the manual here and print for fast reference. In order to read the manual, you need a PDF viewer such as the Acrobat Reader (http://www.adobe.com).
Logs which you can download in menu: “status” “hardware” “logs”. Your software version which you can find in menu: “help” “about” Function: Add license key Here you can enter license key to expand functionality of server. For example you can add a license key for bigger capacity of storage volume. You log out by closing the browser window. 6 Troubleshooting Guide Here is a list of common error messages and their meanings as well as corresponding tips on how to resolve the underlying problem.
Error: Update file not found You instructed uNAS/tNAS to perform a systems update, but did not supply a valid uNAS/tNAS update file. Download the latest uNAS/tNAS update file from the www.open-e.com Web site. Next, copy the upgrade file into your "update" folder (please spell upgrade lower case). Finally, select "update" from the menu. Error: No share volume You must create a volume for file sharing before you can create any resource shares or search for shares.
Administrator password cannot begin or end with a space. Spaces are not legitimate characters at the beginning and end of a password. Maybe you inadvertently hit the space bar during password entry. Reenter your password. Error: invalid resource name Resource name cannot: (1) Contain characters: * : " | < > ? / \ ` # $ & ( ) + ; ' .
7 Appendix A Open-E Software License agreement IMPORTANT: PLEASE READ THE TERMS AND CONDITIONS OF THIS LICENSE AGREEMENT CAREFULLY BEFORE USING THE SOFTWARE. OPEN-E GMBH AND/OR ITS SUBSIDIARIES ("OPENE") IS WILLING TO LICENSE THE SOFTWARE TO YOU AS THE INDIVIDUAL, THE COMPANY, OR THE LEGAL ENTITY THAT WILL BE UTILIZING THE SOFTWARE (REFERENCED BELOW AS "YOU OR YOUR") ONLY ON THE CONDITION THAT YOU ACCEPT ALL OF THE TERMS OF THIS LICENSE AGREEMENT.
In no event will Open-E GmbH liability under this agreement exceed the price that you paid for your Open-E software. Furthermore, in no event will Open-E GmbH be liable for any lost profits, lost data, cost of procurement of substitute goods or services, or any special consequential, incidental, indirect or punitive damages arising out of or under this agreement.
Everyone is permitted to copy and distribute verbatim copies of this license document, but changing it is not allowed. Preamble The licenses for most software are designed to take away your freedom to share and change it. By contrast, the GNU General Public License is intended to guarantee your freedom to share and change free software to make sure the software is free for all its users.
distribution and modification are not covered by this License; they are outside its scope. The act of running a program using the Library is not restricted, and output from such a program is covered only if its contents constitute a work based on the Library (independent of the use of the Library in a tool for writing it). Whether that is true depends on what the Library does and what the program that uses the Library does. 1.
than version 2 of the ordinary GNU General Public License has appeared, then you can specify that version instead if you wish.) Do not make any other change in these notices. Once this change is made in a given copy, it is irreversible for that copy, so the ordinary GNU General Public License applies to all subsequent copies and derivative works made from that copy. This option is useful when you wish to copy part of the code of the Library into a program that is not a library. 4.
relink to produce a modified executable containing the modified Library. (It is understood that the user who changes the contents of definitions files in the Library will not necessarily be able to recompile the application to use the modified definitions). b) Use a suitable shared library mechanism for linking with the Library.
otherwise) that contradict the conditions of this License, they do not excuse you from the conditions of this License. If you cannot distribute so as to satisfy simultaneously your obligations under this License and any other pertinent obligations, then as a consequence you may not distribute the Library at all.
16.