
User guide


uNAS/tNASUserGuideVersion1.0 Page8
4.3 Logging into uNAS/tNAS
You can establish a connection to uNAS/tNAS from every network computer. To establish this connection,
use a browser (e.g. Microsoft Internet Explorer) and enter the IP address or the name of the computer
hosting the NAS-R3 R server into the URL entry line: https://192.168.0.220 (standard address) or
https://nas (this name can be changed in the installation of uNAS/tNAS).
For security reasons, uNAS/tNAS uses the encrypted SSL protocol (https).
You will now be asked for verification of the encryption certification. Since uNAS/tNAS does not allow for
creating shares on the Internet but only on the Intranet, there is no need for global certification by an
authorized body. You can accept the certificate for the session only, but also for all future use. Now you
have to accept the license in order to use the Open-E software and you can choose the language you want
to use. Page with the software agreement and available language option will be shown after first launching
uNAS/tNAS. Later you can change the language you can change using Language Settings, which are
located in “server” through “setup”.
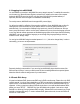
You can log into uNAS/tNAS using the standard password “admin” (this can be changed later). In order to
start working, you can now set all parameters.
Password checking is case-sensitive. If you cannot log into uNAS/tNAS, please check the status of the
Shift and Caps Lock keys. In case your web browser will show something different then expected, please
delete the cache & cookies in settings menu of your web browser.
4.4 Create Disk Array
If system has Hardware RAID, please create RAID array in RAID controller setup. Please refer to the RAID
controller manual. You do not have to install drivers or RAID array monitoring and maintenance software. If
system has only "on motherboard BIOS RAID", please do not use it. Such on motherboard RAID are not
supported. In case you want use software RAID with single drives or even with installed hardware RAIDs,
please go to menu “SETUP”
“SW/RAID” first. Here all available units are listed. A unit can be a single
hard disk or a disk array (if using a hardware RAID controller). Software RAID can be created over a single
hard disk or hardware disk arrays. To create a software RAID, please select units, choose the RAID level
and click on “create” button.