User Guide: Open Mesh OM2PV4 Version 1.
Table of Contents 1. 2. 3. 4. 5. 6. 7. 8. Creating a CloudTrax Network ..................................................................................................3 Configuring a CloudTrax network ............................................................................................10 Monitoring, Management and Troubleshooting .....................................................................16 Additional Resources .............................................................................
Creating a CloudTrax network Overview: what we’re doing This guide is intended to help you set up your first cloud-managed wireless mesh network with CloudTrax. CloudTrax is a free cloud-based network controller that makes it easy for anyone to build, manage, and monitor wireless networks from anywhere in the world. This guide will assist you in setting up a new network on the CloudTrax web application. For easier, faster setup, use the CloudTrax for iOS or CloudTrax for Android apps.
1. One or more CloudTrax-compatible wireless devices, such as the OM2P or MR1750. 2. An Internet connection with at least one Ethernet port available on your modem or router, and one Ethernet cable. 3. A computer with a browser pointed to www.cloudtrax.com, or an iOS or Android device running the CloudTrax app. Terminology We’ll make this process as easy and nontechnical as possible. Here are a few key words that will help.
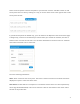
Fill in the following information: First Name: We’ll use this to address you in email correspondence. Username: This is your master login you will use to access ALL networks you create. It allows you to login once and edit/view all your networks. It MUST be different from your network name(s) which you will create in a second step. You may want to use your company name here. Email: You’ll receive an email at this address asking you to verify this master login to continue.
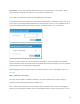
Fill in the following information: Network name: This is the name you want to give this specific network. You will use this name to make changes to the network, display reports, etc. Password: This is the password for local administrators and should be different from your master account login. This limits access and prevents users from making changes to your network. Email: Enter your email address or the address of a local administrator to contact. We will never share this with others.
There are three options to add access points to your network: click the "Add New" button to add access points one at a time by clicking on a map, or use the down arrow to the right of that to add access points in bulk. If you add access points the default way, you’ll be taken to the Map tab of the Access Points page. A Google map, centered on the address you entered when you created the network, will show a popup to enter your first access point.
Description: You can enter optional descriptive text that will be shown on the reports. This is typically used to keep notes on where the access point is installed, etc. Click “Add” and repeat the process for each additional access point. If you need to add a large number of access points, you may want to add them in bulk. You can do so two ways: by entering the MAC addresses in a text field (one per line), or by uploading a list of access points (along with optional name, location, channel overrides, etc.
be fed from a router or switch. If it can get an Internet connection through the cable, it’ll connect to CloudTrax. Once the Ethernet cable is plugged in, connect power. The Ethernet cable (PoE device) must be connected only to PoE networks that is SELV circuit and without routing to the outside plant. Next, plug in additional access points as either gateways (connected to Ethernet) or repeaters, connected only to power.
Configuring a CloudTrax Network Your network should now be up and running, but there’s a lot we can do to customize it to meet your specific needs. We’ll walk you through the most common settings here. Configure > General Settings The General Settings tab controls network-wide settings. This will be partially filled in with the information you used to create the network. Location: This defaults to the first address you entered when setting up the network. You can change it at any time.
Email Alerts: Select this box to send notifications of network outages each hour to the email addresses you entered above. Network notes: Enter any unique notes for this installation you’d like to be able to refer to later. Configure > SSID 1, 2, 3... Each CloudTrax device can broadcast four unique SSIDs that users can connect to. Each of these SSIDs are controlled independently in CloudTrax.
Bandwidth Throttling: Enable and set download/upload limits to set the maximum speeds users will get when connected to your network. You may want to set these to between 10 and 25 per cent of the speed of your Internet connection, ensuring that one or two users can’t consume the entire available bandwidth. Splash Page/Splash Page Type: Enable or disable a page users will see before connecting to your network.
Block LAN Access: Prevents users on this wireless network from accessing your wired LAN. Client isolation: Prevents your wireless users from being able to access each other's computers and common for public networks. Unchecking this box will allow you to do things like share a printer attached to the network, but will also allow malicious users access to other users on the network. Uncheck this ONLY if you know all users have a firewall enabled on their computers.
Manual lets you specify a single channel per band to use for all access points. You can override individual access points in Manage > Access Points. Internet Check: When selected, the wireless network will only be available when there is an active Internet connection. This allows access points to recover quickly when they lose a connection and is the recommended setting. When deselected, the wireless network will stay up even when there is no Internet connection.
Configure > Advanced The Advanced Settings page has a variety of settings that most users won't change. This section will touch on the more common settings. Mesh Encryption: Encrypts all mesh traffic with WPA2 protection. Access points not belonging to this network won't be able to join the mesh due to the encryption. Alternate DNS: Alternate DNS server IP address for your network, such as OpenDNS. OpenDNS provides several additional features such as content filtering that you may find helpful.
Monitoring, Management and Troubleshooting With your network running and customized, you can now monitor its usage and status by selecting the Network Status link. Here’s an overview of the tools available: Network Usage graph at the top of the page shows the number of users on SSID#1 and the amount of upload and download traffic. Node Map shows the nodes relationship to each other on a map. Node List gives details on each individual node. Node Outages Chart shows the check-in status of a node using colors.
Troubleshooting with your device with lights The lights on your Cloudtrax-compatible device can tell you a lot about how that device is functioning. For example, when you are looking at the front of an OM2P, you will see (from right to left): 1. Power light 2. Ethernet port 1 link light 3. Ethernet port 2 link light 4. Mesh quality light (signal bars) The mesh quality light will show three colors: red, yellow and green.
Additional resources To learn more about planning and optimizing your network, download the Cloudtrax Network Planning Guide. To learn more about CloudTrax’s splash page feature, download the Using the Splash Page Editor Guide. To learn more about CloudTrax’s vouchers feature, download the Using Vouchers in CloudTrax Guide. To learn more about integrating vouchers with PayPal, download the Using PayPal in CloudTrax Guide.
Product specifications Data rate (aggregate) Radio Antenna Power 150 Mbps 1 802.11b/g/n 2.4 GHz One external 23 dBm (200 mw) flat power Max users (recommended) 20-50 per AP WLAN standard 802.
Appendix A: FCC / IC Interference Statement This device complies with Part 15 of the FCC Rules. Operation is subject to the following two conditions: (1) This device may not cause harmful interference, and (2) this device must accept any interference received, including interference that may cause undesired operation. This equipment has been tested and found to comply with the limits for a Class B digital device, pursuant to Part 15 of the FCC Rules.
Appendix B: Industry Canada statement This device complies with RSS-247 of the Industry Canada Rules. Operation is subject to the following two conditions: (1) This device may not cause harmful interference, and (2) this device must accept any interference received, including interference that may cause undesired operation. Ce dispositif est conforme à la norme CNR-247 d'Industrie Canada applicable aux appareils radio exempts de licence.
Appendix C: EU Declaration of Conformity This device complies with the essential requirements of the R&TTE Directive 1999/5/EC.
Česky [Czech] Open Mesh tímto prohlašuje, že tento [typ zařízení] je ve shodě se základními požadavky a dalšími příslušnými ustanoveními směrnice 1999/5/ES. Dansk Undertegnede Open Mesh erklærer herved, at følgende udstyr [udstyrets typebetegnelse] [Danish] overholder de væsentlige krav og øvrige relevante krav i direktiv 1999/5/EF.