
User's Manual


!
6!
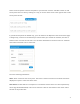
Fill in the following information:
Network name: This is the name you want to give this specific network. You will use this name to
make changes to the network, display reports, etc.
Password: This is the password for local administrators and should be different from your master
account login. This limits access and prevents users from making changes to your network.
Email: Enter your email address or the address of a local administrator to contact. We will never
share this with others.
Network Location: Enter a street address for the first access point. To add access points, you will
be shown a map that you click on to place access points. By entering an address here, you will be
centered on the correct location for your network.
Email for Notifications: Enter the email addresses, separated by spaces, for all people you’d like
to receive “outage” notifications. These are sent hourly.
When finished, click “Create” to save your new network settings.
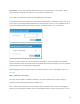
Step 3: Add access points to your network
It’s time to let CloudTrax know which access points you want to include in the network. Adding
them to CloudTrax will allow you to manage and monitor the access points from anywhere.
Navigate to the Manage > Access Points screen.