
User's Manual


!
8!
Description: You can enter optional descriptive text that will be shown on the reports. This is
typically used to keep notes on where the access point is installed, etc.
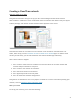
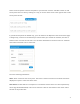
Click “Add” and repeat the process for each additional access point.
If you need to add a large number of access points, you may want to add them in bulk. You can do
so two ways: by entering the MAC addresses in a text field (one per line), or by uploading a list of
access points (along with optional name, location, channel overrides, etc.) in a CSV file.
For both of these options, your access points will be added to the map based on your network
location (similar to how the CloudTrax iOS and Android apps add access points). You can reposition
these access points on the map after adding them.
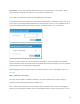
When adding by CSV, the CSV file must be in a specific format. You can download a sample CSV
file here.
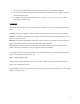
Step 4: Install the access points
Once your access points are added to CloudTrax, it’s time to install them. If you're using an
enclosure, video installation guides are available here.
First, connect your Gateway unit to the Internet with an Ethernet cable. This can be plugged in
directly to your high-speed modem (if it has a single Ethernet port, power cycle it first), or it can