Operation Manual w i th
Operation Manual by Roger Linn and Andrew McGowan Version 1.0 September 2011 Dave Smith Instruments 1210 Cabrillo Hwy N Half Moon Bay, CA 94019-1449 USA ©2011 Dave Smith Instruments www.davesmithinstruments.
This device complies with Part 15 of the FCC Rules. Operation is subject to the following two conditions: (1) This device may not cause harmful interference and (2) this device must accept any interference received, including interference that may cause undesired operation. This Class B digital apparatus meets all requirements of the Canadian Interference-Causing Equipment Regulations. Cet appareil numerique de la classe B respecte toutes les exigences du Reglement sur le materiel brouilleur du Canada.
Analog Drum Machine iii
Table of Contents What’s a Tempest? . . . . . . . . . . . . . . . . . . . . . . . . . . . . . . . . . . . . 1 Quick Start. . . . . . . . . . . . . . . . . . . . . . . . . . . . . . . . . . . . . . . . . . . 2 Overview of Panel Controls . . . . . . . . . . . . . . . . . . . . . . . . . . . . . . . . . 2 Sounds, Beats, and Projects . . . . . . . . . . . . . . . . . . . . . . . . . . . . . . . . 3 Going Deeper. . . . . . . . . . . .
Modulation Paths. . . . . . . . . . . . . . . . . . . . . . . . . . . . . . . . . . . . . 29 Choke and Voice Assign. . . . . . . . . . . . . . . . . . . . . . . . . . . . . . . 30 Beat-wide Parameters. . . . . . . . . . . . . . . . . . . . . . . . . . . . . . . . . 32 Mixer and Effects. . . . . . . . . . . . . . . . . . . . . . . . . . . . . . . . . . . . . 33 Real Time FX . .
Credits and Acknowledgement For their samples, thanks to: Angus Hewlett/FXpansion Audio samples © 2007 FXpansion Audio UK Ltd. Used with permission. www.fxpansion.com Hugo Tichborne/Goldbaby www.goldbaby.co.nz Haptic Audio www.hapticaudio.
What’s a Tempest? Tempest is a professional drum machine that generates its sounds using six powerful analog synthesis voices. It runs an innovative, performance-oriented operating system that permits an extraordinary level of control to create, edit, arrange, and manipulate beats and sounds in real time without ever stopping play. We like to think of Tempest not just as a drum machine but rather as a new musical instrument for the real-time performance of beat-oriented music.
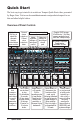
Quick Start The best way to get started is to watch our Tempest Quick Start video, presented by Roger Linn. Visit www.davesmithinstruments.com/products/tempest/ to see this and other helpful videos. Overview of Panel Controls Hold either Shift key to select the alternate function printed below some controls. Connect stereo outputs or 6 direct voice outputs to mixer. Connect power supply. Adjust synthesis settings of last sound pad hit Adjust mix settings of last played sound pad.
Sounds, Beats, and Projects There are three terms that are important to know: A Sound is a collection of all settings required to produce a drum or other type of sound when you play a pad, including settings for samples, oscillators, filters, VCA, envelopes, LFOs, and more. If the 16 Sounds key is pressed, you can use the sixteen pads to play the Sound in the selected Beat. After you create a Sound, you can save it as a Sound file for later reloading into another Beat.
The Pad Function Keys 16 Beats If 16 Beats is pressed, the sixteen pads are used to play the sixteen Beats in memory. This is useful for live arrangement and manipulation of Beats during performance. One beat pad is always selected, indicated by its pad being dimly lit. To start playing a Beat, press Play. While playing, select another beat pad to switch to it. To stop playing, press Stop.
16 Sounds If 16 Sounds is pressed, the sixteen pads are used to play the sixteen Sounds (in either Bank A or B) of the selected Beat. This is useful for playing sounds, or for recording sounds into beats in real time. If the Pads key (in the Screens section) is lit, the following screen will be displayed, showing what’s in each pad and other useful controls: Soft Knob 1: Quantize When recording Beats in real time, notes are moved to the nearest 1/8, 1/16 note, etc., set here.
16 Mutes If 16 Mutes is pressed, the sixteen pads act as sixteen mute switches for playback of the sixteen Sounds in the selected Sound bank (A or B). This is useful for arranging the Beat’s parts in real time while playing. A lit pad indicates the Sound’s playback is on; an unlit pad indicates it is off. Pressing a pad toggles between on and off states.
16 Time Steps If 16 Time Steps is pressed, the sixteen pads represent sixteen time steps within the beat, useful for step programming. A lit pad indicates the presence of a note of the selected sound, and an unlit pad indicates its absence. Pressing a lit pad toggles between deleting and inserting a note (of the selected sound) at the pad’s assigned location in time.
Tunings If 16 Tunings is selected (by pressing the 16 Beats and 16 Time Steps keys together), the sixteen pads play the selected sound at sixteen different tunings. This is useful for playing tuned parts like bass or melody lines. If the Pads key (in the Screens section) is selected, the following screen is displayed, showing the unique tuning for each pad plus related controls: Soft Knob 1: Scale Offers a variety of musical scales for the 16 pads (major, minor, chromatic, etc.
16 Levels If 16 Levels is selected (by pressing 16 Sounds and 16 Mutes together), the sixteen pads play a single Sound at sixteen evenly spaced volume (velocity) levels. This is an alternative to using the pads’ touch sensitivity for playing and recording dynamics.
Pad Options The buttons in this section provide a variety of useful tricks to get the most out of using the pads for playing both sounds and beats. Sound Bank B This key is not implemented in the initial release of the software. Reverse This key is not implemented in the initial release of the software. Fixed Level If off, sound pads are touch-sensitive, playing louder when hit harder. If on, sounds always play at a fixed velocity level, set in the System settings.
The Screens Keys Tempest’s graphic OLED screen can display a variety of different types of information. The keys in this section are used to determine which information it displays. The Events key This displays the Beat Events screen, containing a grid view of the beat’s note events. This is described on the following page. The Play List key The Play List function is not implemented in the initial software release. The Play List key A 2 x 8 matrix is displayed, showing the function of each of the 16 pads.
Events Key: The Beat Events screen If the Events key is pressed, the Beat Events screen will be displayed. The Beat Events screen is used for visual programming and editing of beats. The Beat Events screen contains a 4 x 16 grid with a row for each of four Sounds in the Beat, and sixteen columns representing sixteen time locations within the Beat. A rectangle in one of the cells indicates the presence of a note event of the row’s Sound at the column’s time location.
Soft Knob 1: Row The 4 rows of the grid represent 4 of the beat’s sound pads. Turn this knob (or press the Up/Down Arrow keys) to select a different row. If turned past the bottom or top of the screen, the screen scrolls up or down to reveal higher/lower sound pads. Shift + Soft Knob 1: Assign Row Often the 4 sounds you wish to edit aren’t contiguous and therefore can’t all be edited in the same screen. Turning this knob permits the selected row to be reassigned to any of the 32 sound pads.
The Sound Controls A Sound is a collection of all settings required to produce a drum or other type of sound when you play a pad, including samples, oscillators, filters, envelopes, LFOs, and more.
Use the four arrow keys to move between the screens.
Use the four arrow keys to move between the screens.
Analog Drum Machine Oscillators 17 OSC 4 OSC 3 OSC 2 OSC 1 SUB OSC OSC 4 LEVEL OSC 3 LEVEL OSC MIX HPF Modulation routing omitted for clarity PRE-POST FILTER LPF FEEDBACK LOOP TEMPEST VOICE ARCHITECTURE SUB OSC LEVEL FEEDBACK LEVEL VCA AMP VOLUME PAN R L
Oscillators Tempest has four oscillators for each of its six voices. Oscillators 1 and 2 are digitally controlled analog oscillators or DCOs. “Digitally controlled” does not mean the audio is digitally generated, just that the oscillators’ frequencies are under digital—rather than voltage—control. The audio signal path is still completely analog. The advantage of digital control is that the tuning is exceptionally stable over a ten-octave range without having to compensate for variables like temperature.
Increasing or decreasing the value from 50 causes the waveshape to become asymmetrical. Lower values narrow the positive-going portion of the wave, higher values widen it. At the extreme values, the pulse goes completely flat, which allows for some interesting possibilities with pulse width modulation. 0 50 99 Pulse Width 1/2 Mix: 100/0…0/100—Mixes the outputs of oscillators 1 and 2 in varying amounts. A setting of 100/0 is 100% oscillator 1 and 0% oscillator 2.
Glide Mode: FixRate, FixRate A, FixTime, FixTime A—Determines how the oscillators respond when Glide is on. FixRate: The time to transition between notes varies with the interval between the notes; the greater the interval, the longer the transition time. The glide rate is fixed. FixRate A: The same as FixRate, but glide is only applied when playing legato. That is, glide only occurs when a note is held until the next note is played.
Also, if Level is set to 0, the oscillator is effectively off; modulation applied to the oscillator level will have no effect. Pitch: -24…+24—Offsets the base oscillator pitch as much as two octaves up or down in semitone increments. A setting of 0 indicates there is no offset and the oscillator plays at its base pitch. Note: A few of the sounds—for example, some of the noise types—are of a fixed pitch and do not transpose, either from the Pitch control, the pads, or via MIDI.
Lowpass Frequency: 0...164—Sets the filter cutoff frequency over a range of more than 13 octaves. This control steps in semitones when turned slowly, but smoothly controls the filter without steps when turned at a faster rate. 4 Pole: On, Off—Selects the filter configuration. When on, the filter is in 4-pole mode. A 4-pole, low-pass filter rolls off frequencies above the cutoff frequency at a slope of -24dB/octave.
Highpass Frequency: 0...127—Sets the filter cutoff frequency for the 2-pole high-pass filter. A setting of 0 passes all frequencies. Turning the control up attenuates frequencies below the cutoff at a slope of -12dB/octave. Key > Freq: 0...127—Sets the amount of modulation from the note number— from either the beat, the pads, or via MIDI—to the filter cutoff frequency. Sometimes called key tracking in keyboard synths, because the cutoff frequency “tracks” notes played on the keyboard.
Amp Feedback: 0…127—The left audio output of each voice can feed back into the signal path pre-filter. Depending upon the amount of feedback, this can result in anything from a pleasing fuzzy distortion-like sound to unpredictable harmonic squealing and widespread pandemonium. A setting of 0 prevents any of the signal from feeding back. See “Tempest Voice Architecture” on page 17 for more information.
Envelopes Tempest has five sixstage DAPDSR (delay/ attack/peak hold/decay/ sustain/release) envelope generators for each of its six voices. Two of the envelopes are “hard wired” to specific destinations: low-pass filter and amplifier (VCA). The PITCH envelope uses All Oscillators as a default destination, but it can be changed. The two auxiliary envelopes are assignable to any modulation destination. (For a complete list, see “Modulation Destinations” on page 52.
Sustain has no effect. Release: 0...127—Sets the release time of the selected envelope. In AD Mode, Release has no effect. Amount: -127...127—Sets the amount of modulation from the selected envelope to its destination. Use Amount (and not Velocity Amount) if you don’t want the Sound to use the velocity sensitivity of Tempest’s drum pads. The modulation amount can be positive or negative, allowing for inverted envelope control.
A Note About Envelope Shape Like most synthesizers, Tempest’s envelopes are not linear, but curved. Without going into too much detail (or math), the curve is based on a logarithmic function. But that curve—and, therefore, the envelope’s shape—can be altered with modulation. For example, figure A below shows the “normal” decay of a simple AD envelope where attack is set to 0. Using one of Tempest’s Mod Paths (see page 29), an envelope can be used to modulate itself.
Amount: 0...127—Sets the amount of LFO routed to the destination. Shape: Triangle, Reverse Sawtooth, Sawtooth, Square, Random—The wave- shape of the LFO. Random (or “sample and hold”) generates a random value that changes once per cycle. Destination: Off, mod destination 1, mod destination 2, …—Sets the modula- tion destination to which the LFO is routed. See “Modulation Destinations” on page 52 for a list of possible destinations.
Modulation Paths Tempest has eight general-purpose modulation paths with a great variety of mod sources and destinations available. Press MOD PATH to display the settings for the current sound. Source: Off, mod source 1, mod source 2, …—Sets the modulation source for the selected mod path. See “Modulation Sources” on page 51 for a complete list. Tip: Use Source to route external MIDI controllers to Tempest’s mod destina- tions.
Choke and Voice Assign Each of a Beat’s thirty-two Sounds can be choked by one of two other Sounds in the Beat. The most obvious use is to enable a pedaled or closed hihat to choke off an open hihat. To Set Choke for a Sound: 1. In 16 Sounds pad mode and Sounds edit mode, use the Page Down or key to navigate to the Misc screen. 2. Tap any pad to select a Sound. 3. Use the Choke 1 Soft Knob to choose the Sound/pad that will choke the selected Sound.
To Assign a Sound to a Specific Voice: 1. In 16 Sounds pad mode and Sounds edit mode, use the Page Down or key to navigate to the Misc screen. 2. Tap any pad to select a Sound. 3. Use the Voice Assign Soft Knob to choose one of the six voices.
Beat-wide Parameters Normally the panel sound controls operate on a single sound. However, if Pad Function is set to 16 Beats, only eight of these controls are enabled and they affect the playback of all sounds playing in the beat. These eight parameters are called Beat-wide parameters: The eight parameters are Oscillator Pitch, Lowpass Frequency, Lowpass Resonance, Audio Mod, Highpass Frequency, VCA Feedback, Envelope Attack and Envelope Decay.
Mixer and Effects A 32-input mixer permits unique mix (volume, mute, solo, pan, delay send, and delay on/off for each sound) and effects settings (delay time, delay feedback, distortion, compression) for each Beat. The Delay feature acts like a digital audio delay but instead creates additional delayed notes in order to keep Tempest’s entire signal in the analog domain.
Real Time FX The Real Time FX touch sliders have two modes: 1. Beat FX: The sliders can alter the sound of the entire Beat playback. 2. Note FX: The sliders can alter parameters of a single Sound, and those changes can be recorded into the Beat. Beat FX If Pad Function is set to 16 Beats, Beat FX mode is active, in which slider movements affect Beat-wide sound parameters, altering the sound of the entire Beat’s playback. In this mode, the Playback key is always on. Try it out.
To view or edit the Beat FX assignments, press Shift + either Playback key: Soft Knob 1: Select Row Select one of the rows for editing: rows 1-4 for slider FX1-4 Position, and rows 5-8 for slider FX1-4 Pressure. Edit Beat FX1 Source Proj: Saturday night gig Beat FX1: Slider1 Pos +/Beat FX2: Slider2 Pos +/Beat FX3: Slider3 Pos +/Beat FX4: Slider4 Pos +/120.
Here’s what the panel keys do: Playback key The Playback key is always on. Shift + Playback: Assign This displays the Beat FX Assign screen, permitting the viewing or editing of the Note FX assignments. The Latch On key Normally the sliders are active only when you touch them. If the Latch On key is on, the sliders remain active at their last touched positions at all times.
Rec/Edit Keys These four keys provide a variety of functions for editing Sounds, Beats, Play Lists, and Projects. The Click key Pressing this toggles the click (metronome) on or off. The Undo Rec key If the Undo Rec light is on, this means there is something to undo. Pressing Undo Rec will undo all recording changes made during the last recording pass (since the moment you started the Beat playing with Rec on) and will turn off the light. This is a single-level undo.
To Quickly Erase only Some Notes from a Beat: 1. Press 16 Sounds. 2. Turn Record on and press Play. 3. Hold both Shift and Erase, then during the time that the notes to be erased are playing, also hold the sound pad for those notes. The Copy key To Quickly Copy One Beat over Another Beat Pad, Replacing its Contents: 1. Press 16 Beats. 2. While holding Copy, press the Beat pad to be copied from, then the Beat pad to be copied to. To Quickly Copy One Sound to another Sound Pad, Replacing its Contents: 1.
Save/Load Pressing Save/Load presents a menu of functions related to saving or loading files. Like a personal computer, Tempest has both random access memory (RAM) and permanent non-volatile storage for saved Sounds, Beats, and Projects. The current Sound, Beat, or Project is always loaded into RAM for playback and editing. Tempest uses flash memory for non-volatile storage. It is important to understand the distinction between RAM and flash.
Beats are saved to one of several folders in Tempest’s flash memory. They can also be exported and saved as system exclusive MIDI data. (See “Exporting Sounds, Beats, and Projects” on page 42.) To Save a Beat to Flash: 1. In 16 Beats mode, tap a pad to choose the Beat to save. 2. Press Save/Load, choose Save Beat, and press the Next Soft Key. 3. The current source Beat is displayed and can be changed, if desired. 4. Select the destination Beat folder. 5.
Loading Sounds, Beats, and Projects A Sound is loaded into RAM from flash and assigned to one of Tempest’s pads. Sounds can also be imported via MIDI. (See “Importing Sounds, Beats, and Projects” on page 45.) To Load a Sound: 1. In 16 Sounds mode, tap a pad to choose the destination Sound. 2. Press Save/Load, choose Load File (Sound/Beat/Project), and press the Next Soft Key. 3. Choose the Type, Folder, and File, and press the Next Soft Key. 4.
Beat will be lost. Press Save/Load again at any time prior to pressing Load Now to cancel the operation. A Project is loaded from flash and replaces the current Project in RAM. (Only one Project can be loaded at a time.) The last Project saved is loaded by default on power up. Projects can also be imported via MIDI. (See “Importing Sounds, Beats, and Projects” on page 45.) To Load a Project: 1. Press Save/Load, choose Load File (Sound/Beat/Project), and press the Next Soft Key. 2.
To Export a Sound from RAM over MIDI: 1. Connect Tempest to the receiving device (computer running MIDI application, dedicated hardware sequencer, etc.) using either USB or a MIDI interface. If using a MIDI interface, connecting Tempest’s MIDI out to the device’s MIDI in is sufficient for exporting. 2. In 16 Sounds mode, tap a pad to choose the Sound to export. 3. Press Save/Load, choose Export Sound in RAM over MIDI, and press the Next Soft Key. 4.
To Export a Project from RAM over MIDI: 1. Connect Tempest to the receiving device (computer running MIDI application, dedicated hardware sequencer, etc.) using either USB or a MIDI interface. If using a MIDI interface, connecting Tempest’s MIDI out to the device’s MIDI in is sufficient for exporting. 2. In 16 Beats mode, press Save/Load, choose Export Project in RAM over MIDI, and press the Next Soft Key. 3. Since there can only be one Project in RAM at a time, there is no source to choose.
To Export from one Tempest (master) to Another (slave) over MIDI: 1. Connect MIDI out on the master to MIDI in on the slave. (Tempest is incapable of acting as a USB host, so transfers must be done using a MIDI cable.) • If exporting a Sound from RAM, put both Tempests into 16 Sounds mode, tap a pad on the master to select the source Sound, and tap a pad on the slave to choose the destination.
Important Import Notes Importing a Sound/Beat/Project to flash with the same name as one already in flash will overwrite the file, so always back up your work before importing a file if you are not absolutely certain of the imported file’s contents. Due to the time it takes for Tempest to save a Sound/Beat/Project to flash, you must have a minimum one-second pause between SysEx files transmitted to the unit. Otherwise you will get errors from the flash system.
3. Press Delete Now to delete the file 4. Press Again to rename another file or Save/Load to exit. Note: Deleted files cannot be recovered. To cancel a delete operation, press Save/Load again prior to step 3.
System Settings Press SYSTEM to view the System menu. The System menu contains various global parameters that apply to all operation regardless of the selected Beat or Sound. Any changes to these settings are remembered even after power is turned off. Click Level: 1...127—Sets the volume of the metronome click. One bar count in: Off, On, Record Only—When On, one bar of metronome clicks plays before recording or playback begins. If set to Record Only, the count in only plays before recording.
mation.) Master Volume routes an expression pedal directly to master volume. The Note FX options allow an expression pedal to be used in addition to, or as an alternative to, the Real Time FX sliders. (See “Real Time FX” on page 34 for more information.) MIDI: Clock Mode: Auto, Master, Slave, Off—In Auto mode, Tempest senses whether or not MIDI clock is being received. If it is, Tempest syncs to MIDI clock; if it is not, Tempest uses its internal clock.
Distortion Source: Project, Beat, Pot Position—Each Beat has its own unique distortion setting but there is also a single distortion setting for the Project. If you wish to use the Beat’s setting (and have the distortion amount change when a different Beat is selected), set this to Beat (factory default). If you wish to use the Project’s distortion setting (so that the distortion amount stays the same regardless of which Beat is playing), choose Project.
Modulation Sources Pitch Envelope Filter Envelope Amp Envelope Aux 1 Envelope Aux 2 Envelope LFO 1 LFO 2 Velocity Note Number Noise Random Pad Pressure Slider Position 1 Slider Position 2 Slider Pressure 1 Slider Pressure 2 Foot Pedal 1 Foot Pedal 2 MIDI Pitch Bend MIDI Mod Wheel MIDI Breath MIDI Expression Analog Drum Machine Modulation Sources 51
Modulation Destinations Osc 1 Frequency All Env Amount Osc 2 Frequency Pitch Env Attack Osc 3 Frequency Filter Env Attack Osc 4 Frequency Amp Env Attack Osc All Freq Aux 1 Env Attack Osc 1/2 Mix Aux 2 Env Attack Osc 3 Level All Env Attack Osc 4 Level Pitch Env Decay Osc 1 Pulsewidth Filter Env Decay Osc 2 Pulsewidth Amp Env Decay Osc 1/2 Pulsewidth Aux 1 Env Decay Sub Osc Volume Aux 2 Env Decay Feedback Volume All Env Decay Lowpass Filter Pitch Env Release Resonance Filter Env R
Samples White Noise Beefy Supra Snare Pink Noise Flat Loose Ring Green Noise Shorty Thud Trick Snare Rim Resonant 4K Noise SCI Tom Cart Kick Resonant Loose Soft Noise LM-1 Bass Drum Cool Rim Cicada LinnDrum Bass Another Edge Buzzed 909ish Cut Snare Chain Link 808ish Muted Half Edge Grinder Long Time 808 High Edge 420 HighPass Noise Cut the Mustard Cracker Tight Boom Electron K Light Rim Porky Flab Dry Rim Hollow Thud Solid Pickle-O Hollow Head Early Nineties Woody Si
Funk Sn Noisy Click Close Foot Pedal LM-1 Snare Splatted Snare LM-1 Closed LinnDrum SD Broken SD LM-1 Open Basicly Ghost of a Snare LinnDrum HH Closed Beatbox Video Game LinnDrum HH Machine Caved Perc LinnDrum HH Open Twin Reverse Snare Close Tambo Dry Edge Heavy Tight Studio Hat Short Attack Pedal Edge Crack Hat Digi 8 Pedaled AM Accent CompuSnare Half Edge HH Dub Plate Plastic Open Edge Dry Tap Snare Trash Sharp Closed Peace Corp Bucket Sharp Pedal Old Timer Toy D
9009 HH2 LinnDrum Ride 808ish Hi Tom Perc Hat 909ish Crash 808ish Mid Tom DR55 HH Tom Splash Cart 808ish Low Tom Right Foot Pedal Reverse CY 909ish Tom Hi Another Perc Res Hi 909ish Tom Mid Closing HH Res Mid 909ish Tom Low Small Hi Hat Res Floor Reverse Hi Unnatural Nice Hi Reverse Mid Trip Hop HH Nice Mid Reverse Low Aliens Nice Floor Clap 9090 Silver HH Punchy Hi Layered Clap Kicky Hi Hat Punchy Mid Slap Clap Large Edge Cymbal Punchy Low Digi Clap Zilch Crash Hi Ma
Light Cross 808ish Lo Conga Punch n Drag Low Cross LM-1 CongaHi Nutrino Jam Block H LM-1 CongaLo Solar Explosion Jam Block L LinnDrum Conga Wrinkled Keys Tambouriney Quark Guiro Tambo Ring Particulate Castanet TamBell Hadron Drag That Click Metal Tamb Flutter Moon Golf Wood Tamb Broken Toy Real Shaker LM-1 Tamb Click Reduction Cabasa A LinnDrum Tamb Fazzle Cabasa B Raucous Tamb Grunt LM-1 Cabasa Tri HiFi Bucket Bottom LinnDrum Cabasa Short Triangle Charged Porceline
Square Orient Corn WmBell HighPipe Flute 2 RdBell Mass Med Pure R2Bell ReedOrg Tuba W2Bell OrgAhh FullBell FmtBell MelOrg Bell FzReed Clarinet Pinch FmtAOh AhhFem Clustr FmtAhh AhhHom M.Pinch Banjo1 AhhBass VoxPnch TriPlus RegVox DisBel Vocal1 Pulse2 Vocal2 Pulse3 Harmony SqrReed Bass Oohh Guitar Eehh Nice Feedback WWind Piano1 Oboe E.Pno Harp M.
Support Troubleshooting Here are a few suggestions for resolving problems that may occur. The sequencer has stopped running. Make sure MIDI: Clock Mode in the System menu is set to Auto, Master, or Off, or—if set to Slave—that MIDI: Clock In is set to MIDI Port or USB and that MIDI clock is actually available to that port. An oscillator or filter sounds strange or out of tune. In the System menu, choose Calibrate Analog Oscillators and Filters.
Warranty Repair Dave Smith Instruments warrants that Tempest will be free from defects in materials and/or workmanship for 1 year from the date of purchase. Please register your product online at www.davesmithinstruments.com to establish the date of purchase. (This is not a requirement for warranty service, but it will help expedite the process.) Please contact support@davesmithinstruments.com to determine the best course of action for getting your Tempest repaired.
60 Tempest
Analog Drum Machine 61
62 Tempest
Dave Smith Instruments 1210 Cabrillo Hwy N Half Moon Bay, CA 94019-1449 USA www.DaveSmithInstruments.