MKII Installation and Operating Instructions YEARS UARANT EE ON ALL RA I ATS 5200.477 Lic WMKA 22042 3 AR SG A N KS NB 3 YE Please pass these instructions on to the operator of this equipment. For any assistance or after sales service contact your Davey Dealer. For help in locating your closest dealer contact your appropriate Davey Support Centre listed on the back of this booklet.
Davey commenced in 1934 and today, as Davey Water Products, manufactures and distributes a comprehensive range of products for transfer, conservation, treatment and filtration of water. Davey has a dominant market share in Australia and exports to more than 60 separate countries, servicing some of the toughest environmental and climatic conditions on the globe.
Contents About RainBank®. The easy way to save water......................................................4 How RainBank® works..............................................................................................5 Before you start.........................................................................................................6 Installation tips..........................................................................................................7 Components...............................
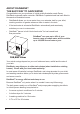
About RainBank®. The easy way to save water Congratulations on your purchase of a high quality Australian made Davey RainBank® automatic water controller. RainBank® is patented and has been fitted to thousands of Australian homes. • RainBank® allows you to use water from your rainwater tank for your toilet, washing machine or garden whenever there is water in the tank. • If the tank water is exhausted RainBank® automatically and seamlessly switches you over to mains water.
How RainBank® works 1. When there is demand for water from your toilet, washing machine or garden tap, RainBank® senses this demand and checks the level of water in the rainwater tank. Note: demand must be greater than 1.5 litres per minute or mains water will be delivered. 2. If there is rainwater in the tank RainBank® switches on the pump. The pressure of the pump is sufficient to overcome the pressure of the mains water inside RainBank® and this moves a plunger and allows the rainwater to flow.
Before you start ! 6 IMPORTANT: • RainBank® must be installed and serviced by a licensed plumber. • Check with your local water authority on water restrictions when your rainwater tank is connected to mains water. • Do not enter a empty rainwater tank - they may contain hazardous gases. • Before installing RainBank® please read all instructions carefully as failures caused by incorrect installation are not covered under warranty.
• All pipe work and fittings should be labelled in accordance with local standards such as Australian Standard AS/NZS 3500. This standard requires that all pipework containing rainwater is marked with green ‘rainwater’ tape or stickers at 1 meter intervals and every outlet that may deliver rainwater is to be permanently signed with ‘Rain Water’ signage or a green tap marked ‘RW’. • In accordance with AS/NZS 60335.2.
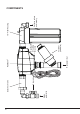
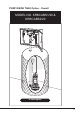
Mains water inlet Stop valve Dual check valve Rainwater inlet RainBank® Y strainer (rainwater) RainBank® Mounting Bracket Outlet to toilets and laundry 10” Filter Housing Components
PUMP INSIDE TANK Option - Overall Model No.
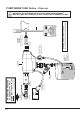
Stop valve MAINS WATER SUPPLY Incoming power to RainBank® via 3 pin plug 3/4" BSP male thread 200 Micron ‘Y’ Strainer * Pressure Limiting Valve WHERE MAINS PRESSURE EXCEEDS 900kPa. A PLV* MUST BE FITTED TO INLET! 1" BSP male thread 3/4" BSP male thread TO TOILETS AND/OR LAUNDRY (do not mix/cross-connect with mains water supply) Pipe WARNING: DO NOT INSTALL CHECK VALVES BETWEEN PUMP AND RAINBANK®. Power to pump via 3 pin socket - plug the rainwater pump in here.
how to install rainbank® 1. Run mains water plumbing, rainwater plumbing and power supply through the external wall according to the following template: 10amp single GPO ” copper pipe from mains water ” copper pipe to toilets and laundry 100mm max 30mm 515mm c to c 2. Mount RainBank® to the wall using the bracket provided. Ensure outlet and mains copper pipes are aligned with inlet/outlet of RainBank® and it is horizontal.
3. Plumb 3/4” copper pipes to RainBank® compression fittings. Note: It is critical that pipes do not interfere with filters to allow access for maintenance. Copper pipe Copper pipe 4. Once RainBank® is mounted and plumbed, install cabinet to the wall over the RainBank® using the four fixing holes provided. Allow at least 50mm clearance between the base of the cabinet and the 10” filter housing. This allows the filter to be removed for regular cleaning and maintenance. 5.
8. Cable tie the power lead from the pump to pipework and plug into base of RainBank®. MAINS WATER SUPPLY TO TOILETS AND LAUNDRY RAINWATER SUPPLY Incoming power to RainBank® via 3 pin plug Power to pump via 3 pin socket 9. Open Mains water valve and check for leaks. 10. Switch on power to RainBank® and check for flashing green light – light will flash ten times as it boots up. 11. Open a tap downstream of RainBank® to clear lines of air and check for leaks. 12.
Testing IMPORTANT: To protect against electrical surges and lightning strike damaging RainBank® or its pump we strongly recommend the use of a suitable surge protection device and residual current devices. Test the operation of RainBank®. 1. With the mains connected and the rainwater tank empty turn on one of the taps in the laundry that feeds the washing machine or flushes the toilet. Mains water should flow normally. The pump should not turn on.
maintaining rainbank® RainBank® does not need maintenance but there are things you can do to ensure its most reliable operation. • Fit a “first flush” system that ensures the first run of dirty rainwater does not go into the tank. • Clean your gutters and first flush devices ‘Y’ strainers and filter regularly. • Remove branches that over hang your roof. • Have a strainer fitted to your rainwater tank inlet and regularly check this for leaves and twigs, etc.
TROUBLE SHOOTING RAINBANK® Symptom: Pump will not switch off 1. Pump plugged directly into power outlet. Plug lead from pump into base of RainBank® as per installation instructions on pg 10. 2. Water is still being used. Check all taps, toilets and appliances connected to RainBank® system to ensure they are turned off. 3. Water is leaking on discharge side of RainBank® system. Check for leaks and repair. Symptom: Pump will not switch on 1. Pump not plugged in.
Other symptoms Pump is running but water is being sourced from the mains supply. 1. Pump needs to be primed. 2. Debris is caught inside RainBank preventing plunger mechanism from sealing completely. 3. Pump impeller blocked. Have pump serviced. Mains water not passing through RainBank®. Possible cause - RainBank® installed backwards. Install RainBank® according to installation & operating instructions. Arrow on top of RainBank indicates direction of flow. Mains water not passing through RainBank®.
notes __________________________________________________ __________________________________________________ __________________________________________________ __________________________________________________ __________________________________________________ __________________________________________________ __________________________________________________ __________________________________________________ __________________________________________________ _______________________________________________
Davey® Repair or Replacement Guarantee In the unlikely event in Australia or New Zealand that this Davey product develops any malfunction within warranty periods beginning from the date of original purchase due to faulty materials or manufacture, Davey will at our option repair or replace it for you free of charge, subject to the conditions below.
AUSTRALIA NEW ZEALAND REST OF WORLD Davey Support Centre 6 Lakeview Drive, Scoresby, Australia 3179 Ph: 1300 367 866 Fax: 1300 369 119 Website: davey.com.au Davey Support Centre 7 Rockridge Avenue, Penrose, Auckland 1061 Ph: 0800 654 333 Fax: 09 527 7654 Website: daveynz.co.nz 6 Lakeview Drive, Scoresby, Australia 3179 Ph: +61 3 9730 9121 Fax: +61 3 9753 4248 E-mail: export@davey.com.au Website: davey.com.