
User Manual


Preparing the ISS for Installation
2
Note: If the ISS is a Plus model and contains UV and solar sensors, do not touch the small white diffusers
on top of the sensors. Oil from skin reduces their sensitivity. If you are concerned that you have
touched the diffusers at any time during the installation, clean the UV diffuser using ethyl alcohol
with a soft cloth. When cleaning the UV diffuser, DO NOT use rubbing or denatured alcohols
because they can affect accuracy of the sensor readings. Ethyl alcohol can be procured through an
industrial or laboratory supply store. Clean the solar diffuser with a soft damp cloth.
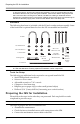
Hardware
The following hardware is included with the ISS and weather station assembly. Some
of the hardware is optional based on how the ISS is assembled and installed.
Note: If any of the hardware components are missing or not included, contact Customer Service toll free
at 1-800-678-3669 about receiving replacement hardware or other components.
Tools for Setup
The following are additional tools required to set up and install the ISS:
• Small Phillips head screwdriver
• Scissors or wire-cutters
• Adjustable wrench or 7/16" wrench
• Compass or local area map
• Ballpoint pen or paper clip (or other small pointed object)
• Drill and 3/16" (5 mm) drill bit (if mounting on a vertical surface)
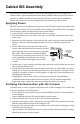
Preparing the ISS for Installation
Please follow the steps in the order they are presented. Each step builds on tasks
completed in previous steps.
Note: Using a well-lit work table or work area to prepare the ISS for installation is recommended.
The steps to prepare the ISS for installation are:
• Assemble the anemometer.
• Check the factory-installed sensor cable connections to the SIM.
• Connect the anemometer sensor cable to the SIM.
1/4" Flat Washers
1/4" Lock Washers
1/4" Hex Nuts
3-Volt
Lithium
Battery
(wireless
models
only)
U-Bolts
Backing Plate
.05" Allen
Wrench
1/4" x 3" Lag Screws
#4 x 1-1/8"
Machine Screw
#4 Tooth
Lock Washer
#4-40 Hex Nut
8" Cable Tie