
User Manual


Check SIM Sensor Connections
6
Connect the Anemometer Cable to the SIM
1. Unwind the coil of cable enough to work with the anemometer.
Note: Do not unwind the entire coil of anemometer cable at this time.
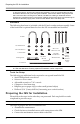
2. Pull the foam insert out of
cable access port in
between the cables and set
the foam insert aside.
3. Insert the anemometer
cable end into the cable
access port from beneath
the SIM box.
Slide the cable through
the cable access port with
the connector lever down.
4. Firmly insert the end of
the anemometer cable into
the connector labeled
WIND. The lever clicks
into place.
5. Make sure that the cables
lie flat on the bottom of
the cable access port.
6. Firmly insert the foam in
between the cables and at
the top of the cable access
port, taking care to ensure
that the foam seals the
access port entirely, leav-
ing no holes or gaps large enough for weather or insects.
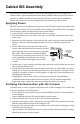
Note: If you are assembling a cabled station, wait to reinsert the foam until cable assembly is com-
plete. See “Cabled ISS Assembly” on page 8.
Once the sensor connections have been checked and the anemometer cable has
been inserted, a connection between the ISS and the Vantage Pro2 console must be
made.
7. Follow the instructions that best apply to your ISS and console:
• See “Cabled ISS Assembly” on page 8 for assembling Vantage Pro2 weather sta-
tions that contain a cabled connection between the ISS and the console.
• See “Wireless ISS Assembly” on page 11 for assembling Vantage Pro2 weather
stations that use a wireless connection to transmit and receive data.
Foam
Insert
Sensor
Interface
Module
(SIM)
Note: Only Plus models have UV and
solar cables already attached.