9 D Q W D J H 3 U R : H D W K H U 6 W D W LR Q &RQVROH 0DQXDO 3URGXFW &
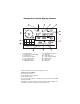
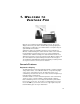
9DQWDJH 3UR &RQVROH 'LVSOD\ )HDWXUHV 3 2 WIND N pm NW NE GRAPH W Last 24 hrs BAROMETER hPa F F Every 1 hr 14 in Vertical Scale: X10 12 1. 2. 3. 4. 5. 6. 7. Compass Rose Graph & Hi/Low Mode Settings Forecast Icons Moon Phase Indicator Time / Sunrise Time Date / Sunset Time 2ND Button Indicator 9 RAIN RATE DAILY 13 8 CHILL HUM IN TEMP IN SE S HUM OUT F E MPH 7 2nd TEMP OUT 1 SW 6 5 4 in/hr STATION NO.1 11 8. 9. 10. 11. 12. 13. 14.
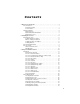
&217(176 1. Welcome to Vantage Pro . . . . . . . . . . . . . . . . . . . . . . . . . . . . . . . . . . . . . 1 Console Features . . . . . . . . . . . . . . . . . . . . . . . . . . . . . . . . . . . . . . . . . . . . . . 1 Keyboard & Display . . . . . . . . . . . . . . . . . . . . . . . . . . . . . . . . . . . . . . 1 Console Modes . . . . . . . . . . . . . . . . . . . . . . . . . . . . . . . . . . . . . . . . . . 2 Vantage Pro Options . . . . . . . . . . . . . . . . . . . . . . . . . . . . . . . . . . . . .
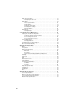
Highs and Lows Mode . . . . . . . . . . . . . . . . . . . . . . . . . . . . . . . . . . . . . . . . . 31 Viewing Highs and Lows . . . . . . . . . . . . . . . . . . . . . . . . . . . . . . . . . . 32 Alarm Mode . . . . . . . . . . . . . . . . . . . . . . . . . . . . . . . . . . . . . . . . . . . . . . . . . . 32 Three Special Alarms . . . . . . . . . . . . . . . . . . . . . . . . . . . . . . . . . . . . 33 Setting Alarms . . . . . . . . . . . . . . . . . . . . . . . . . . . . . . . . . . . . . . . . .
: ( / & 2 0 ( 7 2 9 $ 1 7 $ * ( 3 5 2 Welcome to your Vantage Pro® Weather Station console. The console displays and records your station’s weather data, provides graphing and alarm functions, and interfaces your weather data to a computer using our optional WeatherLink software. Vantage Pro stations are available in two basic versions: Cabled and Wireless.
1. Welcome to Vantage Pro Note: After pressing the 2ND key, the screen displays the 2ND icon for three seconds. All secondary key functions are enabled during this time. Keys resume normal operation after the icon disappears. 2ND The the +, - , <, and > navigation keys are used to select command options, adjust values, and to provide additional functions when used in combination with a command key. To learn more about the keyboard, see “Selecting Weather Variables” on page 21.
Vantage Pro Options Wireless Soil Moisture/Temperature Station (#6361) Measures and transmits soil moisture and temperature data. Wireless Temperature Station (#6370) Measures and transmits temperature data. Wireless Temperature/Humidity Station (#6380) Measures and transmits air temperature and humidity data. Wireless Temperature/Humidity Station with Fan-Aspirated Radiation Shield (#6385) Measures and transmits air temperature and humidity data.
1. Welcome to Vantage Pro Sensor Mounting Shelf (#6672) Required for mounting the optional Solar Radiation and/or UV sensors. The mounting shelf attaches to the ISS. Car/Boat/RV Lighter Cord (#6604) Allows the Vantage Pro to draw power from a standard car cigarette lighter. USB-to-Serial (DB-9) Cable (#8434) Allows WeatherLink to connect to a USB port on your computer. Telephone Modem Adapter (#6533) Allows a dialup connection between the station and the computer.
,167$//,1* 7+( &2162/( The Vantage Pro console is designed to give extremely accurate readings. As with any precision instrument, use care in its assembly and handling. Although installing the console is relatively simple, following the steps outlined in this chapter and assembling the Vantage Pro correctly from the start will help ensure that you enjoy all of its features with a minimum of time and effort.
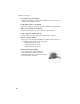
2. Installing the Console Installing the AC Power Adapter 1. Find the power jack located on the bottom of the console case. Power Plug Wrap Cord Around Pins 2. Insert the power adapter plug into the console power jack then plug the other end of the adapter into an appropriate power outlet. 3. Check to make sure the console runs through a brief self-test procedure successfully. The console will display all the LCD segments and then beep twice. 4. After power-up the console automatically enters Setup mode.
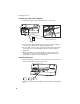
Connecting Cabled Stations 3. Replace the battery cover. Note: To remove old batteries, see “Changing Batteries” on page 43. Connecting Cabled Stations Cabled Vantage Pro stations come with 100 feet (30m) of cable. Maximum cable length from ISS to console is 1000 feet. See “Optional Accessories” on page 3 to purchase additional cable. 1. Gently insert the console end of the 4-conductor wire into the console receptacle marked “ISS” until it clicks into place.
2. Installing the Console Console Location You should place the console in a location where the keyboard is easily accessible and the display is easy to read. For more accurate readings, follow these suggestions: • Avoid placing the console in direct sunlight. This may cause erroneous inside temperature and humidity readings and may damage to the unit. • Avoid placing the console near radiant heaters or heating and air conditioning ducts.
Console Location Table & Shelf Placement The console kickstand can be set to five different angles providing five different display angles. 1. Lean the kickstand out by pulling on its top edge. You’ll see the indentation for your finger at the top edge of the console. 2. Slide the catch to arrest the kickstand in the appropriate angle. Choose low angles for display on a coffee table or other low area. Choose higher angles for display on a desk or shelf. 3. Pull up on the stand to close it.
2. Installing the Console Wall Mounting The console mounts to the wall using two keyholes located on the back of the case. To mount the console on a wall: 1. Use a ruler to mark two mounting hole positions on the wall 8 inches (203 mm) apart. 8" (203mm) Drill two 3/32" or 7/64" (2.4 to 2.8mm) holes 8" (203mm) apart for the #6 x 1" mounting screws. Note: Drawing not to scale.
8 6 , 1 * <2 8 5 :( $7 +( 5 6 7 $7 , 21 The console LCD screen and keyboard provide easy access to your weather information. The large LCD display shows current and past environmental conditions as well as a forecast of future conditions.The keyboard controls console functions allowing you to view current and historical weather information, set and clear alarms, change station modes, view and/or change station settings, set up and view graphs, select sensors, get the forecast, and so on.
3. Using Your Weather Station Screen 1: Active Transmitters Screen 1 displays the message “Receiving from...” and shows the transmitters being received by the console. In addition, an “X” will blink in the lower right-hand corner of the screen every time the console receives a data packet from the ISS. The rest of the LCD screen will be blank. If you have a cabled station, or if your wireless ISS uses the factory settings and you are receiving the signal, the screen displays “Receiving from station No. 1”.
Setup Mode may need to use the alternate transmission interval if it is being substituted for another type of station or because of changes we have made to the products. ISS Transmitter ID Settings: • ISS Station used as an ISS: ISS • ISS Station used as a Temp/Hum Station: TEMP HUM and 4X Temperature/Humidity Station Transmitter ID Settings: • Temp/Hum Stations built before April 2003: TEMP HUM • Temp/Hum Stations built April 2003 or later: TEMP HUM & “4X.
3. Using Your Weather Station 5. To change the transmission interval for a transmitter station, press and hold TEMP then press HI/LOW. The alternate interval for that station type is indicated on the screen: “.25X” or “4X”. 6. Press DONE to move to the next screen. Screen 3: Retransmit - Wireless Only The console can transmit data from the ISS and other outside sensors to other Vantage Pro consoles or to the Davis Weather Echo and Weather Echo Plus. 2 1.
Setup Mode 3. To choose a 12-hour or 24-hour clock, first select either the hour or minute setting, then press 2ND and immediately press UNITS. This will switch the console from one type of clock to the other. 4. To choose a MM/DD or DD/MM display for the date, first select either the day or month setting, then press 2ND and immediately press UNITS. This will switch the console from date display to the other. 5. When you’re finished, press DONE to move to the next screen.
3. Using Your Weather Station 1. Press < and > to move between fields. 2. Press + and - to change the settings up or down. 3. To select the Northern or Southern Hemisphere, press 2ND, then UNITS. 4. Press DONE to move to the next screen. Screen 7: Time Zone The console is pre-programmed with a combination of US time zones and the names of major cities representing time zones around the world. You can also configure your time zone using the Universal Time Coordinate (UTC) offset.
Setup Mode 1. Press + and - to choose Auto or Manual. 2. Press DONE to move to the next screen. Screen 9: Daylight Savings Status Use this screen to either verify the correct automatic Daylight Savings status or to control Daylight Savings manually. 1. If you have a MANUAL Daylight Savings setting, press + and - to turn Daylight Savings Time on or off on the appropriate days of the year. 2.
3. Using Your Weather Station 4. If you are below sea level, such as some places in California like Death Valley, first enter the elevation as a positive number. Then, select the “0” immediately to the left of the left most non-zero digit (the second zero from the left in 0026, for example, or the first zero from the left in 0207) and press + and - to switch from a positive to negative elevation.
Setup Mode Screen 13: Rain Season Because rainy seasons begin and end at different times in different parts of the world, you must specify the month you wish your yearly rain data to begin. January is the default. 1. Press + and - to select the month for the start of the rainy season. 2. Press DONE to move to the next screen. Screen 14: Serial Baud Rate The console uses the serial port to communicate with a computer.
3. Using Your Weather Station Clear All Command After you have completed the above setup procedures and have exited the Setup Mode, please use the Clear All command before putting your weather station into service. Note: The Clear All command clears all stored high and low weather data including monthly and yearly highs and lows and clears the alarm settings. 1. Press the WIND key on the console. 2. Press the 2ND key, then press and hold the CLEAR key for at least six seconds. 3.
Current Weather Mode TEMP IN TEMP OUT F F WIND N NE NW N WIND NW pm NE E W TEMP OUT W MPH SW HUM OUT hPa HUM IN TEMP IN SW SE Last 24 hrs SE S F F HEAT INDEX Every 1 hr S RAIN DAILY RAIN in Vertical Scale: BAROMETER F E MPH X10 YEAR in STATION NO.1 Wind Speed and Direction Press WIND to select wind speed. Wind speed may be disCHILL played in miles per hour (mph), kilometers per hour (km/h), WIND meters per second (m/s), and knots (knots).
3. Using Your Weather Station HUM IN HUM OUT BAROMETER hPa WIND N NW pm NE TEMP OUT E W HUM OUT HUM IN TEMP IN Last 24 hrs SE S F F HEAT INDEX Every 1 hr RAIN DAILY RAIN in Vertical Scale: F hPa MPH SW DEW POINT BAROMETER F X10 YEAR in STATION NO.1 CHILL F Humidity, Pressure, Dew Point, & Wind Chill Humidity Press the HUM key to select outside humidity. Pressing the HUM key a second time selects inside humidity. Humidity is displayed in percent relative humidity.
Current Weather Mode WIND N NW pm NE TEMP OUT BAROMETER F E W HUM OUT hPa MPH TEMP IN SE SW Last 24 hrs S UV F THSW RAIN DAILY RAIN in Vertical Scale: F index Every 1 hr X10 INDEX YEAR F in STATION NO.1 HEAT INDEX UV F index THSW INDEX Daily Rain, Rain Storm, Rain Year, Rain Month, & Rain Rate UV (Ultraviolet Radiation) SUN UV Press the UV key to display the current UV Index. Press again to see MEDS. See “Apparent Temperatures” on page 45. Note: Requires a UV sensor.
3. Using Your Weather Station RAIN RAIN STORM Daily Rain, Rain Storm, Rain Year, Rain Month, & Rain Rate YEAR in in N WIND NW pm NE HUM OUT TEMP OUT hPa MPH Last 24 hrs SE S RAIN HUM IN TEMP IN SW BAROMETER F E W F RAIN DAILY RAIN in Vertical Scale: MO F HEAT INDEX Every 1 hr X10 in YEAR in STATION NO.1 DAILY RAIN RAIN RATE in in/hr Rain Rate RAIN DAY RAINYR Press the RAINYR key to display the current rain rate.
Current Weather Mode SUN WIND N NW NE TEMP OUT HUM OUT hPa MPH HUM IN TEMP IN SW Last 24 hrs SE S BAROMETER F E W W/m2 pm YEAR GRAPH F F RAIN DAILY RAIN in Vertical Scale: ET HEAT INDEX Every 1 hr X10 YEAR YEAR mm in STATION NO.1 ET ET MO mm mm Solar Radiation, Current ET, ET Month & ET Year Solar Radiation LAMPS SUN Press and release the 2ND key, then press the UV 2ND SUN key to display the current solar radiation reading.
3. Using Your Weather Station Forecast Icons The forecast icons show the predicted weather for the next 12 hours. If rain or snow is possible but not necessarily “likely”, you will see the partly cloudy icon along with the rain or snow icon. Mostly Clear Partly Cloudy Mostly Cloudy Rain Likely Snow Forecast Ticker Tape Message The forecast ticker message predicts the weather up to 48 hours in advance.
Current Weather Mode Metric Rain Collector Settings Use the following procedures to set up your Vantage Pro station to display rain data in millimeter. See “Rain” on page 47 for more information. Note: Vantage Pro stations measure rain in 0.01 inch increments and also store rain data in inch units. When you select metric units for rain data, the logged data is converted from inches to millimeters at the time it is displayed. Console Setup: Rain Collector Settings 1.
3. Using Your Weather Station Calibrating Temperature And Humidity You can calibrate inside and outside temperature, inside and outside humidity, as well as any extra temperature or humidity sensors you have transmitting to Vantage Pro. 1. Select the variable to be calibrated. See “Selecting Weather Variables” on page 20. 2. Press and release 2ND, then press and hold SET. After a moment, the variable you’ve selected will begin to blink.
Current Weather Mode Calibrating Barometric Pressure Note: Before calibrating the barometric pressure, be sure the station is set to the correct elevation. 1. Press BAR to select barometric pressure. 2. Press and release 2ND, then press and hold SET. The pressure variable will blink. 3. Continue holding the key until the ticker reads “set barometer...”. 4. Press < or > to select digits in the variable. 5. Press + and - to add to or subtract from the digit’s value. 6.
3. Using Your Weather Station Clearing Weather Variables To clear a single weather variable: 1. Select the weather variable. See “Selecting Weather Variables” on page 20. 2. Press and release 2ND, then press and hold CLEAR. The variable you’ve chosen will blink. Keep holding the key until the value changes to zero or, in the case of the barometer, the raw barometer value.
Highs and Lows Mode Monthly ET Clears the current monthly ET total. Does not affect †he yearly ET total. Yearly ET Clears the current yearly ET total. Highs and Lows Mode The Vantage Pro records highs and lows for many weather conditions over three different periods: days, months, and years. Except for Yearly Rainfall, all high and low registers are cleared automatically at the end of each period.
3. Using Your Weather Station Viewing Highs and Lows 1. Press the HI/LOW key to enter the Highs and Lows mode. The DAY and HIGHS icons light up and the station displays the highs for all visible fields. 2. Press the + and - keys to scroll between Day Highs, Day Lows, Month Highs, Month Lows, Year Highs and Year Lows. The HIGH or LOW icon, as well the DAY, MONTH or YEAR icon will light to show you which High/Low screen you’ve selected. See “Graph & Hi/ Low Mode Settings” on the inside of the front cover. 3.
Alarm Mode Three Special Alarms ET (Evapotranspiration) ET is updated only once an hour, on the hour. If during a given hour the ET Value exceeds the alarm threshold, the ET alarm sounds at the end of that hour. This is true for daily, monthly, and yearly ET alarms. You must have the optional Solar Radiation Sensor to use this alarm. See “Evapotranspiration (ET)” on page 50 for a description of this variable.
3. Using Your Weather Station Setting the Time Alarm 1. Press 2ND then press the ALARM key to enter the alarm mode. The ALARM and HIGHS icons appear. 2. Press Time, then press 2ND, and then press SET. The time field will begin blinking. 3. Press < and > to select hours, minutes, or am/pm. 4. Press the + and - keys to change the digit’s value up and down. 5. When you are finished, press DONE to exit Alarm Mode. Clearing Alarm Settings 1. Press 2ND then press the ALARM key to enter the alarm mode.
Graph Mode TABLE 3-3: VANTAGE P RO S TATION A LARMS (C ONTINUED ) Variable Alarms Outside Temperature High and Low Extra Temperature High and Low Heat Index Temperature High THSW Index Temperature High Wind Chill Temperature Low UV Radiation Index High UV Radiation MED High -- uses the current total if variable has been reset Wind Speed High Time & Date Yes - the alarm sounds for 1 minute.
3. Using Your Weather Station 5. Press the + and - keys to shift the graph’s time span. If you press the - key, the graph will shift from the last 24 hours to the last 24 days. Now each dot represents the high recorded on the day shown in the date field. To see the lows recorded in the last 24 days, press the HI/LOW key. Press the < and > keys to move between days.
Graph Mode TABLE 3-4: VANTAGE P RO C ONSOLE G RAPHS (C ONTINUED ) Available Graphsa H Rain T T T T T H H H H Storm T 1 Rain Rate H Soil Moisture C C H,L H,L A A H H C C H,L H,L Solar Yearly Monthly H,L H,L Hourly H,L C 15 Min C C 10 Min C Leaf Wetnessc 1 Min Dew Point Current Daily Weather Variable Radiationb Inside Temperature H Outside Temperature C C H,L H,L Heat Index Temperature C C H H Temp/Hum/Sun/Wind (THSW) Index Temperatureb C C H H
3.
75 2 8 % / ( 6 + 2 2 7 , 1 * 0 $ , 1 7 ( 1 $ 1 & ( Vantage Pro Troubleshooting Guide While your Vantage Pro weather station is designed to provide years of trouble-free operation, occasional problems may arise. If you are having a problem with your station, please consult this troubleshooting guide before calling the factory. You may be able to quickly solve the problem yourself. If you need help, please contact Davis Technical Support, page 43.
4. Troubleshooting & Maintenance Solution Outside temperature sensor reading seems too high Check calibration number and adjust if necessary. ISS or temp sensor may need to be relocated. See ISS or other transmitter manual. Inside temperature sensor reading seems too high Move the console out of direct sunlight. Make sure that the console or sensor is not in contact with an exterior wall that heats up in sunlight or when outside temperature rises.
Vantage Pro Troubleshooting Guide TABLE 4-1: TROUBLESHOOTING GUIDE Time Problem Incorrect times for sunrise and sunset Solution Check your latitude and longitude settings. Sunrise and sunset times are calculated from the console latitude and longitude settings Troubleshooting Reception Problems While we have tested the Wireless Vantage Pro radio extensively, each site and each installation presents its own issues and challenges.
4. Troubleshooting & Maintenance Console Diagnostic Screen In addition to logging weather data, the console continuously monitors the station’s radio reception. The signal You may find this information very helpful, especially when you are choosing locations for your console and ISS. Note: Radio transmission data is cleared each day at midnight. Diagnostic Screen Commands • Press and hold the TEMP key, then press the TIME key to display the diagnostic screen.
Console Maintenance 8. Number of times the console lost communications with the transmitter for more than 10 minutes. 9. Current number of consecutive misses. The counter increments when the 10. 11. 12. 13. 14. console is synchronized but the packet is not. Longest streak of consecutive packets received. Current streak of consecutive packets received. Current console battery voltage Receiver Gain Status Graph of last 24 days’ percentage of scheduled ISS data packets.
4. Troubleshooting & Maintenance Contacting Davis Technical Support If you have any questions, or encounter problems installing or operating your Vantage Pro weather station, please contact Davis Technical Support. We’ll be glad to help. Note: Please do not return items for repair without prior authorization. (510) 732-7814 – Monday – Friday, 7:00 a.m. – 5:30 p.m. Pacific Time. We are unable to accept collect calls. (510) 670-0589 – Technical Support Fax. support@davisnet.com – E-mail to Technical Support.
$ 3 3 ( 1 ' , ; $ :( $7 +( 5 '$7 $ Refer to this appendix to learn more about the weather variables that are measured, displayed, and logged by your Vantage Pro Station. Note: Some weather variables require optional sensors. See “Optional Sensors” starting on page 2. Wind The anemometer measures wind speed and direction, and is part of the Integrated Sensor Suite (ISS). The console also calculates a 10-minute average wind speed and 10-minute dominant wind direction.
Appendix A: Weather Data saturated with water vapor) the apparent temperature “feels” higher than the actual air temperature, because perspiration evaporates more slowly. Note: Vantage Pro measures Heat Index only when the air temperature is above 57° F (14° C), because it’s insignificant at lower temperatures. (Below 57°, Heat Index = the air temperature.) The Heat Index is not calculated above 135° F (52° C).
Rain You can also use dew point to predict the minimum overnight temperature. Provided no new fronts are expected overnight and the afternoon Relative Humidity ≥ 50%, the afternoon’s dew point gives you an idea of what minimum temperature to expect overnight, since the air cannot get colder than the dew point anytime. Rain Vantage Pro incorporates a tipping-bucket rain collector in the ISS that measures 0.01” for each tip of the bucket. Your station also logs rain data in inch units.
Appendix A: Weather Data reading gives a measure of the amount of solar radiation hitting the solar radiation sensor at any given time, expressed in Watts /sq. meter (W/m2). Solar radiation requires the solar radiation sensor. UV (Ultra Violet) Radiation Energy from the sun reaches the earth as visible, infrared, and ultraviolet (UV) rays. Exposure to UV rays can cause numerous health problems, such as sunburn, skin cancer, skin aging, and cataracts, and can suppress the immune system.
UV (Ultra Violet) Radiation Table A-2: E NVIRONMENT C ANADA S KIN TYPES AND R EACTION TO THE S UN a Skin Color I White History of Tanning & Sunburning Always burns easily, never tans II White Always burns easily, tans minimally Burns moderately, tans gradually III Light Brown IV Moderate Brown Burns minimally, tans well V Dark Brown Burns rarely, tans profusely VI Black Never burns, deep pigmentation Developed by T. B. Fitzpatrick of the Harvard Medical School.
Appendix A: Weather Data the next day’s noontime UV intensity. The Index values displayed by the Vantage Pro are real-time measurements. TABLE A-3: UV I NDEX Index Values Exposure Category 0-2 Minimal 3-4 Low 5-6 Moderate 7-9 High 10+ Very High Evapotranspiration (ET) Evapotranspiration (ET) is a measurement of the amount of water vapor returned to the air in a given area.
$ 3 3 ( 1 ' , ; % 63(&,),&$7,216 See complete specifications for your Vantage Pro Station at our website: www.davisnet.com Console Specifications Console Operating Temperature . . . . . . . . . . Display Temperature . . . . . . . . . . . . . . . . . . . Non-operating Temperature . . . . . . . . . . . . . . Console Current Draw . . . . . . . . . . . . . . . . . Power Adapter. . . . . . . . . . . . . . . . . . . . . . . . Battery Backup . . . . . . . . . . . . . . . . . . . . . . .
Appendix B: Specifications Console Data Display Specifications Historical Data . . . . . . . . . . . . . . . . . . . . . . . . Includes the past 24 values listed unless otherwise noted; all can be cleared and all totals reset Daily Data . . . . . . . . . . . . . . . . . . . . . . . . . . . Includes the earliest time of occurrence of highs and lows; period begins/ends at 12:00 am Monthly Data . . . . . . . . . . . . . . . . . . . . . . . . .
Weather Data Specifications Weather Data Specifications Note: These specifications include optional sensors that may not be installed in your Vantage Pro Station. TABLE 3-1: W EATHER D ATA S PECIFICATIONS Variable Required Sensors Barometric Pressurea Included in Console Barometric Trend (3 hour) Resolution Range Nominal Accuracy (+/-) 0.01” Hg; 0.1 mm; 0.1 hPa; 0.1 mb 26” to 32” Hg; 660 to 810 mm; 880 to 1080 hPa; 880 to 1080 mb 0.03” Hg; 0.8 mm Hg; 1.0 hPa; 1.0 mb Change Rates Rapidly: ≥.
Appendix B: Specifications TABLE 3-1: W EATHER D ATA S PECIFICATIONS Variable Required Sensors Resolution Range Nominal Accuracy (+/-) Outside Temperatureb ISS, Temp Station or Temp Hum Station 0.1°F; 0.1°C -40 to +150°F; -40° to +65°C 1°F; 0.5°C Extra Temperature ISS, Temp Station, Temp Hum Station, Leaf Soil Station or Soil Station 1°F; 1°C -40 to +150°F -40° to +65°C 1°F (0.5°C) Heat Index ISS or Temp/Hum Station 1°F; 1°C -40 to +135°F; -40° to +57°C 3°F (1.
FCC Part 15 Class B Registration Warning This equipment has been tested and found to comply with the limits for a Class B digital device, pursuant to Part 15 of the FCC Rules. These limits are designed to provide reasonable protection against harmful interference in a residential installation. This equipment generates, uses, and can radiate radio frequency energy and, if not installed and used in accordance with the instructions, may cause harmful interference to radio communications.
9DQWDJH 3UR &RQVROH ,FRQV Console icons indicate weather conditions and special functions. Forecast Mostly Clear Partly Cloudy Mostly Cloudy Rain Likely Snow Indicates the weather forecast for the next 12 hours. Moon Phase New Moon First Quarter Full Moon Last Quarter New Moon Shows the current moon phase. Sequence shown for Northern Hemisphere. Reverse sequence for the Southern Hemisphere. Alarm Bell Flashes when an alarm is triggered. Also indicates when the console is in Alarm Mode.