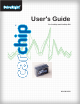
® TM User's Guide For CarChip and CarChip E/X 8210 & 8220
Product Number: 8210, 8220 Davis Instruments Part Number: 7395.064 DriveRight CarChip User’s Manual Rev A (January 2, 2003) © Davis Instruments Corp., 2003. All rights reserved.
Table Of Contents WELCOME TO CARCHIP ............................................................................................................... 1 GETTING STARTED WITH CARCHIP............................................................................................ 1 How CarChip Works..................................................................................................................... 1 What is OBDII........................................................................................
Draw Speed Bands................................................................................................................. 16 Normalize Vertical Speed Axes .............................................................................................. 17 Plot Coordinates Options........................................................................................................ 17 Maximum Vertical Axis .................................................................................................
Activity Log Event View.............................................................................................................. 40 Activity Log Comments .............................................................................................................. 41 ACCIDENT LOG VIEWS (E/X only)............................................................................................... 41 Accident Log Summary View .....................................................................................
iv
Welcome to CarChip CarChip consists of a tiny “black box” data logger (about the size of two 9-volt batteries stacked together), a CD with software for analyzing the data, and a connecting cable and power adapter. The data logger plugs into the OBDII connector in your car, and continuously collects and stores data from the car’s computer control systems. Later, you use the cable and power adapter to download the information to your PC.
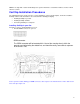
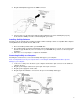
OBDII is an outgrowth of earlier similar diagnostic systems which were created in the 1980’s to monitor vehicle emission controls. CarChip Installation Procedures The following help topics show you how to connect CarChip to your Car and Computer, and how to install the CarChip software. This information is also included in the CarChip packaging.
2. Plug the CarChip data logger into the OBDII connector. 3. Check to make sure the data logger indicator light is blinking. This verifies CarChip was properly inserted into the OBDII port and is communicating with your vehicle. Installing CarChip Software Follow the steps provided below to install the CarChip software. CarChip software is compatible with computers running Windows™ 95, 98, ME, NT 4.0, 2000 or XP. 1. Place the CarChip software CD in your CD ROM drive. 2.
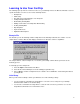
Learning to Use Your CarChip The following topics provide an overview of how to use your CarChip. Refer to the Menu Commands section for specific information on how to use the various CarChip features.
First Time Connecting CarChip to Your Computer When you first connect a CarChip data logger to the software, the CarChip ID dialog box will appear. • • • • You can click Yes to add a name, which will bring up the following dialog box You can click No and the serial number will be used as the CarChip’s name. The Serial Number shown is embedded into the data logger and will be unique for your unit. You can give your CarChip a name or just press Yes to continue.
Downloading CarChip Data Use this command to download data from your CarChip data logger into your computer. To download data: 1. Choose Download CarChip Data from the CarChip menu. The Downloading Logs dialog box appears. 2. The dialog box disappears when the download is complete. 3. Choose Cancel only if you wish to abort the download before it is finished.
You can also use the Vehicle ID dialog box to enter, edit, or delete a vehicle name in the CarChip data base. To enter or edit a vehicle ID: 1. Choose Vehicle ID from the Setup menu. The Setup / Vehicle ID dialog box appears. 2. Use the scroll bar, if necessary to display the vehicle whose name you wish to change. 3. Double-click in the text-edit box containing the current name (or blank box if it is a new name), and edit or enter the vehicle name. 4. Choose OK to save any changes you made.
These apply to the buttons labeled "Report, Plot, and Table" when viewing individual reports in the trip and accident log: Left cursor key -- selects button to the left of current selection. Right cursor key -- selects button to the right of the current selection.
Save Plot As The Save As command in the Plot View right-click menu offers three file formats for saving the displayed information: metafile, bitmap, and data. • Use the Save As > Metafile option if you want to save the plot as a vector graphics ".emf" file . • Use the Save As > Bitmap option if you want to save the plot as bitmapped paint ".bmp" file. • Use the Save As > Data option if you want to save the plot data as a comma delimited text ".txt" file for use in a spreadsheet program.
Speed Bands Right-Click Menu Using the mouse right-click when the cursor is in the Draw Speed Bands edit box displays the following menu choices: • • Requirements... Ctrl+R Errors... Ctrl+E • • Unit Systems... Ctrl+U Help F1 The Help command displays Draw Speed Bands help topic. Plot View Zoom & Unzoom You can expand rectangular sections of a plot view (zoom) to get increased detail. While not truly a right-click menu option, you must use the right-click menu to access the Unzoom command. Zoom: 1.
Properties The Properties command displays information about the data file currently loaded into the CarChip software. This command is only available when you are viewing data loaded from a file or that has been downloaded from the data logger and saved. Print Setup The Print Setup command allows you to select a printer and to configure the printer options. Print Preview The Print Preview command shows how current window would look in a printed document.
Print Records Ending Range You can print groups of records from the Trip Log, Activity Log, Accident Log and Trouble Log by entering a starting and ending range in the Print Dialog box. To print a range of records: 1. Choose Print from the File menu. The Pring dialog box appears. 2. 3. 4. 5. Select Records in the Record range section of the dialog box. Enter a starting record number to be printed in the first edit box. Enter the ending range in the second edit box.
Serial Port You must select the correct serial port used to communicate with the CarChip data logger. To select the serial port: 1. Choose Serial Port from the Setup menu. The Setup / Serial Port dialog box appears. 2. Select the one of the listed serial ports or enter the name of the desired serial port. 3. Choose OK to save the new serial port selection. Choose Cancel to exit the dialog box and retain the previous serial port selection.
• Check "Normalize vertical axes to ___ MPH / KPH" to set the upper limit of the vehicle speed plot to speed of your choice. • You can change the speed used to normalize the axes by highlighting the current speed setting with your cursor and then entering the new speed. If not checked the upper limit of the vertical axes will be the maximum speed achieved by the vehicle during the current trip. 3. Choose OK to save the new plot options.
To show braking events in the plots: 1. Choose Plots from the Setup menu. The Setup / Plots dialog box appears. 2. Click on the check box next to Draw Braking Events to toggle the function on and off. A check indicates that the Draw Braking Events function has been enabled. 3. Choose OK to save the new plot setup. Choose Cancel to exit the dialog box and retain the previous plot setup. Choose Apply to make the change without exiting the dialog box.
Draw Speed Bands You can configure the Trip data plots to indicate your preset speed by enabling Draw Speed Bands in the Setup / Plots dialog box. • Speed bands are indicated by horizontal dotted lines. • The two intermediate speed bands are black dotted lines. • The maximum speed band is a red dotted line. • Use the CarChip / Set Speed Bands command to change your speed bands. To show speed bands in the plots: 1. Choose Plots from the Setup menu. The Setup / Plots dialog box appears. 2.
Normalize Vertical Speed Axes You can configure the Trip data plots to use the same vertical axes by enabling "Normalize vertical axes to ___ mph (kph, m/s)" in the Setup / Plots dialog box and entering the speed To show set the vertical axes in the vehicle speed plots: 1. Choose Plots from the Setup menu. The Setup / Plots dialog box appears. 2. Click on the check box next to "Normalize vertical axes" to toggle the function on and off. A check indicates that the function has been enabled. 3.
2. Click on the check box next to "Draw Plot Coordinates .... " to toggle the function on and off. A check indicates that the function is enabled. 3. If you want to have the plot coordinates displayed continuously, then disable this function. No check in the box indicates that the function is disabled.. 4. Choose OK to save the new plot setup. Choose Cancel to exit the dialog box and retain the previous plot setup. Choose Apply to make the change without exiting the dialog box.
New Unit System You can define a custom unit system for CarChip if you have specialized units-of-measure requirements. 1. Choose Units from the Setup menu. The Setup / Units dialog box appears. 2. Click New on the Setup / Units dialog box. The New Unit System dialog box appears. 3. In Name, type the name of the new unit system. 4. In Based On, select an existing unit system to base the new unit system on. 5.
5. Click OK to add the new unit system, or click Cancel to exit the dialog box without making any changes. The Setup / Units dialog box reappears. Note: You can modify the specific units used for the different parameters in the Setup / Units dialog box. Delete Unit System You can delete any custom unit system you have defined for CarChip. The standard unit system cannot be delete. To delete a custom unit system: 1. Choose Units from the Setup menu. The Setup / Units dialog box appears. 2.
Vehicle ID Use the Vehicle ID dialog box to enter, edit, or delete a vehicle name in the CarChip data base. To enter or edit a vehicle ID: 1. Choose Vehicle ID from the Setup menu. The Setup / Vehicle ID dialog box appears. 2. Use the scroll bar, if necessary to display the vehicle whose name you wish to change. 3. Double-click in the text-edit box containing the current name (or blank box if it is a new name), and edit or enter the vehicle name. 4. Choose OK to save any changes you made.
Vehicle ID VIN Column Each vehicle in the CarChip data base is primarily identified by the vehicle identification number (VIN). In some cases your CarChip will be able to read the VIN via the OBD II port, but not all manufacturers have implemented this feature. In most cases you will need to manually enter a VIN number for each vehicle, or other number by which you can uniquely identify each vehicle.
2. Use the scroll bar, if necessary to display the CarChip whose name you wish to change. 3. Double-click in the text-edit box containing the current name (or blank box if it is a new name), and edit or enter the CarChip name. 4. Choose OK to save any changes you made. Choose Cancel to exit the dialog box without saving any changes. CarChip Name Column Each CarChip data logger can be given a name which is used to identify the CarChip in the different reports available in the View Menu.
Miscellaneous You can configure the CarChip software to always clear the data logger memory after a download, to ask if you want to clear the data logger memory after a download, or to not clear the memory and not ask after a download. To set your clear memory options: 1. Choose Miscellaneous... from the Setup menu. The Setup / Miscellaneous dialog box appears. 2. Use the drop-down list to display your desired clear memory after download configuration. 3. Choose OK to save the clear memory option.
Download CarChip Data Use this command to download data from your CarChip data logger into your computer. To download data: 1. Choose Download CarChip Data from the CarChip menu. The Downloading Logs dialog box appears. 2. The dialog box disappears when the download is complete. 3. Choose Cancel only if you wish to abort the download before it is finished. Clear CarChip Memory? This message is displayed if you have configured the software to ask if you want to clear the memory after each download.
Time Difference Adjustment When your CarChip’s time and date setting are different than your computer’s time and date settings, you can choose to download the data logs using either the CarChip’s or the computer’s clock to date the records. You have the following options: 1. Use the drop-down list to select the CarChip clock to be used to time-stamp the downloaded data. Check Synchronize clocks if want the CarChip clock to be synchronized to the computer clock after the download. 2.
• • You can have the CarChip’s clock changed to match your computer clock by selected (checking) Synchronize clocks. Choose OK when you are ready to download or choose Cancel to exit the dialog without downloading your CarChip. Display CarChip Memory Use this command to show memory usage by the CarChip data logger. Note: This command is only available when a CarChip data logger is connected to your computer. 1. Choose Display CarChip Memory from the CarChip menu.
CarChip LED Modes The CarChip can be toggled between two LED Modes: Diagnostic and Disabled. Diagnostic Mode Diagnostic Mode enables the LED in the following manner: • Self-test Mode - Three rapid blinks indicates the initial hardware self-test is ok. • Communications Mode - Two rapid blinks per second until the CarChip successfully begins to communicate with a vehicle. • Data Mode - One blinks per second while the CarChip is communicating with a vehicle. • Sleep Mode - No blinks.
2. Enter the threshold speed for each of the first three speed bands. The fourth speed band consists of all speeds greater than the last threshold. 3. Select Default to use the software default threshold settings. The Default speed thresholds are: 45, 60, and 75 mph (US); 72, 97, and 121 kph (Metric); and 20.1, 26.8 and 33.5 m/s (S.I.). 4. Choose OK to save the new speed band settings. Choose Cancel to exit the dialog box and retain the previous settings.
Set Acceleration Thresholds Use the Set Accelerations Thresholds dialog box to enter the rates of acceleration that define hard acceleration and extreme acceleration. These thresholds help you monitor how hard the vehicle is being accelerated. Any time the car’s acceleration exceeds these set limits, the event is logged in the Trip Report. To set acceleration thresholds: 1. Choose Set Acceleration Thresholds... from the CarChip menu. The CarChip / Set Acceleration Thresholds dialog box appears. 2.
Set the Date and Time Here you can set the CarChip to the time and date of your computer. To set the clock: 1. Choose Set Clock from the CarChip menu. The CarChip / Set Clock dialog box appears. 2. Choose YES to set the clock on the CarChip to match the clock on your computer. Choose No to exit the dialog box and retain the CarChip’s previous clock settings.
• • • • • • • • • • • • • • • • • • • Intake Manifold Pressure Air Flow Rate Intake Air Temperature Timing Advance Fuel Pressure Fuel System Status Short Term Fuel Trim (B1) Short Term Fuel Trim (B2) Long Term Fuel Trim (B1) Long Term Fuel Trim (B2) O2 Sensor Voltage (B1, S1) O2 Sensor Voltage (B1, S2) O2 Sensor Voltage (B1, S3) O2 Sensor Voltage (B1, S4) O2 Sensor Voltage (B2, S1) O2 Sensor Voltage (B2, S2) O2 Sensor Voltage (B2, S3) O2 Sensor Voltage (B2, S4) Battery Voltage Sampling Interval Column Wh
2. For each parameter, you use the drop-down list to select a sampling interval. The supported sampling intervals are: 5, 10, 20, 30, and 60 seconds. 3. Choose OK to save the sampling interval. Choose Cancel to exit the dialog box and retain the previous settings. View Menu Commands Use the View Menu commands to view data downloaded from CarChip.
Trip Log Summary The Trip Log Summary shows basic trip information for each trip in the current CarChip database. From the Trip Log Summary view you can also select specific trips to see more detailed trip data. To view the Trip Log Summary: 1. Choose Trip Log from the View menu. The Trip Log Summary view appears. 2. You can’t close the summary view, but you can select another view to display, or delete the data from the summary view by selecting New in the File menu.
4. The screen shows the Trip Log Report view. 5. From the Report view you can use the right and left arrows to select the Plot and Table views of the trip record. 6. Select Comments for the record to either view or edit the comments.
Trip Log Plot View The Trip Log Plot view displays line graphs of the trip data. To view the Trip Log Plots: 1. Choose Trip Log from the View menu. The Trip Log Summary view appears. 2. Click on the Summary drop-down list box to display a list of all trips recorded in the Trip Log. The dropdown list box always begins with the Summary view, with each recorded trip listed in order below the Summary. 3.
Trip Log Plot View Options You have the following options when viewing plots in the Trip Log: Zoom Right-Click Menu Options Unzoom Copy As Save As Speed Bands Braking Events Acceleration Events Line Plot Plot Coordinates Normalize Axes Help F1 37
Trip Log Table View The Trip Log Table view displays the trip data in columns, one row for each record. To view the Trip Log Table: 1. Choose Trip Log from the View menu. The Trip Log Summary view appears. 2. Click on the Summary drop-down list box to display a list of all trips recorded in the Trip Log. The dropdown list box always begins with the Summary view, with each recorded trip listed in order below the Summary. 3.
Trip Log Comments You can view or add comments to each individual trip record. To display or edit the comments for a record: 1. Use the View Menu to locate the record you wish to add comments to. 2. Select the Comments button for that record. The Comments dialog box is displayed. 3. If you wish, you can enter comments in the text window, or edit the existing comments. 4. Select OK to save the comments or select Cancel to exit the dialog box without changing the existing comments.
Activity Log Event View The Activity Log Event view displays the activity information including any comments. To view the Activity Log Event: 1. Choose Activity Log from the View menu. The Activity Log Summary view appears. 2. Click on the Summary drop-down list box to display a list of all events recorded in the Activity Log. The drop-down list box always begins with the Summary view, with each recorded event listed in order below the Summary. 3.
Activity Log Comments You can view or add comments to each individual activity record. To display or edit the comments for a record: 1. Use the View Menu to locate the record you wish to add comments to. 2. Select the Comments button for that record. The Comments dialog box is displayed. 3. If you wish, you can enter comments in the text window, or edit the existing comments. 4. Select OK to save the comments or select Cancel to exit the dialog box without changing the existing comments.
Accident Log Stop View The Accident Log Report view shows the vehicle speed for the 20 seconds prior to a stop sudden enough to register as either a hard braking event or an extreme braking event. To view the Accident Log Report: 1. Choose Accident Log from the View menu. The Accident Log Summary view appears. 2. Click on the Accident Log drop-down list box to display a list of all stops recorded in the Accident Log.
Accident Log Plot View The Accident Log Plot View displays a line graph of the vehicle speed data recorded during the 20 seconds prior to the stop. To view the Accident Log Plots: 1. Choose Accident Log from the View menu. The Accident Log Summary view appears. 2. Click on the Summary drop-down list box to display a list of all stops recorded in the Accident Log. The drop-down list box always begins with the Summary view, with each recorded stop listed in order below the Summary. 3.
Accident Log Plot Options You have the following options when viewing plots in the Accident Log: Plot Options Zoom Right-Click Menu Options Unzoom Copy As Save As Line Plot Plot Coordinates Normalize Axes Help F1 44
Accident Log Table View The Accident Log Table view displays the vehicle speed over the 20 seconds prior to the stop. To view the Accident Log Table: 1. Choose Accident Log from the View menu. The Accident Log Summary view appears. 2. Click on the Summary drop-down list box to display a list of all stops recorded in the Accident Log. The drop-down list box always begins with the Summary view, with each recorded stop listed in order below the Summary. 3.
4. The screen shows the Accident Log Table view. 5. From the Table view you can use the right and left arrows to select the Plot and Report views of the stop record, or, just click the Plot or Report button. Accident Log Comments You can view or add comments to each individual accident record. To display or edit the comments for a record: 1. Use the View Menu to locate the record you wish to add comments to. 2. Select the Comments button for that record. The Comments dialog box is displayed. 3.
Trouble Log Views The Trouble Log View displays all the problems detected by your CarChip. Choose a topic below to learn more about the Trouble Log Summary and the Trouble Log Problem View. Trouble Log Summary View The Trouble Log Summary shows all the activity recorded for the currently loaded CarChip database. From the Trouble Log Summary view you can also select specific events to view individually. To view the Trouble Log Summary: 1. Choose Trouble Log from the View menu.
3. Select one of the problem records listed in the drop-down list by placing the cursor over it to highlight the event, then clicking with the left mouse button. You can also browse through all detected problems by using the up and down cursor keys. 4. The screen shows the Trouble Log Problem view. The Problem View includes a "freeze frame" snapshot of the vehicle data at the time the problem was detected. From the Problem view you can select Comments to either view or edit the comments for the problem.
OBDII Freeze Frame The Trouble Log Problem View shows the data and time the problem was detected, the trouble code, and also a description of the problem. Some vehicles will also include a detailed OBDII freeze frame, which reports the vehicle status at the time the problem was detected.
Help Menu Commands CarChip Help Opens the CarChip Help window. You can also access CarChip help by pressing the F1 key or by right-clicking the mouse and selecting Help from the right-click menu. These methods will bring up help topics related to the current display in the software window. About CarChip Provides version information for the hardware and software.
CarChip Specifications General Operating Temperature Primary Power, Connected to Vehicle Primary Power, Connect to Computer Backup Power Memory Memory Storage Time & Date Vehicle Interface Computer Interface Computer Cable Length Indicator Lamp Dimensions Weight OBDII Compatibility Supported Protocols Protocols Not Supported as of December 2002 Supported US Vehicles Supported European Vehicles Vehicle Support Elsewhere Software Requirements Operating System Disk Space Display Data Display Trip Log Summary
Accident Log Summary View (CarChipE/X only) Accident Log Stop View (CarChipE/X only) Accident Log Plot View (CarChipE/X only Accident Log Table View (CarChipE/X only) Trouble Log Summary View Trouble Log Problem View Date and time, CarChip ID, maximum speed in log Date and time, CarChip ID, maximum speed in log, comments Date and time, line graph of vehicle speed for 20 seconds prior to stop. Vehicle speed for each second of the 20 seconds prior to the stop.
Index About CarChip............................................................................................................................................... 48 Accident Log Plot View............................................................................................................................ 40, 41 Accident Log Report View ....................................................................................................................... 40, 41 Accident Log Summary View ..............
G ............................................................................................................................................................ 29, 30 Hard Acceleration Threshold......................................................................................................................... 30 Hard Braking ........................................................................................................................................... 29, 40 Hard Braking Threshold ...........
Table ........................................................................................................................................7, 33, 37, 41, 43 Table button .................................................................................................................................................. 37 Technical Support ......................................................................................................................................... 48 E-mail .......................