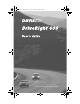
DR600B Cover D004.
DR600B Cover D004.fm Page 2 Wednesday, March 26, 2003 9:52 AM One Year Limited Warranty We warrant our products to be free of defects in material and workmanship for one year from date of original purchase. We make every effort to carefully manufacture our products to the highest standards of quality. Occasionally, however, parts may be missing, defective, or damaged. If you have a defective part, please call 1-510-732-7814 for authorization before returning the item for repair or replacement.
TABLE OF CONTENTS INTRODUCTION TO THE DRIVERIGHT 600 ......................................................... 1 A Note About the Concept of “Trips“ ...........................................................................1 A Word About Safe Use ..............................................................................................1 DriveRight Vehicle Management Software .................................................................2 USING THE DRIVERIGHT 600 ....................................
MISCELLANEOUS INFORMATION ..................................................................... 23 Accident Log .............................................................................................................23 Tamper Log ..............................................................................................................24 Battery Operation ......................................................................................................24 Battery Life ............................
DR600 UG Rev B D008.fm Page 1 Thursday, April 17, 2003 7:17 AM INTRODUCTION TO THE DRIVERIGHT 600 The DriveRight 600, in conjunction with the DriveRight Vehicle Management Software, provides advanced vehicle safety and use monitoring capabilities as well as comprehensive fleet management capabilities. This manual explains how to use the DriveRight 600 display unit to view information.
DR600 UG Rev B D008.fm Page 2 Thursday, April 17, 2003 7:17 AM DriveRight Vehicle Management Software The DriveRight Vehicle Management Software enables more detailed tracking of vehicle usage and access to some additional features of the DriveRight 600. The following is a list of the DriveRight 600 features which may only be accessed using the software.
DR600 UG Rev B D008.fm Page 3 Thursday, April 17, 2003 7:17 AM USING THE DRIVERIGHT 600 This section briefly describes the use of the DriveRight 600 display unit. The use of the four buttons (PLUS, MINUS, MODE, SET/ CLEAR) and the sequence of data screens and settings screens is explained. Descriptions of the information and options available from each screen are explained separately in “Data Screens” starting on page 10 and “Settings Screens” starting on page 18.
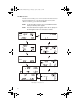
DR600 UG Rev B D008.fm Page 4 Thursday, April 17, 2003 7:17 AM The Data Screens The data screens enable you to view most of the information stored by the DriveRight 600. To cycle through the data screens (in the order shown below), press and release MODE. NOTE: To view the settings screens, press and hold MODE until the Security Code Entry screen appears. NOTE: The GPS Latitude and Longitude screens are not displayed if the DriveRight console is not connected to a vehicle. DAY.
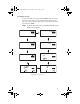
DR600 UG Rev B D008.fm Page 5 Thursday, April 17, 2003 7:17 AM The Settings Screens To access the settings screens, press and hold MODE while viewing any of the data screens. After a few seconds, the Security Code screen will appear. To cycle through the settings screens (in the order shown below), press and release MODE. NOTE: To view the data screens, press and hold MODE until the Current Readings screen appears. YEAR CODE SETTINGS Year Entry SETTINGS Security Code DAY.
DR600 UG Rev B D008.fm Page 6 Thursday, April 17, 2003 7:17 AM CALIBRATING THE DRIVERIGHT 600 You must calibrate the unit before it will report the correct speed, distance, deceleration, and acceleration. Calibration adjusts the unit to work properly with your vehicle’s VSS signal or with the vehicle’s differential and tire size.
DR600 UG Rev B D008.fm Page 7 Thursday, April 17, 2003 7:17 AM . Speed Reading MPH km/h SPEED SETTINGS DISTANCE MILES Km Distance Reading Calibration Speed Calibration Screen 3. Drive the vehicle until you reach 40 km/h (25 MPH) and keep the vehicle steady at that speed. 4. Once the vehicle is moving steadily at the calibration speed, press and hold SET/CLEAR. The word CAL appears in the top right of the display when you press SET/CLEAR.
DR600 UG Rev B D008.fm Page 8 Thursday, April 17, 2003 7:17 AM 6. Once the calibration is complete, drive the vehicle and compare the vehicle’s speedometer to the DriveRight 600’s speed display. Be aware that the DriveRight 600 responds to changes in speed faster than most vehicles’ speedometers. To accurately compare, you must drive steadily at a speed for a short time. 7. If necessary, “fine tune” the calibration by pressing PLUS or MINUS.
DR600 UG Rev B D008.fm Page 9 Thursday, April 17, 2003 7:17 AM 3. Make sure you have a new trip started on the DriveRight 600 (i.e., the distance travelled is 0. To forcibly start a new trip, log out (see page 14 for details). 4. Drive the vehicle for at least 32 km (20 miles). The further you drive, the more accurate your calibration. 5. When you finish driving, compare your vehicle’s trip meter reading to the distance travelled reading on the DriveRight 600.
DR600 UG Rev B D008.fm Page 10 Thursday, April 17, 2003 7:17 AM DATA SCREENS The following section explains all the information and options available in the various data screens. In addition to the options listed in the individual sections below, in every screen you have the following two options: ❏ Move to the next Data Screen Press and release MODE. ❏ View the Settings Screens Press and hold MODE.
DR600 UG Rev B D008.fm Page 11 Thursday, April 17, 2003 7:17 AM NOTE: Although you may specify the type of trip using the DriveRight 600 display unit, you must have the software to view trip type information. To change the type of trip, press and hold MINUS. The trip type screen will appear--do not release MINUS. MILES Trip Type Screen As long as you hold MINUS, the DriveRight 600 will cycle through the letters representing the various trip types: b = Business, P = Personal, C = Commute, O = Other.
DR600 UG Rev B D008.fm Page 12 Thursday, April 17, 2003 7:17 AM Driver ID Code When using the DriveRight 600 to monitor the driving of multiple drivers, assign each driver a unique 4-digit ID code. Before driving the vehicle, the driver must enter his or her ID code. The DriveRight 600 stores the driver ID code with the rest of the trip information, which enables you to view information for each individual driver.
DR600 UG Rev B D008.fm Page 13 Thursday, April 17, 2003 7:17 AM ❏ Log Out To “log out” press and hold SET/CLEAR for 2 seconds, until the code resets to 0000. As soon as a driver logs out, the current trip is ended and data for that trip stored in the DriveRight 600’s memory. Note that you may not log out when the vehicle is in motion. Two Digital Inputs Two digital inputs allow you to track the operation of lights or other electrically powered accessories on the vehicle.
DR600 UG Rev B D008.fm Page 14 Thursday, April 17, 2003 7:17 AM You have the following option from the Trip Start/End Log Screen: ❏ Page Through Stored Trip Information Press MINUS to page backward through stored trip information. Press PLUS to page forward through stored trip information. Hold the button down to increase the speed at which the DriveRight 600 pages. When you reach the first or last stored trip, the DriveRight 600 will no longer page in that direction.
DR600 UG Rev B D008.fm Page 15 Thursday, April 17, 2003 7:17 AM Trip Acceleration/Deceleration Log Screen The Trip Acceleration/Deceleration Log Screen shows the number of times the set acceleration and deceleration limits were exceeded during each trip currently stored in the DriveRight 600’s memory. (Each time the limit is exceeded, 1 “count” is recorded, regardless of the amount of time for which the limit was exceeded.
DR600 UG Rev B D008.fm Page 16 Thursday, April 17, 2003 7:17 AM GPS Latitude and Longitude Position Screens The GPS Position Screens alternate between Latitude and Longitude to show your current position, speed, and direction. NOTE: The GPS screens are not displayed if the DriveRight is not connected to a vehicle. NOTE: The GPS may take up to several minutes to start tracking a new trip, depending on the overhead obstructions surrounding the vehicle.
DR600 UG Rev B D008.fm Page 17 Thursday, April 17, 2003 7:17 AM Odometer Screen The Odometer screen displays the vehicle’s odometer reading which must be set from the DriveRight Vehicle Management Software. The odometer reading is spread across the two digit registers at the bottom of the screen and may take some getting used to (the odometer reading in the screen shown below is 5,812.2 km). DISTANCE Km Odometer Reading (5,812.
DR600 UG Rev B D008.fm Page 18 Thursday, April 17, 2003 7:17 AM SETTINGS SCREENS The following section explains all the information and options available in the various settings screens. In addition to the options listed in the individual sections below, in every screen you have the following two options: ❏ Move to the next Settings Screen Press and release MODE. ❏ View the Data Screens Press and hold MODE.
DR600 UG Rev B D008.fm Page 19 Thursday, April 17, 2003 7:17 AM NOTE: ❏ If the entered code is correct, the clear all log data screen appears when you press MODE. If the entered code is not correct, the word NO appears on the display. You may attempt to enter the correct code five times before the unit returns you to the Current Readings screen and activates the tamper indicator, if the tamper indicator is enabled.
DR600 UG Rev B D008.fm Page 20 Thursday, April 17, 2003 7:17 AM You have the following option from the Clear Log Screen: ❏ Clear all Log Data Press and hold SET/CLEAR. The word CLR (clear) appears in the display to indicate that the unit is preparing to clear all log data. To protect against accidental clearing of data, you must press and hold SET/CLEAR for 3 seconds before the unit clears data.
DR600 UG Rev B D008.fm Page 21 Thursday, April 17, 2003 7:17 AM You have the following option from the Alarm On/Off Screen: ❏ Toggle the Alarm Setting To toggle the alarm setting from On to Off (or vice versa), press and release SET/CLEAR. Each time you press SET/ CLEAR, the display changes to read ON or OFF, depending on the alarm’s status. Calibration Screen The Calibration screen enables you to calibrate the DriveRight 600 for your vehicle. See “Calibrating the DriveRight 600” on page 6 for details.
DR600 UG Rev B D008.fm Page 22 Thursday, April 17, 2003 7:17 AM Time Entry The Time Entry screen allows you to set the time and to select the format (12 hour or 24 hour) in which you want time displayed. AM SETTINGS Time Entry Screen You have the following options from the Time Entry Screen: ❏ Set the Time Use PLUS and MINUS to set the time. If you are displaying time in the 12 hour format, remember to choose either AM or PM.
DR600 UG Rev B D008.fm Page 23 Thursday, April 17, 2003 7:17 AM You have the following options from the Date Entry Screen: ❏ Set the Date Use PLUS and MINUS to set the date. ❏ Change the Time Display Format Press and release SET/CLEAR until the Mo:Day or Day.Mo segment is flashing. Press PLUS to toggle between the two segments. When the desired format appears in the display, stop. The segment displayed when you press MODE to exit this screen sets the format in which the date will be displayed.
DR600 UG Rev B D008.fm Page 24 Thursday, April 17, 2003 7:17 AM Tamper Log The following actions will be logged as a tamper attempt: ❏ The DriveRight 600 is unplugged (loses power) ❏ Five incorrect entries in a row for the Security Code ❏ DriveRight is plugged back into the car (Tamper is logged but not displayed on the console) ❏ DriveRight is rebooted When a tamper is logged, the word “TAMPER” appears on all screens if the tamper light has been enabled using the software.
DR600 UG Rev B D008.fm Page 25 Thursday, April 17, 2003 7:17 AM NOTE: If you notice that the LCD is fading when running on battery power, it means your battery power is low. You should replace your battery as soon as possible. To install a new battery, insert the battery as shown below.
DR600 UG Rev B D008.fm Page 26 Thursday, April 17, 2003 7:17 AM Battery Life When removed from a vehicle, the DriveRight unit taps into its own battery for power (instead of relying on the vehicle’s battery). On the unit’s battery alone, a unit will operate for 260 hours or, in sleep mode for 4 months. The life of the unit’s battery depends on your download schedule. For example, if you take the unit out of the vehicle 5 days a week, 8 hours a day, the unit’s battery can last up to 16 months.
DR600 UG Rev B D008.fm Page 27 Thursday, April 17, 2003 7:17 AM TROUBLESHOOTING GUIDE While the DriveRight 600 is designed to provide years of trouble-free operation, occasional problems may arise. If you are having a problem with your unit, please check the following guide before calling the factory. You will be able to solve many of the problems yourself. If, after checking this guide, you are still unable to solve the problem, please call the factory at 1-510-732-7814 for further instructions.
DR600 UG Rev B D008.fm Page 28 Thursday, April 17, 2003 7:17 AM ❏ My speed reads zero while driving. There could be a number of things wrong. Make sure the DriveRight 600 is plugged in. Make sure the DriveRight 600 is calibrated. Make sure the speed sensor is within 1016 mm (3/8"- 5/8") of the magnet. Make sure the unit is not running on battery power (see “Battery Operation” on page 24). If it is check the fuse in the power line.
DR600 UG Rev B D008.fm Page 29 Thursday, April 17, 2003 7:17 AM Contacting Davis Technical Support If you have questions, or encounter problems installing or operating your DriveRight 600, please contact Davis Technical Support. Most questions can be answered while you’re on the phone. Sorry, we are unable to accept collect calls. NOTE: Please do not return items to the factory for repair without prior authorization. ❏ (510) 732-7814 – Monday through Friday, 7:00 a.m. to 5:30 p.m. Pacific Time.
DR600 UG Rev B D008.fm Page 30 Thursday, April 17, 2003 7:17 AM TECHNICAL SPECIFICATIONS Speed Displays current speed in MPH or km/h. Records maximum speed for each trip Records total time in which speed exceeded set limit for each trip Accuracy ±1% Acceleration and Deceleration Displays current acceleration in g’s (an acceleration of 22 MPH/sec. or 35 km/h/sec.). Records number of times acceleration exceeded specified limit for each trip.
DR600 UG Rev B D008.fm Page 31 Thursday, April 17, 2003 7:17 AM TECHNICAL SPECIFICATIONS Size 5.25” x 2.25” x 0.86” (132 mm x 57 mm x 22 mm) LCD display size: 3.20” x 1.30” (81 mm x 33 mm) Display Mounting Options Visor clip for mounting on visor or door pockets. Double-sided tape for mounting on dashboard and other surfaces. Velcro with pressure-sensitive adhesive for mounting on dashboard and other surfaces. Mounting bracket with right angle adapter for special mounting needs.
DR600 UG Rev B D008.fm Page 32 Thursday, April 17, 2003 7:17 AM 3465 Diablo Avenue, Hayward, CA 94545-2778 U.S.A. 510-732-9229 • Fax: 510-732-9188 E-mail: info@davisnet.com • www.davisnet.