WeatherLink Vantage Pro® ® For and Vantage Pro2 Getting Started Guide TM
FCC Part 15 Class B Registration Warning This equipment has been tested and found to comply with the limits for a Class B digital device, pursuant to Part 15 of the FCC Rules. These limits are designed to provide reasonable protection against harmful interference in a residential installation. This equipment generates, uses and can radiate radio frequency energy and, if not installed and used in accordance with the instructions, may cause harmful interference to radio communications.
Welcome to WeatherLink® The data logger and WeatherLink® software let you connect a Davis Vantage Pro®, Vantage Pro2™ console, or Weather Envoy™ to your personal computer so you can store, view, plot, analyze, export, and print weather data collected by the weather station. Contents of Package The WeatherLink software is available with two connection types, USB and serial. Verify which connection type you need.
Software Installation WeatherLink with a USB connection is compatible with computers running the following platforms: 98 SE, ME, NT 4.0, 2000, or XP. Note: WeatherLink is not compatible with the 64-bit version of Windows XP. The amount of space necessary for the data files depends on the archive interval. Database files containing data stored at a 30-minute archive interval require approximately 36K of disk space per month of data. The file size grows depending on the archive interval.
Software Installation A series of dialog boxes displays, prompting you to complete the WeatherLink installation. 2. Review the Product Features Summary dialog box and click Next. The License Agreement dialog box displays. 3. Review the license agreement and click Next. The Choose Destination Location dialog box displays. 4. Select the default location to install WeatherLink or find another location by clicking Browse. 5. Click Next to accept the destination location.
Software Installation The Select Components dialog box displays a list of the components that are preselected for installation with WeatherLink. The Components List check box contains seven items, each with varying levels of importance: • Application.exe (required) — The executable component needed to run the WeatherLink software. This must be installed with WeatherLink to ensure that the software runs.
USB Connection Installation reinstall the USB driver. See “Updating USB Drivers” on page 16 for more information. USB Connection Installation Complete the local USB connection by using the instructions below: 1. Locate the console or Weather Envoy that will receive the WeatherLink USB connection. 2. For consoles only: Enter the console’s Setup Mode by pressing and holding DONE, then pressing the down arrow (-).
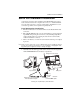
USB Connection Installation 6. Insert the USB - Mini B connector on the USB connector of the USB data logger. The connection between the console and the computer can be extended up to 16' (5 m) using a USB-to-USB connector cable. Note: Do not attempt to use more than a 16' extension cable, or the data logger may have difficulty communicating with the computer. 7. Check the baud rate setting on the console. The default value for the baud rate setting is 19200.
USB Connection Installation Serial Port Hardware Installation A serial port connection can be installed so that WeatherLink uses a direct, local connection between the computer and console, or so that WeatherLink uses a modem connection to a remote weather station. Installation for each connection type differs, and is explained separately below. Local Connection Installation 1. Find the weather station console that will receive the WeatherLink serial connection. 2.
USB Connection Installation 5. Guide the data logger cable through the square slot below the receptacle. 6. Reinstall the batteries and reattach the power adapter, if present. The console beeps three times; each beep occurs within one second of the others. The Weather Envoy beeps twice, or three times if connected to a computer. 7. Replace the battery cover so that the data logger cable exits through the square slot. 8.
Remote Modem Installation • Use the fastest baud rate your computer can handle. 19200 is the fastest baud rate available and is the default setting on the console. • Press DONE when the correct baud rate displays on the console screen. Note: The data logger does not require a constant connection with a computer to continue logging and storing data.
Remote Modem Installation Note: Do not turn the modem on at this time. The cable connecting the data logger to the modem is 8' (2.4 m) long. Use a 40' (12 m) standard 4-conductor extension cable to extend the connection between the console and modem. Do not attempt to use more than 40' of extension cable, or the data logger may have difficulty communicating with the computer. 3. Plug the external modem into the phone jack. 4.
Remote Modem Connection Notes Note: The default value for the baud rate setting is 19200. If you have a Weather Envoy, this value should remain the same in the WeatherLink software. The baud rate settings screen displays only if the data logger has been installed. The baud rate setting on the console must be same as that set in the WeatherLink software. Use the up (+) and down arrows (-) to change the baud rate setting, if needed. Press and hold DONE to return the console to the current weather mode.
Running the Software By default, WeatherLink disconnects from the modem after one minute without any communication with the station. Use the Communications Port dialog box in the Setup menu of WeatherLink to change this default value. (See the WeatherLink help files for more information.) Note: WeatherLink does not hang up the phone line if the bulletin, summary, or other windows receiving real-time data from the console are active.
Communication Port Settings set up and configure your station by separately selecting all of the necessary setup options from the Setup menu. A Walkthrough option is included in the Setup menu that allows you to access the Walkthrough at any time. Note: When necessary, the software automatically dials a phone modem station. By selecting the Walkthrough process, the software displays a series of dialog boxes.
Database Conversion 2. Click Auto Detect. The program searches for the port that the console is connected to. When the correct connection is found, the following dialog box displays: 3. Click OK. The Communications Port dialog box displays with the correct port selected. 4. Click OK to select the port and exit the dialog. Updating Previous Versions Starting with Version 5.2, WeatherLink stores additional sensor data in the weather database.
Database Conversion Note: WeatherLink does not import database files created by versions of WeatherLink 5.2 or later using the Import Database File option. The Import Database Files option imports only database files created by WeatherLink version 5.1 or earlier. To import data files from WeatherLink 5.2 to 5.4, copy the .wlk file directly into your weather station directory. 1. Open WeatherLink 5.2 or later and select Import Database Files from the File menu. The Browse dialog box displays. 2.
Updating USB Drivers 9. Individually select and delete each record in the data base that is dated after the earliest record in your temporary database from the Browse Window. Note: WeatherLink downloads data only for dates and times not already in the database. Deleting records allows it to download new data. 10. Select Download in the File menu or click on the Download icon to download data from the data logger. 11.
Communications Problems 7. Click Uninstall to delete the version of the driver. 8. Disconnect the data logger from the computer. 9. Locate and run the PreInstaller.exe file under the WeatherLink directory (example file directory: C:\WeatherLink\USB_Drivers_4.28x). The new driver successfully installs itself. Troubleshooting Guide The following section answers some of the most commonly asked questions about WeatherLink. Please consult this guide and the online help files before contacting Technical Support.
Communications Problems • Check the Baud Rate setting on the console and in the Communication Port dialog box in the software. Make sure they have the same number. Enter the console’s Setup Mode by pressing and holding DONE and then pressing the down arrow (-) on the console. • Scroll through the setup choices by pressing BAR until you reach the Baud Rate screen. This screen appears only if the data logger is plugged into the console. • Test the serial port using the provided loopback connector.
Program Problems 4. Click Loopback. The software searches all standard ports and displays the COM port number where the loopback connector is located. The correct COM port is automatically selected in the Communications Port dialog box. If the loopback connector is not found on any COM port, your serial port may not be working.
Program Problems V No wind direction reading (or dashes instead of a reading) appears in my database. Be aware that if there is no wind speed when the direction is being sampled, wind direction is not recorded. During intervals with very little wind speed, no direction may be recorded. Note: Because high wind speed is sampled more often, it is possible to have a high wind speed but no wind speed or direction. V WeatherLink says “No new data to download” but I know there’s data there.
Contacting Davis Technical Support Contacting Davis Technical Support If you have questions about the software, or encounter problems installing or using the software, please contact Davis Technical Support. Most questions can be answered on the phone. Note: Sorry, we are unable to accept collect calls. Phone Support: (510) 732-7814 – Monday – Friday, 7:00 a.m. – 5:30 p.m. Pacific Time. (510) 670-0589 – Technical Support Fax E-mail Support: support@davisnet.com – Technical Support e-mail. nfo@davisnet.
Toolbar Icons Open Station Bulletin Window Download Plot Window Strip Chart Window Yearly Rainfall Database Window Alarm Indication Online (Hang Up) This Month’s NOAA Summary View Help Print Window Exit Program Hot Keys Main Program Window Strip Chart Window Ctrl-A. . . . . . Set Alarms ESC . . . . . . . Halt Redraw Ctrl-B. . . . . . View Bulletin Ctrl-M . . . . . Make Default Ctrl-C. . . . . . Station Configuration Ctrl-P. . . . . . Print Strip Chart Ctrl-G. . . . . .