GETTING STARTED GUIDE Envoy8X ™ R ! "#$# # % &' % # #(
FCC Part 15 Class B Registration Warning This equipment has been tested and found to comply with the limits for a Class B digital device, pursuant to Part 15 of the FCC Rules. These limits are designed to provide reasonable protection against harmful interference in a residential installation. This equipment generates, uses, and can radiate radio frequency energy and, if not installed and used in accordance with the instructions, may cause harmful interference to radio communications.
Introduction TM Envoy8X allows you to store, view and manipulate a vast array of weather data on your PC. It can receive data from up to eight different transmitters, including wireless Vantage Pro2 (6152 & 6153), Vantage Pro2 Plus (6162 & 6163), and Vantage Vue® (6250) sensor suites; wireless Leaf Wetness and Soil Moisture Stations (6345); wireless Temperature and Temperature/Humidity Stations (6372 & 6382); as well as many third-party transmitters; in any combination.
Data Logger Requirements • Davis WeatherLink® USB or serial version (sold separately) Note: A WeatherLink data logger is required. You may choose to install WeatherLink software and import the Envoy8X database into WeatherLink. However, WeatherLink software cannot display all the data Envoy8X can log. MS Excel® is required to use some export features of Envoy8X. MS Access is not required for data download to an Access database.
Before You Install Envoy8X Install the transmitting stations you will be using. Make sure that each transmitter has a unique Transmitter ID (TX ID). (The factory default on all transmitters is TX ID 1.) Refer to the transmitting station manual for information on setting or changing the Transmitter ID. You will need to know the Transmitter ID and transmitting station type (such as Vantage Pro2 ISS or Leaf Wetness & Soil Moisture/ Temperature) when you configure the Envoy8X.
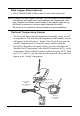
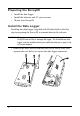
Preparing the Envoy8X • • • Install the data logger Install the batteries and AC power source Mount your Envoy8X Install the Data Logger Installing the data logger (supplied with WeatherLink) is the first step in preparing the Envoy8X to transmit data to the software. CAUTION: Plugging or unplugging the data logger while power is applied to the Envoy8X can lock up or damage the logger. The WeatherLink data logger must be installed before you install the batteries or plug in the AC power adapter. 1.
2. Carefully insert the data logger (Serial or USB) into the connector slot, making sure to push the data logger firmly into place. Serial Data Logger Data Logger Cable Channel USB Data Logger Data Logger Cable Channel Inserting the Serial or USB data logger into the Envoy8X 3. Rejoin the case halves, making sure the data logger cable passes through the cable channel. 4. Fasten using the three screws you removed in step 1.
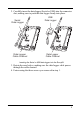
Install or Replace the Batteries Note: Before installing batteries and/or AC adapter, make sure the data logger is already installed. If replacing batteries, see below. 1. Remove the battery cover on the back of the Envoy8X case by pressing on the arrow embossed on the cover and sliding the cover away from the case. 2. Insert three AA-cell batteries, negative terminal (flat side) first. The Envoy8X emits two beeps if the start-up test is successful.
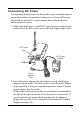
Connecting AC Power The operating battery power for Envoy8X is up to 5 months, depending on the number of transmitters being received. Envoy8X is supplied with an optional AC power adapter that can be used as an addtional power source. 1. Make sure data logger is installed. Locate the power adapter jack on the end of the Envoy case next to the data logger output cable. AC Power Jack Envoy8 X R AC Power Adapter To Computer Power Adapter Plug 2.
Mount Your Envoy8X You can place your Envoy8X on your desktop, install it on a wall near your computer, or install it with the optional Multi-Purpose Shelter (7728). Here are some guidelines for placing your Envoy8X. Envoy8X Location Place the Envoy8X in a location where it is easily accessible and can be easily connected to a computer. For more accurate readings: • Avoid placing the Envoy8X in direct sunlight. This may cause erroneous inside temperature and humidity readings and may damage the unit.
For better reception over greater distances or for weaker signals, consider using a Wireless Repeater (#7626 or 7627) or Long-Range Repeaters (#7653 or 7654) to strengthen the signal or increase the distance between your transmitters and Envoy8X. Wall Mounting the Envoy8X 1. Use the provided wall mounting template on the next page as an example of hole spacing and alignment when installing your Envoy8X. 2.
6. Slide the keyholes on the back of the case over the two screw heads. #6 X 1" Pan-Head Screws Envoy8 X Local Computer Installation USB Connection Locate a free USB port on your computer and connect the USB connector of the 8’ cable to the port, and connect the Mini-B connector to the data logger. The connection between the Envoy8X and the computer can be extended up to 16' (5 m) by replacing the cable with a Mini-B-to-USB connector cable.
Serial Port Connection 1. Locate a free serial port on the back of your computer and connect the blue DB-9 adapter to the port, then connect the the 8’ cable to the adapter. 2. Plug the short cable coming from the data logger into the 8' cable. The connection between the Envoy8X and the computer can be extended up to 40' (12 m) using a Davis Standard 4-Conductor Cable, product number 07876-040.
Software Installation and Setup Before You Install the Software Before you run Weather Data Transfer Utility for Envoy 8X for the first time, you must first decide which database to use. Here are some basic considerations for selecting your database: • MS Access is included with Envoy8X software and requires no additional purchase or setup to use. Access is the easiest to use and is recommended for single-user installations. The maximum size for an Access database is 2 gigabytes.
Installing Weather Data Transfer Utility for Envoy8X Software The following installation was completed in a Windows 7 operating system. The process may vary depending on your operating system and the installation type. 1. Insert the CD. If the install program does not appear automatically, run Setup.exe from the CD. 2. Click Next in the Welcome dialog box. 3. Read the License Agreement and click Yes in the dialog box. 4. The Destination Folder dialog box displays. 5.
Using Your Software The first time you use the software, you will set up the database and add your Envoy8X, and configure the transmitting stations. You should refer to the copious Help files for instructions on each of these steps. You can access Help by clicking the Help menu command, by clicking the Help button that appears on most dialog boxes, or by pressing F1 on your keyboard.