Vantage Pro2™ Weather Envoy Manual For Vantage Pro2™ , Vantage Pro2 Plus™ , and Vantage Vue Weather Stations ® Davis Instruments, 3465 Diablo Avenue, Hayward, CA 94545-2778 U.S.A. • 510-732-9229 • www.davisnet.
Welcome to the Weather Envoy! . . . . . . . . . . . . . . . . . . . . . . . . . . . 1 Preparing the Envoy . . . . . . . . . . . . . . . . . . . . . . . . . . . . . . . . . . 2 Install the Data Logger . . . . . . . . . . . . . . . . . . . . . . . . . . . . . . . . 2 Install the Batteries . . . . . . . . . . . . . . . . . . . . . . . . . . . . . . . . . . . 5 Mount Your Weather Envoy . . . . . . . . . . . . . . . . . . . . . . . . . . . 8 Local Computer Installation . . . . . . . . . . . . . . . . . . . . . .
Welcome to the Weather Envoy! The Davis Instruments’ Weather Envoy® provides a way of getting weather data from your Vantage Pro2™ or Vantage Vue weather station into your Windows XP, Vista, or 7; or Macintosh (OS X) computer using our WeatherLink® software. The Weather Envoy includes the data collection and logging functions of the Vantage consoles, but in a smaller package that can be placed next to your computer, or in a field installation.
Hardware Installation Hardware Installation The Weather Envoy can be installed and connected to a computer via USB, serial or remote connection to a computer via a modem. It can also be connected via a router using WeatherLink IP (# 6555). Local Connection Windows Computer Requirements WeatherLink is compatible with computers using a USB, serial port or IP connection running the following platforms: Windows XP, Vista, or 7.
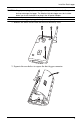
Install the Data Logger CAUTION: Plugging or unplugging the data logger while power is applied to the Envoy can lock up or damage the logger. The WeatherLink data logger must be installed before you install the batteries or plug in the AC power adapter. Note: Make sure the logger is plugged in firmly and completely. 1. Remove the three screws from the back of the Envoy case. 2. Separate the case halves to expose the data logger connector.
Install the Data Logger 3. Carefully insert the data logger (Serial, USB or IP) into the connector slot, making sure to push the data logger firmly into place. USB Data Logger Serial Data Logger Data Logger Cable Channel Data Logger Cable Channel WeatherLinkIP Data Logger Data Logger Cable Channel Inserting the Serial, USB or IP data logger into the Envoy 4. Rejoin the case halves, making sure the data logger cable passes through the cable channel. 5.
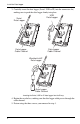
Install the Batteries Install the Batteries 1. Find the battery cover on the back side of the Envoy case. 2. Remove the battery cover by pressing on the arrow embossed on the cover and sliding the cover away from the case. 3. Insert three AA-cell batteries, negative terminal (flat side) first. The Envoy emits two beeps if the start-up test is successful. If you do not hear two beeps, check your battery orientation and reinstall the batteries.
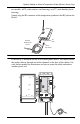
Optional: Adding an External Temperature Probe (Wireless Envoy Only) 1. Locate the power adapter jack on the end of the Envoy case. It’s next to the data logger output cable. RJ Jack Insert Power Adaper Plug and rotate to fit RJ Connector from Cabled ISS or Optional External Temperature Probe 2. Insert the power adapter plug into the power jack. Optional: Connecting a Cabled Envoy to the Integrated Sensor Suite (ISS) Refer to the figure shown above “Connecting AC Power”. 1.
Optional: Adding an External Temperature Probe (Wireless Envoy Only) two models: 6475 (with stainless steel housing) or 6477 (with durable plastic housing). Simply plug the RJ connector of the temperature probe into the RJ jack on the Envoy. External Temperature Sensor Note: RJ Jack RJ Connector Note: It may take several minutes for the temperature reading to stabilize.
Mount Your Weather Envoy Mount Your Weather Envoy You can place your Envoy on your desktop, install it on a wall near your computer, or install it with the optional Multi-Purpose Shelter (7728). Here are some guidelines for placing your Weather Envoy. Envoy Location You should place the Envoy in a location where it is easily accessible and can be easily connected to a computer (or router if using WeatherLinkIP).
Mount Your Weather Envoy The screws should be 3.25'' (82.5 mm) apart and lined up vertically. 3. Drill the marked locations with a 3/32'' or 7/64'' (2.2 to 2.7 mm) drill bit. 4. Drive the two #6 x 1'' (3.5 mm x 25 mm) pan head self-threading screws into the wall. 5. Leave at least a 1/8'' (3 mm) space between the wall and the heads of the screws. Drill 3/32" or 7/64" (~2.2 to 2.7mm) Holes 3.25" (82.55mm) 6. Slide the keyholes on the back of the case over the two screw heads.
Local Computer Installation Local Computer Installation The following instructions contain the basic procedures for connecting and setting up a local or remote connection between your Weather Envoy and a computer. Additional setup not described in this manual is required for all Weather Envoy, Vantage Pro and Vantage Pro2 consoles. See the WeatherLink Getting Started Guide for complete instructions on connecting the data logger to your computer.
Local Computer Installation 4. Locate a free Ethernet port on your broadband or DSL router and connect the cable to the port. 5. Reconnect the AC adapter. Note: An Envoy using a WeatherLinkIP data logger requires use of the AC-power adapter. Battery power can be used for short-term backup power in the event of a power outage, but an Envoy with WeatherLinkIP should use the AC-power adapter as its main source of power. The Weather Envoy beeps two times, occurring within one second of each other.
Local Computer Installation Serial Port Connection These instructions explain how to make a typical local connection between your Envoy and your computer via a serial port. Note that if you extend the cable run beyond 48' (14.4 m), the software may have difficulty communicating with the station. 1. Locate a free serial port on the back of your computer and connect the blue DB9 adapter to the port, then connect the 8’ cable to the adapter. 2.
Installing the Software Software Installation and Setup Refer to the following procedure and the WeatherLink Getting Started Guide to install the WeatherLink software on your computer. The instructions below contain the basic procedures for running the WeatherLink software and setting up a connection to your Weather Envoy. All information about the software is included as an overview. Additional setup not featured in this manual is required for all Weather Envoy, and Vantage Pro2 consoles.
Running the Software To set transceiver options: 1. Select Set Transceiver from the Setup menu. The Set Transceiver dialog box displays. 2. Select a Station Type for each of the possible 8 transmitter IDs (“channels”) the Envoy may be receiving. See the WeatherLink Online Help System for more information on configuring the stations, the retransmit feature, and configuring the Envoy for using repeaters.
Communications Problems Troubleshooting Guide The following section answers some of the most commonly asked questions about WeatherLink® and the Weather Envoy. Please consult this guide and the WeatherLink software Help before contacting Davis. Please see Contacting Davis Technical Support on page 20 for more information. Communications Problems If you are having trouble establishing communication between WeatherLink and the Weather Envoy, start by checking the Enovy’s own diagnostics.
Communications Problems • If the port settings or the loopback process identifies a serial port other than the one selected, try again using that port. 1. If necessary, disconnect the cable from the blue serial adapter. 2. Insert the loopback connector into the adapter. 3. Select Communications Port from the Setup menu. The Communications Port dialog box displays. 4. Click Loopback. The software searches all standard ports and displays the COM port number where the loopback connector is located.
Communications Problems Note: Contact your PC vendor or technical support for more information on device difficulties. • • • • Hardware device conflict—Check the Device Manager tab in the Windows System Properties dialog box to ensure that Windows recognizes the selected COM port. Consult your computer’s documentation to see how to access the System Properties dialog box. The communication port uses a nonstandard device name— WeatherLink recognizes serial ports named COM1 through COM18 only.
Communications Problems Troubleshooting WeatherLinkIP Communication Note: An Envoy using a WeatherLinkIP data logger requires use of the AC-power adapter. Battery power can be used for short-term backup power in the event of a power outage, but an Envoy with WeatherLinkIP should use the AC-power adapter as its main source of power. 1. See if you have a connection to the internet established.
Program Problems Program Problems ? The barometer graph on the Bulletin does not “fill in” completely. When you first load the bulletin, the barometer graph will only fill in completely when you have data in your database for the last six hours. Make sure of the following: • There is data in your database for the span of the barometer graph. • The time and date of the stored barometer data is correct in your database. • The time and date on the PC is correct.
Contacting Davis Technical Support the entry rather than showing invalid data. You can use the record editor to correct these entries. ? The data I want to see, such as solar radiation, soil moisture, or Temp 2 does not display. Why? All optional sensors must be enabled in the Station Configuration dialog box before the data will be displayed in WeatherLink.
Appendix A: Weather Data Refer to this appendix to learn more about the weather variables measured and/or calculated by the Weather Envoy, by the Vantage Pro2 Integrated Sensor Suite (ISS), and by the optional Vantage Pro2 sensors. Each section includes a brief discussion of the weather condition and a listing of the various ways in which the unit displays or stores that condition. Note: Some of the weather conditions require an optional sensor in order to measure or calculate a value.
Heat Index The Heat Index uses the temperature and the relative humidity to determine how hot the air actually “feels.” When humidity is low, the apparent temperature will be lower than the air temperature, since perspiration evaporates rapidly to cool the body. However, when humidity is high (i.e., the air is saturated with water vapor) the apparent temperature “feels” higher than the actual air temperature, because perspiration evaporates more slowly.
predict the formation of dew, frost, and fog. If dew point and temperature are close together in the late afternoon when the air begins to turn colder, fog is likely during the night. Dew point is also a good indicator of the air’s actual water vapor content, unlike relative humidity, which takes the air’s temperature into account. High dew point indicates high water vapor content; low dew point indicates low water vapor content.
pressure value is generally less important than the change in barometric pressure. In general, rising pressure indicates improving weather conditions while falling pressure indicates deteriorating weather conditions Solar Radiation Note: Requires that the Weather Envoy listens to station with optional solar radiation sensor attached (#6450, included on Vantage Pro2 Plus weather stations).
TABLE A-1: EPA SKIN PHOTOTYPESTABLEA-2: ENVIRONMENT CANADA SKIN Skin Phototype Skin color Tanning & Sunburn history 1 - Never tans, always burns Pale or milky white; alabaster Develops red sunburn; painful swelling, skin peels 2 - Sometimes tans, usually burns Very light brown; sometimes freckles Usually burns, pinkish or red coloring appears; can gradually develop light brown tan 3 - Usually tans, sometimes burns Light tan; brown, or olive; distinctly pigmented Rarely burns; shows moderately rap
I 1 Skin Phototype (EPA) II 2 All Burn III Some Burn IV 3 V Skin Type (Environment Canada) UV Dose that Causes Sunburn 4 VI 20 40 1 2 60 80 3 UV Dose (MEDs) 2 120 mJ/cm 100 4 5 6 UV Dose and Sunburn - Use this plot to estimate the MED dose leading to sunburn. A person with Type II (Environment Canada) skin type might choose 0.75 MED as the maximum for the day; in contrast, a person with Type V (Environment Canada) Skin Type might consider 2.5 MEDs a reasonable dose for the day.
EvapoTranspiration (ET) Note: Requires optional solar radiation sensor (#6450, included on Vantage Pro2 or Vantage Pro2 Plus weather stations). EvapoTranspiration (ET) is a measurement of the amount of water vapor returned to the air in a given area. It combines the amount of water vapor returned through evaporation (from wet vegetation surfaces and the stoma of leaves) with the amount of water vapor returned through transpiration (exhaling of moisture through plant skin) to arrive at a total.
Appendix B: Specifications General Operating Temperature. . . . . . . . . . . .+0° to +140°F (-18° to +60°C) Storage Temperature . . . . . . . . . . . . .-22° to +158°F (-30° to +70°C) Current Draw, Wireless . . . . . . . . . . .0.90 mA average, 20 mA peak, (plus 0.125 mA for each optional wireless transmitter in use) at 4 to 6 VDC Current Draw, Cabled . . . . . . . . . . . .10 mA average, 15 mA peak at 4 to 6 VDC AC Power Adapter . . . . . . . . . . . . . . .5 VDC, 200 mA, regulated Batteries . . . . . . .
Barometric Pressure (sensor located in Envoy) Resolution and Units . . . . . . . . . .0.01" Hg, 0.1 mm Hg, 0.1 hPa/mb (userselectable) Corrected Range . . . . . . . . . . . . .26.00" to 32.00" Hg, 660.0 to 810.0 mm Hg, 880.0 to 1080.0 hPa/mb Uncorrected Range . . . . . . . . . . .18.00" to 33.50" Hg, 457.0 to 850.0 mm Hg, 592.0 to 1130.0 hPa/mb Elevation Range . . . . . . . . . . . . .-1500' to +15,300' (-460 m to 4670 m) Uncorrected Reading Accuracy . .±0.03" Hg (±0.8 mm Hg, ±1.
WeatherLink Tool bar Icons Open Station Bulletin Window Download Plot Window Strip Chart Window Yearly Rainfall Database Window Hot Keys Alarm Indication Online (Hang Up) This Month’s NOAA Summary View Help Print Window Exit Program Strip Chart Window ESC. . . . . . . Halt Redraw Main Program Window Ctrl-M . . . . . Make Default Ctrl-A. . . . . . Set Alarms Ctrl-P . . . . . Print Strip Chart Ctrl-B. . . . . . View Bulletin F1 . . . . . . . . Context-Sensitive Help Ctrl-C. . . . . .