DriveRight ® Fleet Management Software Getting Started Guide CarChip DriveRight Drivers Vehicles Product #8186
DriveRight Fleet Management Software Getting Started Guide; P/N 8186 Davis Instruments Part Number: 7395.313 Rev. M (6/24/13) © Davis Instruments Corp. 2013. All rights reserved. This product complies with the essential protection requirements of the EC EMC Directive 2004/108/EC. DriveRight and CarChip are registered trademarks of Davis Instruments Corp.
Table of Contents DriveRight FMS Features............................................................................. 1 Package Contents ................................................................................... 2 System Requirements ............................................................................ 2 Optional Requirements .......................................................................... 2 Additional DriveRight FMS Documentation ........................................
2
Introduction ® The DriveRight Fleet Management Software (FMS) package allows you to store, view and manipulate DriveRight and CarChip data on your PC. More specifically, FMS provides tools for sorting, tracking, analyzing and printing data, and viewing and printing reports for a number of individual DriveRights and CarChips. This guide is intended to get you up and running with DriveRight FMS in the shortest time possible.
Package Contents Before installing the software on your PC, make sure your package includes the following items: • DriveRight download cable — A black interface cable to connect a DriveRight device to your PC. • CarChip download cable — A USB cable for CarChip. • DB9 connector — A 9-pin connector with modular “telephone” jack to connect to a serial port in your PC. • DriveRight FMS software CD — The CD contains the DriveRight FMS software as well as special CarChip software to view engine performance.
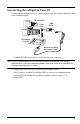
Connecting DriveRight to Your PC Connect the DriveRight device to a serial port on your PC using the hardware and cable as shown below. Windows PC COM Port DB9 (9-Pin) DriveRight Console Molded One-Piece Download Cable 1. Connect the DB9 connector to a serial port on your computer. Note: If your PC has no serial port, you may use a serial-to-USB adapter, such as Davis product #8434. If you use a third-party adapter, make sure the driver is compatible the Windows operating system you have. 2.
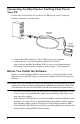
Connecting CarChip Fleet or CarChip Fleet Pro to Your PC Connect the CarChip Fleet or Fleet Pro to a USB port on your PC using the hardware and cable as shown below. USB Cable 4' (1.2 m) USB Port CarChip Fleet Pro Data Logger Mini-B Port 1. Connect the USB connector to a free USB port on your computer. 2. Connect the free end of the download cable to the CarChip. After you have installed DriveRight FMS, be sure to test communications between the CarChip and the computer.
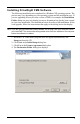
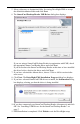
Installing DriveRight FMS Software The following installation was completed in a Windows XP operating system. The process may vary depending on your operating system and the installation type. If you are upgrading from a previous version of FMS, for example, the Destination Folder dialog box may not display because a destination has already been created in a previous installation. The installation below describes a full installation.
5. Select a directory or destination folder for storing DriveRight FMS or accept the default destination folder and click Next. 6. The SmartCard Desktop Reader USB Driver dialog box displays. If you are using a SmartCard Desktop Reader in conjunction with FMS, check the appropriate Smart Card Reader driver and click Next. If you do not have the SmartCard Desktop Reader at this time or have installed the driver before, deselect the driver and click Next. 7.
Installing USB Drivers for the SmartCard Desktop Reader DriveRight SmartCard Desktop Reader (# 8108) works with the DriveRight SmartCard System to upload data from a DriveRight 600 or 600E to a computer running DriveRight FMS version 3.3 or later. The SmartCard Desktop Reader connects to a computer via a USB port. USB drivers must be installed for the SmartCard Desktop Reader to properly communicate with DriveRight FMS.
3. Click Install to continue. 4. Click Finish once the installation is complete. 5. Once the installation is complete, Athena ASEDriveIIIe USB should display in the Device Manager under the Smart card readers list. FMS can now properly recognize the SmartCard Desktop Reader and the correct driver displays in the SmartCard Reader Setup dialog box. Follow these steps for ACS Drivers Note: The following installation was completed in a Windows XP operating system.
3. A Found New Hardware dialog box should display through your operating system. If the dialog box does not display, check the connection between the hardware and your computer, or see your operating system’s documentation for more information. If the dialog box still does not display, contact Davis Technical Support for help with this problem. 4. Click the No, not at this time field and click Next.
5. Click Install the software Automatically and click Next. The new drivers install automatically. 6. Click Finish once the installation is complete. Installing Drivers for Wireless Download Accessories The Base Station for Wireless Download System (# 8130) and Configuration Cable for Wireless On-Board Module (# 8131) are used in conjunction with the Wireless On-Board Module (# 8129) to wirelessly transmit data from a DriveRight 600 or 600E to a computer running DriveRight FMS version 3.7 or later.
Note: It is important that you do not allow your operating system to automatically check the web for drivers because it could install versions of drivers that may have compatibility issues with the accessory or FMS. The second dialog box displays. 3. Click Install from a list or specific location and click Next. The Please Choose Your Search and Installation Options dialog box displays. 4. Click Search for the best driver in these locations and select the Include this location in the search check box.
5. Click Browse. 6. Navigate to the DriveRight directory. A list of subfolders displays. When DriveRight FMS is installed, the drivers for the wireless devices are stored under the DriveRight directory so that they can be installed at any time a Base Station or On-Board Module is added. The wireless device driver is located in the FTDI Drivers subfolder. 7. Select the FTDI Drivers folder and click OK. Note: Install the driver only once, even if installing both products.
Before You Run the Software There are software concepts you should become familiar with, and some initial planning considerations to think about. Setting the Current Location All data is organized according to location. Any information downloaded or input into the software is stored to a current location. A location ID is assigned to all downloaded data. All operations like database browsing, reporting and maintenance are performed with respect to the current location.
Planning for Initial Software Use The software allows for several layers of classification, and for different degrees of detail in accounting for driver and vehicle information. We recommend thinking about the following items so that you can tailor FMS to your needs. • Define Fleets (Optional) — Track separate groups of vehicles at the same location by assigning these groups of vehicles to different fleets. Fleets can be created when you first set up your database or can be added at any time.
Software Setup After you have finished the initial program configuration, you will want to check the program preferences and enter the default DriveRight device settings, and test the DriveRight device communications. Note: Please refer to the DriveRight FMS Online Help System for more information. Use the following steps to set DriveRight FMS preferences: 1. Set unit preferences by selecting Setup>Preferences>Units.
• Include last __ hours of speed and GPS logging — determine number of hours of speed data recorded by the CarChip that the FMS software keeps. To save database space, CarChip uses the default setting of 1 hour and saves the last hour of GPS and Speed Interval data that gets displayed in the GPS database table. Select this check box and enter the number of hours of speed and GPS logging data you want to keep.
Considerations for Using CarChip and DriveRight Together • If both a CarChip and DriveRight device are installed in the same vehicle, you will need to create two entries for the driver and two entries for the vehicle in the DriveRight FMS database. Otherwise you will see duplicate trip data in your DriveRight FMS reports. • If you are using both CarChip and DriveRight devices, make sure both types of devices use the same safety settings.
vehicle for it from the list of vehicles. If you do not have a default vehicle to assign to this DriveRight, select Unknown Vehicle. Note: If you are using GPS with your DriveRight 600, activate the GPS module using the GPS Settings command: Select DriveRight> DriveRight Settings>Setup GPS. 4. Add New CarChips — Add CarChip devices to your database using Add New CarChip in the CarChip Menu. CarChips must be assigned to either a vehicle or a driver.
Additional Software Topics Once you begin collecting data, you can use DriveRight FMS to record, report, filter, export and import DriveRight data. The following topics provide a brief overview of some FMS features. Be sure to review the documentation listed on page 2 for a complete description of FMS features and commands. Backup and Restore Use Backup in the File menu to create backups of your DriveRight FMS data.
6. Click Browse to select the old Borland tables directory. (The Borland tables are likely in C:\Program Files\DriveRight Software\tables.) 7. Click Convert to start the conversion. After the data is converted you will see a success message. At this point all of your 2.x data has been converted into the new DriveRight FMS database format. Note: The conversion process may take a long time depending on the size of your 2.x database.