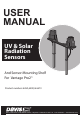
USER MANUAL UV & Solar Radiation Sensors And Sensor Mounting Shelf For Vantage Pro2 ™ Product numbers 6450, 6490, & 6673 R Davis Instruments, 3465 Diablo Avenue, Hayward, CA 94545-2778 U.S.A. • 510-732-9229 • www.davisnet.
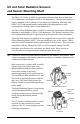
UV and Solar Radiation Sensors and Sensor Mounting Shelf The Davis UV Sensor (# 6490) is a precision radiometer that detects ultraviolet (UV) radiation at wavelengths of 290 to 390 nanometers. The spectral response is closely matched to the Erythema Action Spectrum, defined by McKinlay and Diffey (1987) and internationally recognized as the radiation that is most responsible for causing redness of the human skin.
• Diffuser: With the comb structure of the shield, the precision-machined Teflon diffuser provides an excellent cosine response for zenith angles from zero to 90 degrees. • Transducer: A latest-technology, hermetically-sealed hybrid microcircuit responds to UV irradiance according to the Erythema Action Spectrum. • Amplifier: Converts the transducer output to a 0 to +2.5VDC signal.
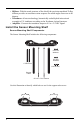
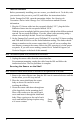
Mount the Sensor Mounting Shelf Note: In the illustration, the rain collector cone has been removed for clarity. It is not necessary to remove the cone to install the Sensor Mounting Shelf. 1. Place a support tube on each of the outside mounting holes at the rear of the rain collector base as illustrated. 2. Place a lock washer and a flat washer onto one of the 7-3/4" screws. 3. Locate the support tube mounting holes in the shelf. (See illustration on page 2.) 4.
Test the Sensors Before permanently installing your new sensor, you should test it. To do this, take your console with you out to your ISS, and follow the instructions below. On the Vantage Pro2 ISS, open the transmitter shelter. See Opening the Transmitter Shelter in the Vantage Pro2 ISS Installation manual for more information. 1. Plug the UV Sensor cable into the receptacle labeled “UV”; plug the Solar Radiation Sensor into the receptacle labeled “SUN.
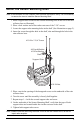
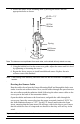
4. Secure the sensor to the mounting shelf by driving the screws into the appropriate holes as shown. #6-32 x 1½” Screw #6 Flat Washer Spring #6 Screw Retainer Note: The holes are not equidistant from each other, so the shield will only attach one way 5. Using the bubble level on the sensor as a guide, adjust the sensor until it is level by tightening or loosening the screws. 6. Repeat the above process to install an additional sensor. Replace the rain collector cone when finished.
Maintaining the Sensors For the most accurate readings, clean the diffuser after mounting, and then periodically. Use ethyl alcohol (not rubbing alcohol). Due to the sensitivity of ultraviolet and solar radiation sensors, it is common practice for manufacturers to recommend recalibration after a period of time. Here at Davis Instruments, we have seen approximately 2% drift per year on the readings from these sensors.