
Installation manual


16
• Guidelines on proper depths for specific crops and conditions can be obtained
from your local farm advisor. Irrometer also maintains an excellent resource list-
ing the suggested placement for soil moisture sensors by crop at www.irrome-
ter.com.
Installation Procedure
1. Soak the soil moisture sensors overnight in water.
• Always “plant” a wet soil moisture sensor.
• If time permits, wet the soil moisture sensor for 30 minutes in the morning and let
dry until evening, wet for 30 minutes and let dry overnight, wet again for 30 min-
utes the next morning and let dry again until evening. Soak over the next night
and install wet. This will improve sensor response during the first few irrigations
or waterings.
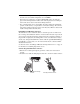
2. Make sensor access holes to the depth required with a 7/8” diameter rod.
• Make a hole for the soil moisture sensor and a separate adjacent hole for the tem-
perature probe.
• For very coarse or gravely soils, an oversize hole of 1” to 1 1/4” may be needed
to prevent abrasion damage to the soil moisture sensor membrane. In this case,
you will need to “grout in” the sensor with a slurry made from the sample soil to
get a snug fit in the soil.
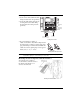
3. Always install sensors in the active root system of the crop with a snug fit in the
soil.
Note: In gravelly soils and with deeper sensors, carefully install the sensor to prevent damaging the
membrane.
• Lack of a snug fit is the biggest problem in obtaining
good soil moisture sensor readings.
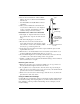
• The ideal way of making the access hole is to use a
stepped installation tool. The stepped tool makes an
oversize hole for the upper portion and an exact sized
hole at the bottom where the sensor is located.
• The illustration to the right shows the dimensions
required to make a stepped installation tool.
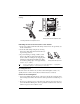
4. After installing the soil moisture sensor the hole
needs to be carefully backfilled and tamped down.
This prevents the creation of air pockets which could
allow water to channel down to the sensor.
• Fill the hole with water and push the sensor down
into the hole so it bottoms out.
• A length of 1/2” Class 315 PVC tubing fits snugly
over the sensor collar and can be used to push the
sensor. A good snug fit in the soil is important.
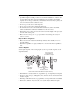
Home-Made Stepped Sensor
Installation Tool
2-1/2" (64 mm)
7/8" (22.5 mm)
Cold rolled steel,
round rod
1-1/4" (32 mm)
approximate
diameter
Overall length
variable