
Installation manual


7
Testing Station Communications
1. If you are using a Soil Moisture sensor to test the station, press TEMP until you
see “SOIL MOIST” displayed on the console screen where the inside
temperature is usually displayed. If you are using a Leaf Wetness sensor, press
HUM until you see “LEAF WET” displayed where you usually see the inside
humidity. Both TEMP and HUM will display temperatures if you are using a
temperature probe to test the station.
• Soil temperature is displayed in the TEMP OUT location on the LCD. Leaf
temperature is displayed below the barometer reading on the LCD.
• If you see SOIL MOIST or LEAF WET and no number, you are seeing the
moisture and temperature readings for sensor pair #1. A two, three or four
will appear above the readings for the second, third or fourth set of sensors.
2. If you continue to press TEMP or HUM, you will see the readings for sensor
pairs #2, #3 and #4 (#3 and #4 are displayed for soil moisture and temperature
only).
• If no sensor is installed, the reading for that sensor will be dashed out.
3. A soil moisture, temperature, or leaf wetness reading confirms communication
between your Leaf/Soil Station and the console.
• Disconnect the sensor(s) that were temporarily installed to test communica-
tions.
• Go on to “Choosing a Location to Mount the Station” on page 8.
If your console does not show a sensor reading, proceed to “Troubleshooting Com-
munication Problems.”
Troubleshooting Communication Problems
First, verify that the console/receiver is powered and is not in Setup Mode (exit
Setup Mode by pressing DONE and holding it for a moment). Then, on the Leaf/
Soil Station, check that the battery is properly installed. Walk around the room with
the console, standing for a few moments in various locations to see if you are pick-
ing up signals.
If you don’t see any readings, no matter where you stand with the console, put the
transmitter in TEST mode as described below.
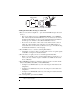
TEST mode
DIP switch #4 on the SIM (see illustration on page 6) is the TEST DIP switch.
Switch it to the ON position using a ball-point pen or paper clip. This puts the trans-
mitter in Test Mode. The test LED will flash each time the transmitter broadcasts a
signal, which should be about every 2.5 seconds.
If the LED flashes only once and then remains dark, or does not flash at all, there is
a problem with the transmitter. See “Contacting Davis Technical Support” on
page 19.