Vantage Connect Retrofit Kit ™ For Vantage Pro2™ , Vantage Pro2 Plus™ , Vantage Vue R and Weather Envoy ™ Product number 6626 ® Davis Instruments, 3465 Diablo Avenue, Hayward, CA 94545-2778 U.S.A. • 510-732-9229 • www.davisnet.
Vantage Connect Retrofit Kit Product Numbers 6626, 6626EU,6626UK, 6626G, 6626S, 6626SEU 07395.322 Rev. C, June 21, 2012 For use with Vantage Pro, Vantage Pro2, and Vantage Vue Consoles and Weather Envoy. Vantage Connect™, Vantage Pro®, Vantage Pro2™, Vantage Vue® , WeatherLink® and Weather Envoy™are trademarks of Davis Instruments Corp., Hayward, CA.
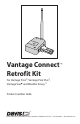
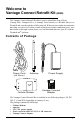
Welcome to Vantage Connect Retrofit Kit (6626) The Vantage Connect Retrofit Kit allows you to upload data from a Davis Vantage Pro®, Vantage Pro2™, or Vantage Vue® console; or a Weather Envoy™ to WeatherLink.com through the cellular network. With your own online account and a data plan, you can receive alarm e-mails when preset weather conditions occur, view data online or through a smart phone, or even download data into your PC with the WeatherLink® software.
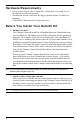
Hardware Requirements • • • Davis weather console, either Vantage Pro, Vantage Pro2, or Vantage Vue; or Weather Envoy (all sold separately) WeatherLink software with serial data logger (product number 6510SER, not included) GSM/GPRS cellular network coverage in the area Before You Install Your Retrofit Kit 1. Backup your data. The Vantage Connect Retrofit Kit will upload data to the Weatherlink.com server in intervals. The update interval will be determined by the purchased data plan.
3. Purchase a Vantage Connect Service Plan. Vantage Connect Retrofit Kit requires an annual service plan. Choose #6632, 6634, or 6636 in the version appropriate for your region (US, A, B, or C). Each plan offers a different update interval (5, 15, or 60 minutes). For more information see your Davis reseller or purchase a plan during your registration process on WeatherLink.com. After purchase, you will receive an e-mail with an Activation Code that you will use to register online. 4.
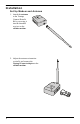
Installation Set Up Modem and Antenna 1. Attach the antenna to the Vantage Connect Retrofit Kit by screwing it into the threaded receiver on the cellular modem. 2. Adjust the antenna orientation vertically and connect the Vantage Connect adapter to the cellular modem.
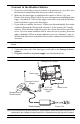
Connect to the Weather Station 1. If you have not already set up your console or Weather Envoy, do so first. (See the instruction manual that came with your console or Envoy.) 2. Make sure the data logger is installed in the console or Envoy. (See your WeatherLink Getting Started Guide for more information on installing the data logger.) Attach the 8' (2.44 m) data logger serial cable (sold with the WeatherLink Serial Data Logger) to the data logger. 3. If you wish to set alarms, do so now.
Power Up Note: It is important to register your Vantage Connect Retrofit Kit online and wait 5 to 10 minutes BEFORE you power it up to avoid a delay in uploading data. If you already powered up before registering, remove power from the retrofit kit, register, then repower. Plug in the power supply cable to the cellular modem (see the illustration on “Connect to the Weather Station” on page 5) and plug the power cord into the AC outlet to power up the Retrofit Kit.
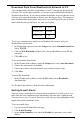
Download Data From WeatherLink Network to PC You can download your data stored online to your PC through the WeatherLink software. This can be done manually, or you can set up automatic downloads in WeatherLink software. If you choose manual downloads, be aware that the server will store four times the amount of data as your data logger alone. The amount of data stored depends on the update interval of your service plan. Be sure to download within the time period below for your service plan.
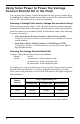
Using Solar Power to Power the Vantage Connect Retrofit Kit in the Field You can power the Vantage Connect Retrofit Kit on solar power if needed. Keep in mind that the Vantage weather station or Envoy uses 6v DC and the Retrofit Kit uses 12v DC. Each will need to be powered separately. Powering a Vantage Pro2 console, Vantage Vue console or Envoy These receiving consoles require 6v DC.
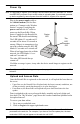
Troubleshooting My status LED is not blinking. Make sure the power cord is connected. If power is connected and the LED is still off, open the Retrofit Kit and press the ON/OFF button shown in the diagram. If the LED is still off, contact technical support. On/Off Button My status LED is flashing or always on. The speed at which the LED flashes or blinks indicates specific information. Use the table below to ascertain what the condition is and what to do about it. ON Off (seconds) (seconds) 2 0.
Appendix A: Switching Data Loggers To switch out a USB data logger for a serial data logger: 1. If you are using a console, enter Setup Mode (press and hold DONE and -). 2. Power down the console or Weather Envoy (batteries and AC). 3. Unplug the USB data logger; plug in the serial data logger. 4. Repower the console or Envoy. 5. Check the time and adjust if necessary. Use the console key pad or WeatherLink software (Envoy or console) to set the correct time.