
Installation & Assembly


5
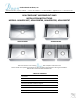
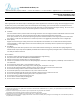
ADA COMPLIANT UNDERMOUNT SINKS
INSTALLATION INSTRUCTIONS
INSTALLATION STEPS FOR PREFAB COUNTER
IMPORTANT: Recommended for professional installers only. The installer maintains responsibility for installing the product safely and correctly.
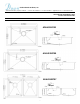
● STEP 1: Create A Template
Determine and mark the centerline of the sink posion and alignment with cabinet and countertop. Plan for
adequate clearance between the faucet holes and the countertop backsplash or nished wall. To create a template,
rst use the framing square to draw a centerline on the plywood sub-counter. Then, place the cardboard template
(included in the Dawn Undermount Sink Package) over sub-counter, and draw the template line. Make sure the
template line is even.
Drill a hole on the inside of the template line. Insert the saw blade through the hole, and cut out the plywood
template along the template line.
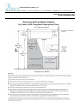
● STEP 2: Make The Sink Cutout
Secure the plywood template onto the solid surface countertop in a desired posion. Then, place the saw over the
plywood template and cut the countertop around it. Make sure your saw cuts along the edge of the plywood
template. This creates the sink cutout on the countertop.
Kitchen & Bath Products, Inc.
27688 Industrial Blvd., Hayward, CA 94545 • Toll-Free: 877-329-6872 • Fax: 510-723-0099 • dp@dawnusa.net • www.dawnusa.net
NOTE: Cardboard templates are
supplied only as a guide.
The actual use of sink provides
more accurate cutout. Template Line
Plywood
Sub-counter
Cardboard
Template
Template Line
Plywood
Template
Saw
Cut Around Plywood Template
To Create Sink Cutout.
Solid Surface
Counter Top
Plywood
Template
* Each Dawn ADA Complaint Undermount Sink package includes: one Dawn ADA Compliant Undermount Sink, one cardboard template, and one
ADA Compliant Sinks Installaon Instrucons (any other suggested materials & tools are not included).