
Installation & Assembly


6
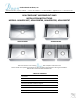
ADA COMPLIANT UNDERMOUNT SINKS
INSTALLATION INSTRUCTIONS
INSTALLATION STEPS FOR PREFAB COUNTER
IMPORTANT: Recommended for professional installers only. The installer maintains responsibility for installing the product safely and correctly.
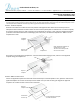
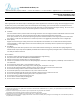
● STEP 3: Installing Undermount Sink
Posion the sink into the cabinet and align the sink to the cutout opening. Press the sink against the plywood sub-
counter while making sure the sink is well supported. Verify the sink is level both front to back and le to right.
Adjust the sink posion as needed.
● STEP 4: Installing Countertop
Clean the boom of the countertop and the sink ange with denatured alcohol. Apply a thin bead of silicone sealant
on the sink ange where the countertop meets the sink. Also apply enough amount of stone epoxy on the plywood
to adhere to the countertop. Immediately wipe away any excess sealant with a damp cloth.
● STEP 5: Clean Up
Aer compleng the installaon of the undermount sink, please follow the maintenance ps provided in this
instrucon guide.
Kitchen & Bath Products, Inc.
27688 Industrial Blvd., Hayward, CA 94545 • Toll-Free: 877-329-6872 • Fax: 510-723-0099 • dp@dawnusa.net • www.dawnusa.net
Plywood Sub-Counter.
Posion sink into cabinet.
Make sure sink is level.
Sink
Install counter top.
Apply silicone sealant
on sink ange.
Apply stone epoxy
on plywood.
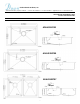
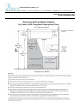
Note:
Toe clearance shall be 30 inches
(760 mm) minimum in width.
Knee clearance shall be 30 inches
(760) mm) minimum in width.