RackAccess 8i RackAccess 16i Installation guide
Specifications Part Numbers 3115-108M-xx 3115-116M-xx 3115-116IP-xx 3117-108M-xx 3117-116M-xx 3117-116IP-xx 3119-108M-xx 3119-116M-xx 3119-116IP-xx RackAccess 8i console 15” TFT Display & integrated SCOUTutp 8 port kvm Switch RackAccess 16i console 15” TFT Display & integrated SCOUTutp 16 port kvm Switch RackAccess 16i console 15” TFT Display & integrated SCOUTutp 16 port kvm Switch & IP Access RackAccess 8i console 17” TFT Display & integrated SCOUTutp 8 port kvm Switch RackAccess 16i console 17” TFT Disp
Monitor Display Area: Scan frequency horizontal: Scan frequency vertical: Viewing Angle: Pixels: Pixel pitch: Picture tube: Video: Sync: Display Data Channel Compatibility Keyboard Keys Travel Typing force Life cycle 17” TFT Display 33.7 x 27.0 cm 13.7 x 10.64” 31.47K to 68KHz 60Hz 140° Horizontal, 110° Vertical 1280 x 1024 0.264 x 0.264 mm 17” TFT Active Matrix Analog RGB 0.7 Vp-p/75Ω Separate DDC 2B 19” TFT Display 37.6 x 30.10 cm 14.8 x 11.8” 31.
Agency Approvals EMI Emissions Energy Saving CPU Adaptors FCC-A and CE MRP-II EPA energy star, VESA DPMS PS/2 USB SUN Video HD15 HD15 HD15 Keyboard/Mouse MiniDin6 USB MiniDin8 System RJ45 RJ45 RJ45 Power From computer’s Keyboard port From USB port From computer’s Keyboard port Connections Product weight 107g / 0.23lb Shipping weight 300g / 0.66lb Dimensions 91 x 41 x 24mm / 3.58 x 1.61 x 0.
RackAccess 8i & RackAccess 16i Introduction The RackAccess 8i and 16i are compact 1U high rack mountable TFT Screen, keyboard and mouse, with integrated kvm switch (SCOUTutp). Available in 3 screen sizes 15”, 17” and 19” Product Features ¾ ¾ ¾ ¾ ¾ ¾ ¾ ¾ ¾ ¾ ¾ ¾ ¾ ¾ ¾ ¾ Integrated SCOUTutp 8 or 16 port KVM switch. Available with integrated IP control (SCOUTip). Operating system independent, transparent to all applications. Supports PS/2, USB and SUN computers through an adapter for each platform.
Power switch 7. Use the power switch to turn ON or OFF power. We recommend turning your system on first, then the LCD monitor. Adjusting the Monitor The LCD monitor is designed to work with a range of compatible video adapters on the market. Due to all the possible variations between these video adapters, you may need to adjust the settings for your video card.
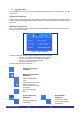
User Mode: Changes the RGB colour values Changes the viewable screen size Execute the white balance function Adjusts phase tracking to reduce screen flicker Change Red gain for the colour temperature Moves the whole screen left or right Change Green gain for the colour temperature Moves the whole screen up or down Change Blue gain for the colour temperature Return to the previous Menu Return to the previous Menu Sets the colour temperature to 6500K Sets the colour temperature to 9300K Return to th
Auto-Adjustment We recommend that you use the Auto-Adjustment to get optimized video quality. Use the + & ▬ key to select auto-adjustment, then press ▼ key to get optimized quality. Introduction – Integrated SCOUTutp Switch The built in KVM switch (SCOUTutp) will ensure easy and accurate control of up to 16 PCs through a single console. The SCOUTutp is compatible with PS/2, USB and SUN style computers. It has keyboard and mouse emulation for error free boot-ups.
Using the SCOUTutp Note: Before switching your computers on, please configure non PS/2 computers emulation type in the OSD! The SCOUTutp provides two possibilities to select the desired computer. You may use either the keyboard Hot Key commands or take advantage of the OSD (On-Screen-Display). You may notice that the mouse cannot be used for around 1 second when the SCOUTutp switches to another computer.
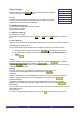
General Settings Select General and press ENTER , the General Settings window will appear. From this window you can do the following: Security The OSD comes with an advanced password security system with 3 different security levels. Each security level has different access rights to the system and have are limited in number as shown below.
Ports PORTS SETTINGS In the Settings window navigate to the Ports line and press ENTER. The Ports Settings window appears. Name (Editing the computer name) In this window you can edit the computer names with up to 15 characters. To erase a character you have to select it and then press the Space Bar. Blank spaces remain in place of the character. To erase an entire line place the cursor at the beginning of the line and press the space bar until the line is erased.
Typing 9 9 9 in the T/O column disables the Timeout function. Typing 0 0 0 – the Timeout function works immediately. We recommend a T/O setting of at least 10 seconds. Typing 9 9 9 in the SCN column displays the screen for 999 seconds. Typing 0 0 0 – the computer screen is skipped. Users In the Settings window navigate to the Users line and press Enter . The Users Settings window appears. Turn on the Security feature (under OSD Settings) to configure any Users Settings. There are 3 different access levels.
Moving the label – F6 Position the OSD label anywhere on the screen. To position the OSD label from the Main window, navigate to the desired computer using the Up and Down arrow keys. Press F6 . The selected screen image and Identification label will appear. Use the arrow keys to move the label to the desired position. Press Esc to save and exit. Using the Control software As an alternative to the OSD you can operate the SCOUTutp system with the Control software located on the Documentation CD.
Communication Error If a Communication Error box appears when trying to scan the system, check that: The Serial download cable is connected to the computer’s and SCOUTutp IP Manager’s serial ports. The Com Port Settings in Options / Com Port are set correctly. After changing the Com port exit and re-start the Control software. The View menu From the View menu choose one of the following: -All computers, or only active switched on computers.
Password protection When the SCOUTutp system is password protected, the Control software behaves in exactly the same way as the OSD. You must type in the required password to access the Control software. The access you gain depends on the security status –. To change the security access, close and reopen the Control software, and type in the different passwords.
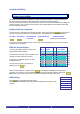
Single computer Settings To see all the Settings of a single computer, right click the computer icon. The Settings appear as in the figure below. Note! There is no Select box to check. Loading a saved configuration To load a saved configuration: From the File menu choose Open.
Verifying the version numbers Before upgrading the firmware, you must first verify which firmware and hardware versions you have. The OSD version number To verify the OSD version number: 1. Open the SCOUTutp Switch Update program. 2. In the Switch Unit box, check the OSD option. 3. Click F/W Version the version number appears in the Switch box. The H/W Version button is greyed out, as there is no hardware relevant to the OSD. The SCOUTutp Manager version number To verify the SCOUTutp version number: 1.
Resetting the Switch or ADAPTOR units To reset the Switch or ADAPTOR units: 1. For the Switch, check the SCOUTutp Switch option in the Switch Unit box. 2. For the Adaptors, check one or more Adaptors in the ADAPTOR Units box. 3. From the Options menu choose Advanced / Reset. The units reset. The system should now be operational. Troubleshooting tips When using Firmware Update software you may sometimes get a Communication Error message.
NOTE: The USB ADAPTOR stores these settings in their own internal memory so even if you unplug, power down, or move them to another computer, the settings will not be lost. The following table illustrates how the W and R settings change key assignments on a PS/2 keyboard.
Service Information Technical Support If you cannot determine the nature of a problem, please call Daxten and ask for Technical Support. If possible, call from a phone located near the unit, as we may be able to solve your problem directly over the phone. If we cannot solve your problem, and determine that the fault is in the unit, we will issue a Return Material Authorisation (RMA) number that must appear on the outside of all returned products.
www.daxten.com Ireland Bay 21 Free Zone West Shannon, Co. Clare info.ie@daxten.com www.daxten.ie Tel: +353 (0) 61 23 4000 Fax: +353 (0) 61 23 4099 • Österreich Künstlergasse 11/4 A-1150 Wien info.at@daxten.com www.daxten.at Tel: +43 (0)1 879 77 65 Fax: +43 (0)1 879 77 65 30 Worldwide info.eu@daxten.com www.daxten.eu • USA info.us@daxten.com www.daxten.us • Deutschland Salzufer 16, Geb. B 10587 Berlin info.de@daxten.com www.daxten.