Boomerbeast Deluxe and Ultimate User Manual
About Daymak Daymak is one of Canada’s largest Alternative Vehicle providers. We design, engineer, manufacture, import and repair everything from recreational dirt scooters, go-karts and electric golf cars to alternative transportation solutions such as e-scooters and gas scooters. Our electric scooters represent an energy-efficient and eco-friendly alternative for people who need to get around the city. They greatly increase the practicality of scooter transportation in urban centres.
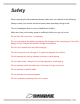
Safety When operating the Boomerbeast please make sure you adhere to the following: Always check your mirrors and blind spots when operating through trails. Turn on headlights when in need of additional visibility. Make sure that your battery power is sufficient before you go out to ride Do not ride with more than 1 passenger Do not over charge the battery by leaving the charger in the charging port. Once the battery is fully charged remove the charger immediately.
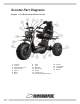
Scooter Part Diagrams Diagram 1: The Boomerbeast Electric Scooter 1. 2. 3. 4. 5. 6. 7. 4 Controller Throttle Tablet Charging Port Tablet / Mount Ignition Mirrors Seat 8. Rack 9. Tires 10. Ball Hitch 11. Motor (rear) 12. Battery 13. Charging Port 14. Motor (front) [Ultimate Only] 15. 16. 17. 18.
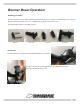
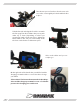
Boomer Beast Operation Mounting your tablet The Boomerbeast comes wiht a tablet mount that allows you to attach a tablet that gives you speed, distance travelled and allows you to configure the performance infront of you. The Mounting brackets come with 4 pieces. Piece A Piece B Piece C Piece D Instructions To start take Piece A and put it around the handlebar as seen here: Take Piece B and put it through the screws and hold it in place where you want the table to rest.
Take the two pieces from Piece C and screw each one on the screws tightly to lock the tablet holder in place. Take the Piece D, and align the four holes to match the four pegs from Piece B. Once they are in, push either up or down (depending on where you mounted it) until it clicks into place. Adjust the tablet width to the size you need and flip down the lever on the back to lock that into place.
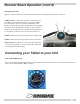
Boomer Beast Operation (cont’d) Turning on your unit Ignition - The Boomerbeast comes with an ignition that you must put your key into to turn on. 1) Wheel Lock - To put it into position 1 put the key into the ignition slot and turn left as far as you can go. Once you cannot turn any more, turn the handlebars of the Beast to the left, then push the key further into the ignition and turn to the left again. Once in this position your tire will be locked perpendicular to the bike making it harder to steal.
The Boomerbeast can be connected to via bluetooth to increase torque range and more. Once the App is open, it will show you a list of the nearby bluetooth devices as well as the Front and rear motor. Connect to the motor. For the first time you connect, it will require you to input a password: 12345678.
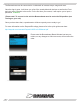
Boomer Beast Operation (cont’d) Driving your unit Once you have your Boomerbeast set up and connected. It’s time to ride! Right Handlebar 1) Throttle - Turn this toward you to engage the motor and to propell the unit forward. Do this very slowly at first until you get the feel of how quickly it goes.
Brakes On both sides of the handlebar there are brake levers as seen on the right. To engage the brakes, pull the brake lever towards you. The right brake lever activates the front brakes The left brake lever activates the rear brakes Brake lock To engage the brake lock, first pull the brake lever towards you as you would normally engage the brakes. Then push the knob seen here behind the brake lever .
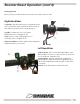
The Battery The Boomerbeast Deluxe / Ultimate come with a solar powered lithium ion battery case. This allows the unit to trickle charge the bike while it is out in the sun for additional range and battery longevity. To take it out of the battery, on the right hand side there is a lock in which you can put your key into. Turn the key and release the frame top of the frame that keeps it in place. Unplug all connecting wires to the battery and then lift it up by the handles on each side.
The Battery (cont’d) The Boomerbeast battey can function completly on its own whether you want to use it as a power bank or charge it in or outside of your home. 1) External Charging Port - This is the charging port if you want to charge the battery outside of this unit. Plug the charger directly into this spot. Please see below for charging instructions.
The Battery Charging Your Unit If you are charging the Boomerbeast directly in the frame there is a chargeport to the left near the front of the unit that is covered by a plastic flap. To begin charging, take the charger and plug it into a 110V wall outlet. Once it has been plugged in, the light will turn green to show that the charger is on. Take the other end and plug it into the Boomerbeast as seen on the right and the charger will turn red.
The Controller Daymak Drive Bluetooth Controller The Daymak Drive controller is what makes the unit do what it does when a function is press or a switch is switched. This controller is located underneath the seat covered by a black panel. This should not be tampered with by consumers. If you have any issues with your controller please see a licensed Daymak dealer for support. *Please note* On the Ultimate version, there are two controllers.
Mirrors The Boomerbeast comes with a set of mirrors that screw on each handlebar. Screw each mirror into the appropriate side (left mirror on left side etc). Until it is loosely in the position you want. Then take a wrench and tighten the bolt at the bottom of the mirrors to make it stick in that position. Ball joint Hitch The Boomerbeast comes with a ball joint hitch so that you can tow a wagon or whatever you need to behind your unit.
The Seat King Seat The Boomerbeast comes with an adjustable King seat with arm rests. 1) Arm Rests - Raise these up or down as you see fit. Set it however makes you the most comfortable. 2) Back Rest Angle - Pull this lever up and push the back rest of your chair to set it to the angle that is most comfortable for you. 3) Seat Position - Pull this lever up and slide the seat either forward or backward to pull the seat closer or further from the handlebars.
Maintenance Always ensure that your tire pressure is to the recommended value of your unit. You can find the PSI value on the side of each tire. Check your brakes before you ride, make sure they are firm and the unit does not move while they are being pulled. Check that all lights are working, headlights brake lights and signal lights. When storing it outside, use a cover to prevent weather damage to the unit. If possible bring the whole unit inside. Otherwise if possible bring the battery inside.
Thank you for choosing Daymak 18