
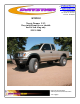
Manual

Installation Steps
CAUTION: BEFORE BEGINNING INSTALLATION. READ INSTRUCTIONS CAREFULLY AND COM-
PLETELY.
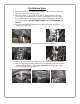
15. Park vehicle on a level work area and set emergency brake. Block front tires and lift the rear of the vehicle un-
til the wheels clear the ground approximately 3”. Place jack stands under frame rail behind inner spring perch.
Lower vehicle onto jack stands with axle supported by floor jack.
16. Carefully remove upper and lower spring shackle mounting hardware and left and right shackle plates. Lower
axle carefully until wheels touch the ground.
17. Carefully remove the existing rubber and metal outer shell. The spring eyes have a rubber bushing that is
molded into an outer shell. This needs to be removed and it may take force to remove it. It is recommended
that you have an experienced mechanic perform this operation.
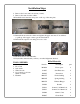
18. Clean the I.D. of the spring eye and the frame with a wire brush or sand paper. Install the new bushings into
the frame and the spring eye.
19. Install the new shackle onto the frame with the small opening first. Insert the 5” bolt and start the nut. Care-
fully raise the axle so that the large opening of the shackle lines up with the spring eye. Insert the 6” bolt and
tighten nuts 35 ft lbs.
20. Generously grease the Zerk fittings with Daystar Lubrathane Poly Lube or Teflon based grease. DO NOT USE
OIL BASED GREASE!
21. Raise the vehicle and remove the jack stands. RE-TORQUE THE SHACKLE BOLTS AFTER 500 MILES.
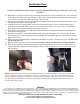
22. Remove the rear rubber exhaust hanger and lower the exhaust bracket down 1 hole. Some trimming may be
required. Install the supplied new exhaust hanger. This is so that the exhaust won’t rub on the bottom of the
rear leaf spring.
WARNING
This vehicle has been modified to enhance its performance. The steering, braking and handling of this vehicle will differ from standard passen-
ger cars and trucks, This vehicle handles differently from an ordinary vehicle in driving conditions which may occur on streets, highways and off
road. Avoid unnecessary abrupt maneuvers, sudden stops, sharp turns and other driving conditions that could cause loss of control, possibly
leading to a roll over or other accident that could result in serious injury or death to driver and passengers. If larger tires are installed the speed-
ometer will read lower than the vehicles actual speed.
DRIVE WITH CARE, REDUCE SPEED AND WEAR SEAT BELTS AT ALL TIMES.
Do not combine with any other suspension kit.
This kit should be installed by a professional mechanic.
IMPORTANT NOTE: The advertised amount of lift that this kit provides and the thickness of the spacers supplied will
not be the same! For example, a 2-1/2” lift may only have 1-1/2” thick spacers. The reason for the difference between
the spacer thickness and the amount of lift has to do with suspension geometry. There is a ratio involved, and it is this
ratio that determines the thickness of the spacers. Rest assured, installing the spacer supplied will result in the proper
amount of lift out at the wheel.