™ WDX-AS10 10” Active Sub woofer OE DENT USER MANUAL Installation Instructions | Owners Manual [Te DB Research LLP. 302 Han more Industrial Parkway Harbinger, TX 78550 Ph: (877) 787-0101 Fac (956) 421-4513 www drive. nat tech support: supportable net Due bo continuous Improvement of the product, specifications are subject to change without notice.
Introduction Congratulations on your purchase of a DB Drive state-of-the-art sub woofer. Your selection of a DB Drive car audio product indicates a true appreciation of fine musical reproduction. Whether adding to an existing system or including your DB Drive sub woofer in a new system, you are certain to notice immediate performance benefits. Keep Your Sales Receipt Take this time to attach your sales receipt to the manual and put in a safe place.
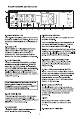
Panel controls and features all Cumin A.POWER STATUS LED F.INPUT GAIN CONTROL This bl-color LED glows green when power Is on and no problems are present. If one of the protection circuits comes on, it will sangs to red. B.PHASE SHIFT Use this switch to help compensate for time alignment problems in the system. Such problems usually result from having the sub woofer ata different distance from the listener than the other speakers In the system. C.
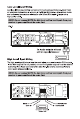
Low Level Input Wiring Low-level (RCA) Input wiring Is preferred for best audio performance. Most trunk or hatchback installations will require a 15-20 fest RCA cable, while pickup trucks and under-seat installations will require a 6-12 feet RCA cable. Always use a high quality cable. Fig-1 FIFO) 1 i To Audio outputs of head unit or signal processor High Level Input Wiring [Oder] The high level Input(s) should only be used when your receiver lacks RCA outputs.
Power Connections Connect the ground terminal to the closest point on the chassis of the vehicle. Keep this ground wire fo less than 39” (100 em) in length. Use at least an 8 gauge {or heavier} wire. Connect the remote terminal to the cremate output of head unit using 16 gauge ( or heavier ) wire. Connect an empty fuse holder within the car battery, and run at least an 8 gauge {or heavier} cable from this fuse to the amplifier location.
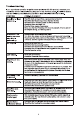
Troubleshooting If you experience operation or performance problems with this product, compare your Installation with the electrical wiring diagram on the previous pages. If problems persist, read the following troubleshooting tips which may help eliminate the problems. SYMPTOM POSSIBLE REMEDY Amplifier will not Check to make sure you have a good ground connection. power up. Check that the Remote input (Tum-On) has 12 Volts. Check that there Is battery power on the terminal.
LIMITED WARRANTY DB Drive™ warrants any products purchased in the US.A. from an authorized DB Drive™ dealer. All products are warranted to be free from defects in material and workmanship under normal use and service for a period of one (1} year when purchased over the counter. This warranty applies to the original purchase only.