MANUALE D’USO – Sezione 1 USER MANUAL - Section 1 BEDIENUNGSANLEITUNG - Abschnitt 1 CARACTERISTIQUES TECHNIQUES - Section 1 MANUAL DEL USUARIO - Sección 1 Le avvertenze nel presente manuale devono essere osservate congiuntamente al “MANUALE D’USO - Sezione 2”. The warnings in this manual must be observed together with the "User Manual - Section 2". Die Warnungen in diesem Handbuch müssen in Verbindung mit der "BEDIENUNGSANLEITUNG - Abschnitt 2" beobachtet werden.
EMI CLASSIFICATION According to the standards EN 55103 this equipment is designed and suitable to operate in E3 (or lower E2, E1) Electromagnetic environments. FCC CLASS B STATEMENT ACCORDING TO TITLE 47, CHAPTER I, SUBCHAPTER A, PART 15, SUBPART B This device complies with part 15 of the FCC Rules.
ITALIANO ENGLISH DEUTSCH FRANÇAIS ESPAÑOL ES 602 - 802 REV. 1.1 Cod. 420120228 REV. 1.
Italiano INDICE 1. INFORMAZIONI GENERALI.................................................................................................... BENVENUTI!......................................................................................................................... PANORAMICA INTRODUTTIVA........................................................................................... RIFERIMENTI PER L’UTENTE.................................................................................................
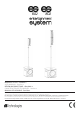
Italiano 1. INFORMAZIONI GENERALI BENVENUTI! Grazie per aver acquistato un prodotto progettato e sviluppato in Italia da dBTechnologies! La serie ES 602-802, di facile portabilità, racchiude in sé anni di esperienza ed innovazione in campo acustico, elettronico, di ricerca sui materiali. PANORAMICA INTRODUTTIVA La serie di sistemi bi-amp ES 602-802 è caratterizzata da una facile trasportabilità, unita a prestazioni acustiche eccellenti.
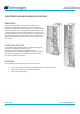
Italiano CARATTERISTICHE MECCANICHE ED ACUSTICHE DIMENSIONI I sistemi ES 602 ed ES 802 si presentano compatti. Sono facilmente smontabili per il trasporto, il peso e l’ingombro principale è quello della sezione subwoofer: 14,2 kg per l’ES 602, 16,4 kg per l’ES 802.
Italiano CARATTERISTICHE DELLA SEZIONE DI AMPLIFICAZIONE E DI CONTROLLO L’amplificatore digitale di ultima generazione DIGIPRO G3, in classe D, è il cuore dei sistemi ES 602-802, ed è capace, rispettivamente, di una potenza sonora di 800 W (Power Amp - Picco) per ES 602, e di una potenza sonora di 1200 W (Power Amp - Picco) per ES 802.
Italiano SEZIONE DI INPUT E DI CONTROLLO 1. CANALE “CH1” L’ingresso combo “CH1” permette l’ingresso sia di un collegamento da MIXER/LINE, sia un collegamento microfonico. ATTENZIONE! • Utilizzare solo cavi dotati di connettori originali Neutrik® di alta qualità. 2. USCITA “LINK” Permette di rilanciare il segnale in uscita a un altro sistema di diffusione ES o ad altro diffusore attivo. 3.
Italiano 8. SELETTORE LINE/MIC Permette di selezionare se l’ingresso è un segnale di linea o se proviene da un microfono. SEZIONE DI ALIMENTAZIONE E COLLEGAMENTO DEL SATELLITE 9. INTERRUTTORE DI ALIMENTAZIONE Interruttore ON (I) OFF (0) di alimentazione del sistema 10. INGRESSO DI ALIMENTAZIONE Ingresso per il connettore del cavo di alimentazione in dotazione. 11. OUTPUT DI COLLEGAMENTO AL SATELLITE Uscita per il collegamento al satellite ES-TOP A tramite cavo bilanciato SPEAKON. 12.
Italiano 2. PRIMA ACCENSIONE CONTENUTO DELLA CONFEZIONE Verificate, aprendo il contenuto della confezione, che il contenuto dell’imballo del sistema ES 602- ES 802 sia completo. L’imballo contiene: 1. Cavo di alimentazione 2. ES SYSTEM: • 602: 1 unità subwoofer ES-SUB 602 + 1 satellite ES-TOP A • 802: 1 unità subwoofer ES-SUB 802 + 1 satellite ES-TOP A + 1 satellite ES-TOP B 3. 2 pali diametro 25 mm con filettatura M20, di cui uno telescopico con pin di regolazione dell’altezza e volantino di bloccaggio 4.
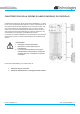
Italiano INSTALLAZIONE MONTAGGIO DEL SATELLITE (ES 602) O DEI SATELLITI (ES 802) SUL SUBWOOFER ES 602 e 802: 1. Avvitare il palo inferiore da 25 mm nell’apposito foro presente sul lato superiore del subwoofer, come illustrato. 2. Avvitare su questo il palo telescopico. 3. Regolare quindi l’altezza dell’asta, prima allentando il volantino, poi inserendo il pin nel foro dell’asta telescopica all’altezza desiderata. Riavvitare quindi il volantino ES 602: 1.
Italiano 4. A questo punto Inserire il diffusore così ottenuto dal lato TOP A utilizzando il foro posto sulla parte inferiore. ATTENZIONE! • • • Assicurarsi che il TOP A sia ben fissato, ma non forzare mai con un movimento rotatorio l’installazione per non danneggiare il sistema di innesto.
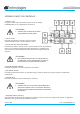
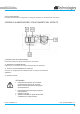
Italiano COLLEGAMENTO DELL’ALIMENTAZIONE E DEL SATELLITE (ES 602) / SATELLITI (ES 802) ALIMENTAZIONE ES-TOP A ES-TOP A ES-TOP A ATTENZIONE! • • ES 602 - 802 REV. 1.1 Utilizzare solo cavi dotati di connettori Neutrik®. Sostituire i cavi eventualmente danneggiati, per evitare malfunzionamenti ed una scarsa qualità del suono. Cod. 420120228 REV. 1.
Italiano Per installare correttamente il diffusore ES 602 / ES 802: • • • • • • • • • Effettuare la connessione all’input principale (1) con un cavo dotato di connettore XLR (bilanciato) o di tipo TRS (sbilanciato). Per una panoramica dei cavi più comuni esistenti per i collegamenti audio confrontare la tabella sottostante. Scegliere, a seconda della sorgente (linea/mixer o microfonica) l’impostazione del selettore relativo (8). Portare al minimo il volume MASTER CONTROL (4).
Italiano COLLEGAMENTO DELLE USCITE FRA PIU’ MODULI (rilancio del segnale audio) LINK E’ possibile rilanciare il segnale audio utilizzando un collegamento con cavo bilanciato XLR a una seconda unità, e in cascata a una terza, e così via. Per rilanciare il segnale audio effettuare il collegamento collegando l’uscita LINK (2) del primo ES 602 o ES 802 all’ingresso (1) di un secondo dispositivo. Effettuare il collegamento con il sistema a valle con apposito selettore (8) sulla posizione LINE.
Italiano 3. PROGRAMMI PREIMPOSTATI DEL DSP INTERNO Il potente DSP dei sistemi ES 602-802 presenta 8 configurazioni, che permettono di equalizzare digitalmente il segnale audio secondo diversi contesti preconfigurati e diverse esigenze di utilizzo. Per selezionare il programma relativo basta utilizzare un piccolo cacciavite e ruotare il rotary sul numero di programma desiderato: 1.
Italiano 4. RISOLUZIONE DEI PROBLEMI Il diffusore non si accende: 1. Verificare la corretta presenza dell’alimentazione a monte dell’impianto 2. Verificare che il cavo di alimentazione sia correttamente inserito 3. Verificare che il selettore ON/OFF sia posizionato sul simbolo “I”. Il diffusore si accende ma non emette nessun suono: 1. Verificare che i collegamenti in ingresso del segnale audio principale ed eventualmente di quello ausiliario siano correttamente effettuati 2.
Italiano 5.
Italiano PROCESSORE Controller interno: Impostazioni del sistema: Limiter: DSP 24 bit/48 kHz Impostazioni predefinite selezionabili Dual active, Peak, RMS, Termico INGRESSI Ingressi: Uscite: 1x Combo (XLR/Jack) bilanciato/sbilanciato + 1 ingresso stereo RCA 1x XLR link OUT bilanciato DIMENSIONI Cabinet del subwoofer: Cabinet del satellite: Maniglie: Compensato spessore 15 mm Polipropilene PP 2, laterali (nel subwoofer) Montaggio su palo: 2 pali di diametro 25 mm con filettature M20 in dotazione, di
Italiano 6.
Italiano PROCESSORE Controller interno: Impostazioni del sistema: Limiter: DSP 24 bit/48 kHz Impostazioni predefinite selezionabili Dual active, Peak, RMS, Termico INGRESSI Ingressi: Uscite: 1x Combo (XLR/Jack) bilanciato/sbilanciato + 1 ingresso stereo RCA 1x XLR link OUT bilanciato DIMENSIONI Cabinet del subwoofer: Cabinet del satellite: Maniglie: Compensato spessore 15 mm Polipropilene PP 2, laterali (nel subwoofer) Montaggio su palo: 2 pali di diametro 25 mm in dotazione, di cui uno telescopico
Italiano Le caratteristiche, specificazioni e aspetto dei prodotti sono soggetti a possibili cambiamenti senza previa comunicazione. dBTechnologies si riserva il diritto di apportare cambiamenti o miglioramenti nel design o nelle lavorazioni senza assumersi l’obbligo di cambiare o migliorare anche i prodotti precedentemente realizzati. A.E.B. Industriale Srl Via Brodolini, 8 Località Crespellano 40053 VALSAMOGGIA BOLOGNA (ITALIA) Tel +39 051 969870 Fax +39 051 969725 www.dbtechnologies.
English INDEX 1. GENERAL INFORMATION.......................................................................................................24 WELCOME!..........................................................................................................................24 PRELIMINARY OVERVIEW...................................................................................................24 USER REFERENCES...................................................................................................
English 1. GENERAL INFORMATION WELCOME! Thank you for purchasing a product designed and developed in Italy by dBTechnologies! The ES 602-802 series, easy to transport, is the result of years of experience and research on acoustics, electronics and materials. PRELIMINARY OVERVIEW The ES 602-802 bi-amp system series is easy to transport, while providing excellent acoustic performance.
English MECHANICAL AND ACOUSTIC CHARACTERISTICS DIMENSIONS The ES 602 and ES 802 systems are compact; they can be easily disassembled for transport and the main weight is that of the subwoofer section: 14.2 kg for ES 602, 16.4 kg for ES 802.
English • • • Protect the module from humidity Never try to open the amplifier In case of malfunction, immediately cut off the power supply, by disconnecting the module from the mains, then contact an authorised repairman The DIGIPRO G3 panel consists of: • • INPUT AND CONTROL SECTION POWER SUPPLY AND SATELLITE CONNECTION SECTION ES 602 - 802 26 AMPLIFIER ATTENTION! POWER SUPPLY AND SATELLITE CONNECTION SECTION The D-class latest generation digital amplifier DIGIPRO G3 is the core of the ES 602-80
English English INPUT AND CONTROL SECTION 1. “CH1” CHANNEL The “CH1” combo input allows to input both a connection from MIXER/LINE and a microphone connection. ATTENTION! • Only use cables equipped with highquality genuine Neutrik® connectors. 2. “LINK” OUTPUT It allows to link the output signal to another ES speaker system or to another active speaker. 3.
English 8. LINE/MIC SELECTOR It allows to select whether the incoming signal is a line signal or whether it comes from a microphone. POWER SUPPLY AND SATELLITE CONNECTION SECTION 9. POWER SWITCH ON (I) OFF (0) system power supply switch 10. POWER SUPPLY INPUT Input for the connector of the supplied power cord. 11. SATELLITE CONNECTION OUTPUT Output allowing to connect the system to the ES-TOP A satellite through a SPEAKON balanced cable. 12.
English 2. FIRST SWITCH-ON PACKAGE CONTENTS Open the package and check that the ES 602-ES 802 system packaging contains all the items included in the supply. The packaging includes: 1. power cord 2. ES SYSTEM: • 602: 1 ES-SUB 602 subwoofer unit + 1 ES-TOP A satellite • 802: 1 ES-SUB 802 subwoofer unit + 1 ES-TOP A satellite + 1 ES-TOP B satellite 3. 2 poles having a diameter of 25 mm, with M20 threading, one of which telescopic, equipped with height adjustment pin and locking hand wheel 4.
English INSTALLATION INSTALLING THE SATELLITE (ES 602) OR THE SATELLITES (ES 802) ON THE SUBWOOFER ES 602 and 802: 1. Screw the lower 25 mm pole into the specifically designed hole on the subwoofer top side, as shown. 2. Screw the telescopic pole onto the latter. 3. Then adjust the rod height, first loosening the hand wheel, then inserting the pin into the hole of the telescopic rod at the desired height. Then retighten the hand wheel. ES 602: 1.
English 4. Now insert the speaker assembly from the TOP A side using the hole located on the bottom side. ATTENTION! • • • Make sure that ES-TOP A is firmly in place, but never forcibly rotate it during installation, do avoid damaging the coupling system. Never transport the ES-TOP A and ES-TOP B speakers while they are coupled to each other; always detach them when carrying them to avoid damaging the couplings.
English CONNECTING THE POWER SUPPLY AND THE SATELLITE (ES 602) / SATELLITES (ES 802) ES-TOP A POWER SUPPLY ES-TOP A ES-TOP A ATTENTION! • ES 602 - 802 32 Only use cables equipped withNeutrik® connectors. Replace any damaged cables, to avoid malfunctions and poor sound quality Cod. 420120228 REV. 1.
English To properly install the ES 602 / ES 802 speaker: • • • • • • • • • Perform the connection to the main input (1) using a cable equipped with a XLR (balanced) or TRS (unbalanced) connector. For an overview of the most common cables available for audio connection please refer to the table below. Depending on the source (line/mixer or microphone), set the relevant selector (8) to the appropriate value. Turn the MASTER CONTROL (4) volume to the minimum level.
English CONNECTING OUTPUTS BETWEEN MULTIPLE MODULES (audio signal linking) LINK The audio signal can be linked using a balanced XLR cable connection to a second unit, then in a cascade to a third one, and so on. To link the audio signal connect the LINK output (2) of the first ES 602 or ES 802 to the input (1) of a second device. Perform the connection with the downstream system by turning the relevant selector (8) to the LINE position. The volumes of the linked systems will be independent of each other.
English 3. INTERNAL DSP PRE-SET PROGRAMS The powerful DSP of the ES 602-802 systems provides 8 configurations, allowing to digitally equalise the audio signal according to different pre-set contexts and different usage needs. To select the relevant program just use a small screwdriver and turn the rotary control to the desired program number: 1. FLAT: the setting performs no equalisation, directly outputting the input signal with no changes 2. BASS BOOST: it emphasises the low frequencies 3.
English 4. TROUBLESHOOTING The speaker doesn’t turn on: 1. Check that the power supply upstream of the system is working properly 2. Check that the power cord is properly plugged 3. Check that the ON/OFF selector is turned to “I”. The speaker turns on but it doesn’t output any sound: 1. Check that the input connections of the main audio signal and of the auxiliary one, if any, have been performed properly 2. Check that the cables in use are not damaged 3.
English 5.
English PROCESSOR Internal controller: System settings: Limiter: DSP 24 bit/48 kHz Selectable pre-defined settings Dual active, Peak, RMS, Thermal INPUTS Inputs: Outputs: 1x Combo (XLR/Jack) balanced/unbalanced + 1 RCA stereo input 1x XLR link OUT, balanced DIMENSIONS Subwoofer cabinet: Satellite cabinet: Handles: Installation on pole: Plywood, thickness 15 mm Polypropylene PP 2, lateral (in the subwoofer) the supply includes 2 poles having a diameter of 25 mm, with M20 threading, one of which telesco
English 6.
English PROCESSOR Internal controller: System settings: Limiter: DSP 24 bit/48 kHz Selectable pre-defined settings Dual active, Peak, RMS, Thermal INPUTS Inputs: Outputs: 1x Combo (XLR/Jack) balanced/unbalanced + 1 RCA stereo input 1x XLR link OUT, balanced DIMENSIONS Subwoofer cabinet: Satellite cabinet: Handles: Installation on pole: Plywood, thickness 15 mm Polypropylene PP 2, lateral (in the subwoofer) the supply includes 2 poles having a diameter of 25 mm, with M20 threading, one of which telesco
English Features, specification and appearance of products are subject to change without notice. dBTechnologies reserves the right to make changes or improvements in design or manufacturing without assuming any obligation to change or improve products previously manufactured. A.E.B. Industriale Srl Via Brodolini, 8 Località Crespellano 40053 VALSAMOGGIA BOLOGNA (ITALIA) Tel +39 051 969870 Fax +39 051 969725 www.dbtechnologies.com info@dbtechnologies-aeb.com ES 602 - 802 REV. 1.1 Cod. 420120228 REV. 1.
Deutsch INHALTSVERZEICHNIS 1. ALLGEMEINE INFORMATIONEN............................................................................................43 WILLKOMMEN!...................................................................................................................43 EINFÜHRENDE ÜBERSICHT.................................................................................................43 HINWEISE FÜR DEN BENUTZER.......................................................................................
Deutsch 1. ALLGEMEINE INFORMATIONEN WILLKOMMEN! Dank für den Erwerb eines in Italien von dBTechnologies geplanten und entwickelten Produkts! Die leicht zu befördernde Serie ES 602-802 birgt in sich jahrelange Erfahrung auf dem Gebiet der Akustik, der Elektronik und der Materialforschung. EINFÜHRENDE ÜBERSICHT Die Doppelverstärker-Reihe ES 602-802 zeichnet sich aus durch einfachen Transport in Verbindung mit ausgezeichneten akustischen Leistungen.
Deutsch MECHANISCHE UND AKUSTISCHE MERKMALE ABMESSUNGEN Die Systeme ES 602 und ES 802 sind Kompakt-Ausführungen. Sie sind für den Transport leicht zu zerlegen. Das größte Gewicht ist das des Subwoofers: 14,2 kg bei ES 602, 16,4 kg bei ES 802. Für die Montage des Satelliten (ES 602) bzw. der beiden Satelliten (ES 802) werden in der Verpackung zwei 25 mm dicke Stangen mit Gewinde M20 mitgeliefert, von denen eine teleskopisch ist, für die Einstellung auf vorgegebene Höhen bis zu insgesamt ca.
Deutsch • • • Das Modul muss vor Feuchtigkeit geschützt werden Es darf keinesfalls versucht werden, den Verstärker zu öffnen Bei Funktionsstörungen sofort die Stromversorgung unterbrechen, indem der Netzstecker des Moduls abgezogen wird.
Deutsch EINGANGS- UND STEUERSEKTION 1. KANAL “CH1” Der Kombi-Eingang “CH1” gestattet den Eingang sowohl über einen MIXER/LINE- Anschluss, als auch über ein angeschlossenes Mikrophon. ACHTUNG ! • Ausschließlich Kabel mit hochwertigen Originalsteckern Neutrik® verwenden. 2. AUSGANG “LINK” Gestattet das Durchschleifen des Ausgangssignals zu einem anderen ES-Lautsprechersystem oder einem anderen aktiven Lautsprecher 3.
Deutsch 7. STEREO-EINGANG TYP RCA Der Stereo-Eingang gestattet den Anschluss eines CD-Players oder MP3 oder anderen externen Geräten zusätzlich oder als Alternative zum HAUPTKANAL “CH1” (1). 8. WAHLSCHALTER LINE/MIC Gestattet die Auswahl zwischen Leitungssignal oder von einem Mikrophon kommendem Signal. NETZTEIL UND ANSCHLUSS DES SATELLITEN 9. NETZSCHALTER Schalter ON (I) OFF (0) für die Netzversorgung des Systems. 10. NETZEINGANG Eingang für den Stecker des mitgelieferten Versorgungskabels. 11.
Deutsch 2. ERSTE INBETRIEBNAHME VERPACKUNGSINHALT Beim Öffnen der Verpackung des Systems ES 602- ES 802 kontrollieren, dass der Inhalt vollständig ist. Die Verpackung enthält: 1. Versorgungskabel 2. ES SYSTEM: • 602: 1 ES-SUB 602 subwoofer unit + 1 ES-TOP A satellite • 802: 1 ES-SUB 802 subwoofer unit + 1 ES-TOP A satellite + 1 ES-TOP B satellite 3. 2 Stangen Durchmesser 25 mm mit Gewinde M20, wovon eine teleskopisch mit Pin zur Höheneinstellung und Feststell-Drehknopf 4.
Deutsch INSTALLATION MONTAGE DES SATELLITEN (ES 602) BZW. DER BEIDEN SATELLITEN (ES 802) AM SUBWOOFER ES 602 und 802: 1. Die untere Stange mit 25 mm Durchmesser in die entsprechende Öffnung an der Oberseite des Subwoofers einschrauben, wie in der Abbildung dargestellt. 2. Die Teleskopstange daran anschrauben. 3. Die Höhe der Stange regeln, indem zunächst der Feststellknopf gelöst und dann der Pin in die Öffnung der Stange eingerastet wird, die der gewünschten Höhe entspricht.
Deutsch von TOP A anhand der Öffnung an der Unterseite einsetzen. ACHTUNG ! • • • Sicherstellen, dass der ES-TOP A einwandfrei befestigt ist. Dabei darf die Vorrichtung jedoch nicht gewaltsam gedreht werden, da andernfalls die Steckverbindung beschädigt wird.
Deutsch ANSCHLUSS DER STROMVERSORGUNG UND DES SATELLITEN (ES 602) / BZW. DER SATELLITEN (ES 802) ES-TOP A POWER ES-TOP A ES-TOP A ACHTUNG ! • ES 602 - 802 REV. 1.1 Ausschließlich Kabel mit Stecker Neutrik® verwenden. Eventuell beschädigte Kabel müssen ersetzt werden, um Funktionsstörungen und schlechte Tonqualität zu vermeiden Cod. 420120228 REV. 1.
Deutsch Zur korrekten Installation des Lautsprechers ES 602 / ES 802: • • • • • • • • • Den Haupteingang (1) anhand eines Kabels mit Stecker XLR (symmetrisch) oder TRS (unsymmetrisch) anschließen. Eine Übersicht über die handelsüblichen Kabel für Audio-Anschlüsse bietet die nachstehende Tabelle. Je nach Tonquelle (Leitung/Mixer oder Mikrophon) den Wahlschalter (8) entsprechend einstellen. Die Lautstärke MASTER CONTROL (4) auf Minimum stellen.
Deutsch ANSCHLUSS DER AUSGÄNGE UNTER MEHREREN MODULEN (Durchschleifen des Audiosignals) LINK Das Audio-Signal kann unter Verwendung eines symmetrischen Kabels XLR einer zweiten Einheit und in Kaskadenschaltung zu einer dritten Einheit durchgeschleift werden, u.s.w. Dazu muss der Ausgang LINK (2) des ersten ES-602 oder ES-802 am Eingang (1) eines zweiten Geräts angeschlossen werden. Den Anschluss an das nachgeschaltete System ausführen, während der Wahlschalter (8) auf LINE steht.
Deutsch 3. VORGEGEBENE PROGRAMME DES INTERNEN DSPPROZESSORS Der leistungsfähige DSP- Prozessor der Systeme ES 602-802 enthält 8 Konfigurationen, die es gestatten, eine digitale Entzerrung des Audiosignals aufgrund verschiedener, vorkonfigurierter Aufbauten und unterschiedlicher Betriebserfordernisse vorzunehmen. Zur Auswahl des gewünschten Programms mit einem kleinen Schraubenzieher den Drehschalter auf die Nummer des gewünschten Programms drehen: 1.
Deutsch 4. TROUBLESHOOTING Der Lautsprecher lässt sich nicht einschalten: 1. Kontrollieren, dass die Anlage korrekt mit Spannung versorgt wird 2. Kontrollieren, dass das Versorgungskabel richtig eingesteckt ist 3. Kontrollieren, dass der Wahlschalter ON/OFF auf “I” steht. Der Lautsprecher lässt sich einschalten, gibt jedoch keinen Ton ab: 1. Kontrollieren, dass die Anschlüsse des eingehenden Haupt-Audiosignals und eventuell die des Hilfssignals korrekt ausgeführt wurden 2.
Deutsch 5.
Deutsch PROZESSOR Interner Controller: Einstellungen des Systems: Limiter: DSP 24 bit/48 kHz Wählbare Voreinstellungen Dual active, Peak, RMS, Thermo EINGÄNGE Eingänge: 1x Kombi (XLR/Jack) symmetrisch/unsymmetrisch + 1 StereoEingang RCA Ausgänge: 1x XLR link OUT symmetrisch ABMESSUNGEN Subwoofer-Gehäuse: Sperrholz Stärke 15 mm Satelliten-Gehäuse: Polypropylen PP Griffe Montage auf Stange: 2, seitlich (am Subwoofer) 2 mitgelieferte Stangen Durchmesser 25 mm mit Gewinde M20, davon eine teleskopisc
Deutsch 6.
Deutsch PROZESSOR Interner Controller: Einstellungen des Systems: Limiter: DSP 24 bit/48 kHz Wählbare Voreinstellungen Dual active, Peak, RMS, Thermo EINGÄNGE Eingänge: 1x Kombi (XLR/Jack) symmetrisch/unsymmetrisch + 1 StereoEingang RCA Ausgänge: 1x XLR link OUT symmetrisch ABMESSUNGEN Subwoofer-Gehäuse: Sperrholz Stärke 15 mm Satelliten-Gehäuse: Polypropylen PP Griffe Montage auf Stange: 2, seitlich (am Subwoofer) 2 mitgelieferte Stangen Durchmesser 25 mm mit Gewinde M20, davon eine teleskopisc
Deutsch Eigenschaften, Spezifikationen und Aussehen der Produkte können ohne Ankündigung geändert werden. dBTechnologies behält sich das Recht vor, Änderungen oder Verbesserungen der Eigenschaften oder Herstellung des Produkts vorzunehmen, ohne verpflichtet zu sein, die vorher hergestellten Produkte auf den gleichen Stand zu bringen. A.E.B. Industriale Srl Via Brodolini, 8 Località Crespellano 40053 VALSAMOGGIA BOLOGNA (ITALIA) Tel +39 051 969870 Fax +39 051 969725 www.dbtechnologies.
Français RÉSUMÉ 1. INFORMATIONS GÉNÉRALES.................................................................................................62 BIENVENUE !........................................................................................................................62 VUE D’ENSEMBLE INTRODUCTIVE......................................................................................62 RÉFÉRENCES POUR L’UTILISATEUR.....................................................................................
Français 1. INFORMATIONS GÉNÉRALES BIENVENUE ! Merci d’avoir acheté un produit conçu et développé en Italie par dBTechnologies ! La série ES 602-802, à la portabilité aisée, renferme en soi des années d’expérience et de recherche dans le domaine acoustique, électronique, de recherche sur les matériaux. VUE D’ENSEMBLE INTRODUCTIVE La série de systèmes bi-amp ES 602-802 est caractérisée par une transportabilité aisée, jointe à d’excellentes performances acoustiques.
Français CARACTÉRISTIQUES MÉCANIQUES ET ACOUSTIQUES DIMENSIONS Les systèmes ES 602 et ES 802 sont compacts ; ils sont facilement démontables pour le transport et le poids principal est celui de la section caisson de graves : 14,2 kg pour ES 602, 16,4 kg pour ES 802.
Français ATTENTION ! • • • Protéger le module de l’humidité Ne tenter en aucune façon d’ouvrir l’amplificateur En cas de dysfonctionnement, couper immédiatement l’alimentation, en débranchant le module du réseau, et contacter un réparateur agréé SÉCTION AMPLIFICATEUR D’ALIMENTATION ET CONNEXION DU SATELLITE L’amplificateur numérique de dernière génération DIGIPRO G3, en classe D, est le cœur des systèmes ES 602-802, et il est capable, respectivement, d’une puissance acoustique de 800 W (Power Amp - Peak
Français SECTION D’INPUT ET DE CONTRÔLE 1. CANAL “CH1” L’entrée combo “CH1” permet l’entrée soit d’une connexion depuis MIXER/LINE, soit une connexion microphonique. ATTENTION ! • Utiliser seulement des câbles dotés de connecteurs originaux Neutrik® de haute qualité. 2. SORTIE “LINK” Permet de relancer le signal de sortie à un autre système de diffusion ES ou à un autre diffuseur actif. 3.
Français 7. ENTRÉE STÉRÉO TYPE RCA Entrée stéréo qui permet de connecter un dispositif comme un lecteur CD ou MP3 ou autres dispositifs extérieurs, en plus ou à la place de l’entrée principale CANAL “CH1” (1). 8. SÉLECTEUR LINE/MIC Permet de sélectionner si l’entrée est un signal de ligne ou s’il provient d’un microphone SÉCTION D’ALIMENTATION ET CONNEXION DU SATELLITE 9. INTERRUPTEUR D’ALIMENTATION Interrupteur ON (I) OFF (0) d’alimentation du système 10.
Français 2. PREMIÈRE MISE EN ROUTE CONTENU DE L’EMBALLAGE Vérifiez, en ouvrant le contenu de l’emballage, que le contenu de l’emballage du système ES 602- ES 802 soit complet. L’emballage contient : 1. câble d’alimentation 2. ES SYSTEM: • 602: 1 unité caisson de graves ES-SUB 602 + 1 satellite ES-TOP A • 802: 1 unité caisson de graves ES-SUB 802 + 1 satellite ES-TOP A+ 1 satellite ES-TOP B 3.
Français INSTALLATION MONTAGE DU SATELLITE (ES 602) OU DES SATELLITES (ES 802) SUR LE CAISSON DE GRAVES ES 602 et 802: 1. Visser la barre de support inférieure de 25 mm dans le trou prévu à cet effet présent sur le côté supérieur du caisson de graves, comme illustré. 2. Visser sur celle-ci la barre télescopique. 3. Régler donc la hauteur de la tige, d’abord en desserrant le volant, puis en insérant la goupille dans le trou de la tige télescopique à la hauteur souhaitée. Revisser ensuite le volant.
Français ATTENTION ! • • • S’assurer que le ES-TOP A soit bien fixé, mais ne jamais forcer avec un mouvement rotatoire l’installation pour ne pas endommager le système d’enclenchement.
Français CONNEXION DE L’ALIMENTATION ET DU SATELLITE (ES 602) / SATELLITES (ES 802) POWER SUPPLY ES-TOP A ES-TOP A ES-TOP A ATTENTION ! • ES 602 - 802 70 Utiliser seulement des câbles dotés de connecteurs Neutrik®. Remplacer les câbles éventuellement endommagés, pour éviter des dysfonctionnements et une mauvaise qualité du son Cod. 420120228 REV. 1.
Français Pour installer correctement le diffuseur ES 602 / ES 802 : • • • • • • • • • Effectuer la connexion à l’entrée principale (1) avec un câble doté de connecteur XLR (équilibré) ou de type TRS (déséquilibré). Pour une vue d’ensemble des câbles les plus communs existants pour les connexions audio consulter le tableau ci-dessous. Choisir, selon la source (ligne/mixeur ou microphonique) le réglage du sélecteur relatif (8). Mettre le volume MASTER CONTROL (4) au minimum.
Français CONNEXION DES SORTIES ENTRE PLUSIEURS MODULES (relance du signal audio) LINK Il est possible de relancer le signal audio en utilisant une connexion avec câble équilibré XLR à une seconde unité, et en cascade à une troisième, et ainsi de suite. Pour relancer le signal audio effectuer la connexion en connectant la sortie LINK (2) du premier ES-602 ou ES-802 à l’entrée (1) d’un second dispositif. Effectuer la connexion au système en aval avec le sélecteur (8) spécifique sur la position LINE.
Français 3. PROGRAMMES PRÉCONFIGURÉS DU DSP INTERNE Le puissant DSP des systèmes ES602-802 a 8 configurations, qui permettent d’égaliser numériquement le signal audio selon différents contextes préconfigurés et différents besoins d’utilisation. Pour sélectionner le programme relatif il suffit d’utiliser un petit tournevis et de tourner la commande rotary sur le numéro de programme souhaité : 1.
Français 4. DÉPANNAGE Le diffuseur ne s’allume pas : 1. Vérifier la présence correcte de l’alimentation en amont de l’installation 2. Vérifier que le câble d’alimentation soit inséré correctement 3. Vérifier que le sélecteur ON/OFF soit positionné sur le symbole “I”. Le diffuseur s’allume mais n’émet aucun son : 1. Vérifier que les connexions en entrée du signal audio principal et éventuellement de l’auxiliaire soient effectuées correctement 2. Vérifier que les câbles utilisés ne soient pas endommagés 3.
Français 5.
Français PROCESSEUR Contrôleur interne : DSP 24 bit/48 kHz Paramètres du système: Paramètres prédéfinis sélectionnables Limiteur : Dual active, Peak, RMS, Thermique ENTRÉES Entrées : 1x Combo (XLR/Jack) équilibrée/déséquilibrée + 1 entrée stéréo RCA Sorties : 1x XLR link OUT équilibr.
Français 6.
Français PROCESSEUR Contrôleur interne : DSP 24 bit/48 kHz Paramètres du système: Paramètres prédéfinis sélectionnables Limiteur : Dual active, Peak, RMS, Thermique ENTRÉES Entrées : 1x Combo (XLR/Jack) équilibrée/déséquilibrée + 1 entrée stéréo RCA Sorties : 1x XLR link OUT équilibr.
Français Les caractéristiques, les spécifications et l’aspect du produit peuvent être soumis à des variations, sans aucune communication préalable. dBTechnologies se réserve le droit de modifier ou d’améliorer le projet ou la fabrication de l’appareil sans s’engager à modifier ou améliorer les produits déjà fabriqués. A.E.B. Industriale Srl Via Brodolini, 8 Località Crespellano 40053 VALSAMOGGIA BOLOGNA (ITALIA) Tel +39 051 969870 Fax +39 051 969725 www.dbtechnologies.com info@dbtechnologies-aeb.
Español ÍNDICE 1. INFORMACIÓN GENERAL.......................................................................................................81 ¡BIENVENIDOS!...................................................................................................................81 INTRODUCCIÓN...................................................................................................................81 REFERENCIAS PARA EL USUARIO................................................................................
Español 1. INFORMACIÓN GENERAL ¡BIENVENIDOS! Gracias por haber adquirido un producto diseñado y desarrollado en Italia por dBTechnologies. La serie ES 602-802, de fácil portabilidad, encierra años de experiencia e investigación en el campo acústico, electrónico y búsqueda de materiales. INTRODUCCIÓN La serie de sistemas bi-amp ES 602-802 se caracteriza por ser fácil de transportar y por unas prestaciones acústicas excelentes.
Español CARACTERÍSTICAS MECÁNICAS Y ACÚSTICAS DIMENSIONES Los sistemas ES 602 y ES 802 se presentan compactos, por ello son fáciles de desmontar para el transporte. El elemento más pesado y voluminoso es la sección subwoofer: 14,2 kg para el ES 602 y 16,4 kg para el ES 802.
Español • • • Proteger el módulo de la humedad No intente abrir el amplificar de ninguna manera En caso de fallo de funcionamiento, cortar de inmediato la alimentación, desconectando el módulo de la red, y ponerse en contacto con un reparador autorizado AMPLIFICADOR ¡ATENCIÓN! SECCIÓN DE ALIMENTACIÓN Y CONEXIÓN DEL SATÉLITE El amplificador digital de última generación DIGIPRO G3, en clase D, es el corazón de los sistemas ES 602-802, y es capaz, respectivamente, de ofrecer una potencia sonora de 800 W
Español SECCIÓN DE INPUT Y DE CONTROL 1. CANAL “CH1” La entrada combo “CH1” permite la entrada tanto de una conexión desde MIXER/LINE, como una conexión microfónica. ¡ATENCIÓN! • Utilizar únicamente cables dotados de conectores originales Neutrik® de alta calidad. 2. SALIDA “LINK” Permite transmitir la señal saliente a otro sistema de difusión ES o a otro difusor activo. 3.
Español 7. ENTRADA ESTÉREO TIPO RCA Entrada estéreo que permite conectar un dispositivo como un reproductor CD o MP3 u otros externos, de forma adicional o como alternativa a la entrada principal CANAL “CH1” (1). 8. SELECTOR LINE/MIC Permite seleccionar si la entrada es una señal de línea o se procede de un micrófono. SECCIÓN DE ALIMENTACIÓN Y CONEXIÓN DEL SATÉLITE 9. INTERRUPTOR DE ALIMENTACIÓN Interruptor ON (I) OFF (0) de alimentación del sistema 10.
Español 2. PRIMER ENCENDIDO CONTENIDO DEL EMBALAJE Comprobar, abriendo el contenido del embalaje, que el contenido del embalaje del sistema ES 602- ES 802 está completo. El embalaje contiene: 1. cable de alimentación 2. ES SYSTEM: • 602: 1 unidad subwoofer ES-SUB 602 + 1 satélite ES-TOP A • 802: 1 unidad subwoofer ES-SUB 802 + 1 satélite ES-TOP A + 1 satélite ES-TOP B 3.
Español INSTALACIÓN MONTAJE DEL SATÉLITE (ES 602) O DE LOS SATÉLITES (ES 802) EN EL SUBWOOFER ES 602 y 802: 1. Enroscar la barra inferior de 25 mm en el correspondiente orificio presente en el lado superior del subwoofer, tal como se ilustra. 2. Enroscar la barra telescópica sobre esta. 3. Regular la altura de la barra, primero aflojando el volante y luego insertando la clavija en el orificio de la barra telescópica a la altura deseada. Luego apretar nuevamente el volante. ES 602: 1.
Español ¡ATENCIÓN! • • • Comprobar que el ES-TOP A esté bien fijado, pero no forzar nunca con un movimiento rotatorio la instalación para no dañar el sistema de acoplamiento.
Español CONEXIÓN DE LA ALIMENTACIÓN Y DEL SATÉLITE (ES 602) / SATÉLITES (ES 802) ES-TOP A POWER SUPPLY ES-TOP A ES-TOP A ¡ATENCIÓN! • ES 602 - 802 REV. 1.1 Utilizar únicamente cables dotados de conectores Neutrik®. Sustituir los cables, si están dañados, para evitar fallos de funcionamiento y un sonido de baja calidad Cod. 420120228 REV. 1.
Español Para instalar correctamente el difusor ES 602 / ES 802: • • • • • • • • • Conectar a la entrada principal (1) con un cable dotado de conector XLR (equilibrado) o de tipo TRS (desequilibrado). Para hacerse una idea de los cables más comunes existentes para las conexiones de audio, consultar la tabla siguiente. Elegir, en función de la fuente (línea/mixer o microfónica), la configuración del selector correspondiente (8). Poner al mínimo el volumen MASTER CONTROL (4).
Español CONEXIÓN DE LAS SALIDAS ENTRE VARIOS MÓDULOS (transmisión de la señal de audio) LINK Es posible transmitir la señal de audio utilizando una conexión con cable equilibrado XLR a una segunda unidad, y en cascada a una tercera, y así sucesivamente. Para transmitir la señal de audio, realizar la conexión conectando la salida LINK (2) del primer ES 602 o ES 802 a la entrada (1) de un segundo dispositivo.
Español 3. PROGRAMAS PRECONFIGURADOS DEL DSP INTERNO El potente DSP de los sistemas ES602-802 presenta 8 configuraciones que permiten ecualizar digitalmente la señal de audio según diferentes contextos preconfigurados y diferentes exigencias de uso. Para seleccionar el programa correspondiente, basta con utilizar un pequeño destornillador y girar la rueda en el número de programa deseado: 1.
Español 4. DETECCIÓN DE AVERÍAS El difusor no se enciende: 1. Comprobar la correcta presencia de la alimentación antes del sistema 2. Comprobar que el cable de alimentación esté correctamente enchufado 3. Comprobar que el selector ON/OFF esté posicionado en el símbolo “I”. El difusor se enciende pero no emite ningún sonido: 1. Comprobar que las conexiones en la entrada de la señal de audio principal y, en su caso, de la auxiliar sean correctas 2. Comprobar que los cables utilizados no están dañados 3.
Español 5. ESPECIFICACIONES TÉCNICAS ES 602 GENERAL Tipología Sistema activo de 2 vías compuesto por un top full range y por un subwoofer DATOS ACÚSTICOS Respuesta en frecuencia [-10dB]: Máx.
Español PROCESADOR Controlador interno: Ajustes del sistema: Limitador: DSP 24 bit/48 kHz Ajustes predefinidos seleccionables Dual active, Peak, RMS, Térmico ENTRADAS Entradas: Salidas: 1x Combo (XLR/Jack) equilibrado/desequilibrado + 1 entrada estéreo RCA 1x XLR link OUT equilibrado DIMENSIONES Caja del subwoofer: Caja del satélite: Asas Contrachapado de 15 mm de grosor Polipropileno PP 2, laterales (en el subwoofer) Montaje en barra: 2 barras de 25 mm de diámetro con roscado M20 incluidos, una de
Español 6. ESPECIFICACIONES TÉCNICAS ES 802 GENERAL Tipología Sistema activo de 2 vías compuesto por dos top full range y por un subwoofer DATOS ACÚSTICOS Respuesta en frecuencia [-10dB]: Máx.
Español PROCESADOR Controlador interno: Ajustes del sistema: Limitador: DSP 24 bit/48 kHz Ajustes predefinidos seleccionables Dual active, Peak, RMS, Térmico ENTRADAS Entradas: Salidas: 1x Combo (XLR/Jack) equilibrado/desequilibrado + 1 entrada estéreo RCA 1x XLR link OUT equilibrado DIMENSIONES Caja del subwoofer: Caja del satélite: Asas Contrachapado de 15 mm de grosor Polipropileno PP 2, laterales (en el subwoofer) Montaje en barra: 2 barras de 25 mm de diámetro con roscado M20 incluidos, una de
Español Las características, las especificaciones y la apariencia de los producen pueden sufrir cambios sin preaviso. dBTechnologies se reserva el derecho a realizar cambios o mejoras en el diseño o fabricación sin asumir obligación alguna de cambiar o mejorar productos fabricados anteriormente. A.E.B. Industriale Srl Via Brodolini, 8 Località Crespellano 40053 VALSAMOGGIA BOLOGNA (ITALIA) Tel +39 051 969870 Fax +39 051 969725 www.dbtechnologies.com info@dbtechnologies-aeb.com ES 602 - 802 98 Cod.