CARE & USE MANUAL PROFESSIONAL A 48”, 36” & 30” DUAL FUEL RANGE MODELS DESI GN R I CAN ME A A S ® N G S S O O TI CE C I A D R TIFIE Retain this manual for future reference. Shown here is your warranty serial number.
TABLE OF CONTENTS Propane Gas Installation..........................................1 General Safety Instructions......................................2 Precautions..........................................................2-4 Model / Parts Identification ..................................5-6 Before Using Your Appliance ...................................7 Cooktop Use......................................................8-10 Grill Use.........................................................11-12 Griddle Use.
SAFETY PRACTICES TO AVOID PERSONAL INJURY -READ AND UNDERSTAND THESE PRECAUTIONS BEFORE USING THIS APPLIANCE. Do not repair or replace any part of this appliance unless it is specifically recommended in this manual. All other servicing should be referred to a qualified technician. Thank you for choosing your new DCS Professional Range. Our products are designed to be safe and reliable when properly cared for and used reasonably.
SAFETY PRACTICES TO AVOID PERSONAL INJURY Never let clothing, pot holders, or other flammable materials come in contact with, or too close to, any burner or burner grate until it has cooled. Fabric may ignite and result in personal injury. Always use caution when pulling out the drip trays when the oven has been on, or is currently on. The drip trays get hot when the oven is on. Do not remove drip trays until they are cool.
SAFETY PRACTICES TO AVOID PERSONAL INJURY Do not use the grill for cooking excessively fatty meats or products which promote flare-ups. DO NOT use cooking utensils on the grill. Clean the ventilator hood and filters above the range or cooktop frequently so grease from cooking vapors does not accumulate on them. GREASE IS FLAMMABLE. Let hot grease cool before attempting to handle it. Avoid letting grease deposits collect in the container under the cooktop burners, the grill or the griddle.
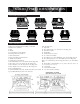
PARTS IDENTIFICATION EXTERIOR PARTS IDENTIFICATION- (RD 484GG SHOWN) SEE PAGE 6 FOR PART LIST 5
MODEL / PARTS IDENTIFICATION DUAL-FUEL RANGE MODELS DCS-RD-484GG DCS-RD-486GL DCS-RD-486GD OVEN ON HEATING HEATING DOOR LOCKED DCS-RD-366 DCS-RD-364GL DCS-RD-364GD DCS-RD-304 PARTS IDENTIFICATION 1. Backguard. a-Island Trim, b-LowBack, c- Hi-Shelf 2. Burner Grates / Burners 3. Grill 4. Griddle 5. Cooktop Burner Control Knobs 6. Proofing Oven Control Knob 7. Grill Control Knob 8. Large Oven Mode Control Buttons 9. Griddle Control Knob 10. Small Oven Control Knobs 11. Oven Rack Slides.
BEFORE USING YOUR APPLIANCE 1. Remove all packaging materials and labels from your appliance. If the installer has not set up your appliance, do it now. Check that you have the following items: To insert the oven racks: A. Hold the rack with the back safety rail in the up position and towards the rear of the oven. Slip it into the oven so the rack slides are between the rack and the rack guides. B.
COOKTOP USE BURNERS SIMMER CAP SIMMER CAP SIMMER FLAME LOCATING SLOT BURNER BASE PORT RING PORT RING BURNER BASE 605 fig. 32 .eps LOCATING PIN Your new professional gas range or cooktop is equipped with burners typical of those used in restaurants. These burners are designed in two pieces for maximum cleanability and controllability. The center, smaller cap covers and protects the simmer burner from boil overs, that could put the flame out.
COOKTOP USE flame it will not relight automatically as the outer burner would. ELECTRONIC IGNITERS 1" 3/8" The burner flame should burn completely around and within the burner with no excessive noise or lifting. The flame should be blue in color and stable with no yellow tips. If a burner does not ignite, listen for the clicking sound. If the igniter is not clicking, TURN OFF THE BURNER. Check the circuit breaker for a blown fuse or a tripped circuit breaker.
COOKTOP USE • For safety reasons the flame must never extend beyond the bottom of the cooking utensil. Never allow flames to curl up the side of the pan. • Utensils which conduct heat slowly (such as glassceramic) should be used with medium to low flames. If you are cooking with a large amount of liquid a slightly larger flame can be used. DO NOT PULL THE DRIP TRAY OR THE LINERS OUT DURING OR IMMEDIATELY AFTER COOKING ON THE OVEN, THE GRILL OR THE GRIDDLE.
GRILL USE GRILL CERAMIC BRIQUETTES The layer of ceramic briquettes, under the grill racks, will last for many years with proper care. They are shipped from the factory pre-assembled on the radiant tray, ready to be set in place into the fire box, under the grill racks. Be sure to remove any packaging material from the radiant tray and briquettes before using the grill. Burned food particles and ash can be emptied off the radiant tray when cool by shaking over a waste receptacle.
GRILL USE They should be cleaned each time they are used. DO NOT leave the grill unattended while it is turned on. NOTE: The longer you preheat the grill, the darker the grill marks. GRILLING HINTS The doneness of meat is affected by the thickness of the cut. It is impossible to cook a thin piece of meat to a rare doneness. A steak should be at least 1-inch thick to have it turn out rare and juicy.
GRIDDLE USE tion components. Once the unit is in position the rear shipping screw can be removed. It is located beneath the griddle flue cover which is removed by lifting off (be careful not to scratch your backguard during removal of the cover). Remove the center shipping screw. GRIDDLE The two outer screws are leveling screws. They can be turned to level the griddle or to provide a forward slope to help grease and oils to drain away from the food being cooked.
GRIDDLE USE GRIDDLE COOKING CHART FOOD USE OF THE GRIDDLE Before starting to cook on the griddle, be sure the drip tray and liners are in place. Preheat griddle for 15 minutes with the control knob set to the temperature suggested on the cooking chart. When the grill is preheated, the HEATING light will turn off. Place the food on the griddle and cook to desired doneness.
OVEN USE Foods Suitable to Cook by Convection Air Leavened Foods (Angel Food Cake, soufflés, cream puffs, meringue shells) Appetizers Breads Main Dishes Oven Meals (1 to 3 racks) Cookies Poultry Roasts REGULAR BAKING Bake is baking with hot air; there is no fan. The air movement comes from natural convection - as the air heats, it moves to the top of the oven. This oven mode is the same as you have been using for baking on one or two racks.
OVEN USE Converting Recipes to Convection Baking Low sided baking utensils will give the best results as the hot air can reach all sides of the food easier. The oven temperature can be left the same as the recipe and the food cooked a shorter period of time. The temperature can be lowered 25ºF to 50ºF and the food will probably take the same length of time to cook as the recipe states.
OVEN USE SETTING BAKE/CONVECTION BAKE FOR THE 27”&24” MAIN&12”PROOFINGOVENS- OFF BAKE BROIL PROOF OFF BAKE BROIL PROOF OVEN ON HEATING OVEN ON HEATING DOOR LOCKED PREHEATING SETTING THE 27” & 24” OVEN FOR BAKING: Preheating takes about 10 to 15 minutes depending on the temperature set. Preheating is usually necessary for foods baked at high temperature for a short period of time, i.e. drop cookies. The oven heating light will turn off when the oven has reached temperature.
OVEN USE If you are using two racks simultaneously, be sure to stagger the baking utensils so that one is not directly above the other and the heated air can circulate freely around each pan. Allow at least 1” of space between the oven walls and the pans. If using large or commercial size baking utensils, the food may take a few extra minutes as the air cannot circulate as freely as it does with a smaller pan.
OVEN USE Steaks should be at least one inch thick, if a rare doneness is desired. It is difficult to get rare with meat that is thinner, or to get a nice brown piece of meat. • After half the total cooking time turn the food over only once. It is not necessary to turn over thin foods (fillet of fish, ham slices, etc.). Liver slices must be turned over. • When top browning use metal or glass-ceramic bakeware.
OVEN USE OVEN RACK POSITION SUGGESTED TEMPERATURES TO KEEP FOOD HOT The rack position depends on the type and thickness of the food. Thick pieces of meat or poultry would typically be broiled on rack position 2, steaks, chops and hamburger, would be broiled on rack position 1. If top browning casseroles or bread the thickness of the food would indicate the rack position. The casseroles would typically be browned on rack position 2 or 3 and the bread on rack position 1. (see p.
12” PROOFING / 27”& 24” SELF-CLEANING 12 “ PROOFING OVEN CONTROL KNOB 12” OVEN PROOF MODE This feature of the 12” Proofing Oven maintains a warm, non-drafty environment useful for proofing yeast leavened products. SETTING THE 12” OVEN FOR PROOFING: 1) Place dough in dish in the small oven. 2) Press “PROOF” Selector button OFF OVEN ON BAKE BROIL 27” & 24” OVEN SELF-CLEANING PROOF The self-cleaning oven of your new range features pyrolytic self-cleaning.
27” & 24” OVEN SELF-CLEANING (NOTE: An Interlock System has been designed so that the Self-Clean Cycle will not engage until the Rack Slide Assemblies have been removed. The roller assisted rack supports are designed to withstand the temperature range of the standard baking thermostat. They will not withstand the extreme temperatures of pyrolytic self cleaning. To remove the Assemblies; A) For each side, Remove the retaining screw, B) Lift up slightly and pull the entire Assembly out. Set aside.
27” & 24” OVEN SELF-CLEANING 3) Replace the oven rack slide assemblies by A) Guiding the rear of the rack slide assembly into the bottom rear bracket of the oven side, B) Guide the top rear of the rack slide assembly into the top Ushaped bracket of the oven side, C) Lift up the Push Rod so that it rests on the “ledge” of the side support of the assembly, and D) Screw the assembly secure to the oven through the hole in the front middle section of the side support. Repeat for the other side of the oven.
CARE and MAINTENANCE When cleaning this range: BURNER GRATES Be careful cleaning any part of this appliance particularly the griddle or the grill while hot. All parts of the appliance (except the stainless steel griddle) can be cleaned with hot soapy water, rinsed, dried and buffed to a shine with a soft, heavy pile cloth. Always try this first, as it is the mildest cleaning procedure. 1. Use the mildest cleaning procedure first.
CARE and MAINTENANCE of stainless steel. The drip trays are on rollers so they are easy to remove and replace. To remove, pull the tray forward. If something has spilled into the trays it should be cleaned up as soon as possible to prevent “baked on” food soil. Grease from the griddle or the grill drains through the drain tube into the tray and liner below. Do not allow the grease to accumulate in the tray or liner as it can be a fire hazard. Clean the tube, tray and liner as soon as they are cool.
CARE and MAINTENANCE If hot soapy water, vinegar, scouring powder, steel wool or metal scouring pads are used to clean the griddle, it must be reseasoned. Follow the directions on page 14 to reseason the griddle. CONTROL KNOBS - Cooktop, Griddle, Grill and Oven NEVER FLOOD THE HOT GRIDDLE WITH COLD WATER. This could cause the griddle to crack or warp. GRILL Clean the grill immediately after cooking. Turn off the burner. To protect your hand from steam and heat, wear a barbecue mitt.
CARE and MAINTENANCE If the rear top burners are used extensively on high it is possible for the vertical stainless steel panel of the low back or high shelf to discolor from the burner heat. This discoloration can be removed by using Revere Ware Stainless Steel Cleaner. food has burned onto the oven and is difficult to remove, soak the spots with a cloth saturated with household ammonia. Allow it to soak for an hour or two, with the door closed.
CARE and MAINTENANCE burner separately, each time you want to use it. cleaners cause darkening and discoloration. Test the cleaner on a small part of the rack and check for any discoloration before cleaning the entire rack. Apply a generous coating. Allow to stand for 15 to 20 minutes. Rinse thoroughly and dry. After being cleaned, if the racks do not slide easily, pour a small amount of cooking oil on a paper towel and rub it lightly over the side rails.
WARRANTY *TO ENSURE WARRANTY SERVICE, FILL OUT AND SEND IN YOUR POSTAGE-PAID WARRANTY CARD This warranty covers the following and ranges. DCS RD 484 GG, DCS RD 486 GL, DCS RD 486 GD, DCS RD 364 GD, DCS RD 366, DCS RD 364 GL, DCS RD 304.
As product improvement is an ongoing process at DCS, we reserve the right to change specifications or design without notice. Litho in USA 02-02 Part No. 10605 REV 3.