
Service manual
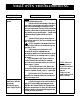

CHECK 1) the Electrical / Gas Supply as outlined in
the General Instr uction section.
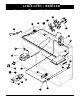
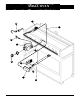
2) Remove Kick Panel assembly (fastened by 2
screws in the front, just below each of the oven doors.
Remove the oven rac k supports and the two front
lower oven rac k brackets. Once the Kick Panel and two
br ac kets have been removed, pull out the bottom tray
in the Small Oven to access the igniter. - Visuall y c heck
for igniter breaka ge. If igniter is broken, remove /
replace
3) Remove Valve Panel (see General instr uc -
tions and note removal of "Red" screw behind control
knob- on some units )
4) 120 V supplied to Thermostat from the ter-
minal block ?(live= black) If not, troubleshoot power
supply lines, If YES,
5) Disconnect power, Remove wires off
Thermostat & check for continuity between
Thermosta t ter minals when Thermosta t dial is rotated
to the ON. If there is no continuity remove / replace
Thermostat.
6) If Ther mostat is OK, Remove the wires
from the Thermal Valve and check for continuity
between the two (2) ter minals on the face of the valve.
If none, remove / replace.
7) If the Thermal Valve is OK, Remove the
wires from the Small Oven Igniter and check the ignit-
er leads for continuity. If none, remove / replace ignit-
er.
8) If the Igniter is OK, Check the Neutral
Return Wire for continuity to the neutral (white) wire
of the power suppl y cord.
1) Verify Gas supply to the unit. Turn the Gas
supply OFF. Loosen tubing supplying gas from the
manifold to the Thermal Valve at the Thermal Valve.
Quickly turn manual valve On, then Off while an assis-
tant listens closely for the sound of flowing g as at the
loosened end of the connection.
SMALL OVEN TROUBLESHOOTING
WHAT TO DO: USEFUL NOTES:
Small Oven will not
operate
Small Oven still will
not operate,
(Electrically opera-
tional - Steps 1-8 OK)
NOTE:-Ensure at
the supply source
that the live and neu-
tral wires are not
reversed
( If they are, this
would not be covered
under warranty)
?
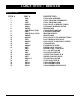
28
PROBLEM AREA: