A MESSAGE TO OUR CUSTOMERS Thank you for selecting this DCS Professional "BGB" Series Grill. Because of these appliances' unique features we have developed this Use and Care Guide. It contains valuable information on how to properly install, operate and maintain your new appliance for years of safe and enjoyable cooking. To help serve you better, please fill out and submit your Product Registration by visiting our website at www.dcsappliances.
TABLE OF CONTENTS SAFETY PRACTICES & PRECAUTIONS 3-5 GRILL MODELS 6 INSTALLATION Locating Grill/Built-in Built-in Construction Clearances Details 7-9 10-11 Gas Hook-up Leak Testing 12-15 16 Burner Adjustment Radiant Assembly Installer Checklist 17 18 19 USING THE GRILL Lighting Grilling Instructions 20 21-22 USING THE SMOKER SYSTEM 23 USING THE ROTISSERIE 24-27 CARE & MAINTENANCE 28-30 TROU BLESHOOTI NG 31 SERVICE 32 WARRANTY 33-34
SAFETY PRACTICES & PRECAUTIONS IMPORTANT SAFETY NOTICE! Certain Liquid Propane dealers may fill liquid propane cylinders for use in the grill beyond cylinder filling capacity. This"Overfilling" may create a dangerous condition. "Overfilled"tanks can build up excess pressure. As a safety device, the tank pressure relief valve will vent propane gas vapor to relieve this excess pressure. This vapor is combustible and therefore can be ignited.
SAFETY PRACTICES & PRECAUTIONS • After a period deterioration, of storage or non-use (such as over the winter), the gas grill should proper assembly, and burner obstructions before using. • Never let clothing, pot holders or other flammable materials come in contact with or get too close to any grate, burner or hot surface until it has cooled. Fabric may ignite and result in personal injury. • Do not heat unopened • Always • Never lean over an open grill.
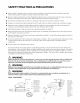
SAFETY PRACTICES & PRECAUTIONS When using the side burners always use flat bottomed pans which are large enough to cover the side burner. Adjust the flame so that it heats only the bottom of the pan to avoid ignition of clothing. Position handles inward away from open edges of the unit to avoid burns associated with unintentionalspillovers. Hold the handle of the pan to prevent movement of it when turning or stirring food. For proper lighting and performance of the burners keep the ports clean.
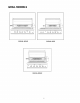
GRILL MODELS m= BGB48-BQAR BGB48-BQR BGB36-BQAR
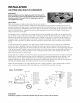
INSTALLATION LOCATING GRILL/BUILT-IN CLEARANCES Important! Before installation, remove shipping brackets from the grill. To do so, loosen the 4 screws on the bottom sides of the grill which hold the brackets to the grill. Slide the shipping brackets off and retighten the screws. LOCATION: FIG.
INSTALLATION LOCATING GRILL/BUILT-IN Clearances to Non-Combustible A minimum of 3" clearance from the purpose of allowing the lid to open combustible construction above the the space is essential for motor and combustible construction below the Clearances CLEARANCES Construction*: back of the grill to non-combustible construction is required for the fully. It is desirable to allow at least 6" rear and side clearance to noncooking surface for counter space.
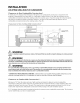
INSTALLATION LOCATING GRILL/BUILT-IN Clearances to Combustible CLEARANCES Construction _ --_ 12" rnin. 12"rain. -- ii_ 26q/2"-- rotisserie motor 9rill exhaust A I, J _ 12"min.(tocombustible construction) 24- [10-1/2' 10" FIG. 04 _ DEFINITION OF COMBUSTIBLE wood, compressed paper, plant being ignited and burned.
INSTALLATION BUILT-IN CONSTRUCTION DETAILS grill exhaust ......... i ........3" (to non-combustible construction / minimum lid clearance) 12" (to combustible construction) '_Bottom t of i 10" supportflange Standard layout for non-combustible enclosure: Layout for insulated jacket only - combustible NOTE: If using a backguard 48" Models = 45-3/4" I 10 in, 2Min. ventilation on the back side 36" Models = 34-1/2" .
INSTALLATION BUILT-IN CONSTRUCTION DETAILS Access Drawers Cutout dimensions Access Doors Cutout dimensions Vent* Vent _ j - Venr_ Opt real support bocations _* Cutout FIG. 06 NOTE: The cutout drawers of each corner installed support be 90°angle in order NOTE: The cutout for the access for the to use minimum and drawer per Installation Guide MODEL NUMBER of 3 vents, operation, Doors FIG. 07 to fit properly.
INSTALLATION GAS HOOK-UP GAS REQUIREMENTS Verify the type of gas supply to be used, either natural or LP, and make sure the marking on the appliance rating plate agrees with that of the supply. The rating plate is located underneath the unit bottom. Never connect an unregulated gas line to the appliance. You must use the gas regulator provided with the unit, even if the supply is controlled.
INSTALLATION GAS HOOK-UP Connection: I/2" NPT male with a 3/8" Flare adapter included. Operating pressure: 11.0" W.C. (included). LP Hose with a quick disconnect and fittings are CAUTION! Before connecting LP tank to regulator, check that all grill burners and side burners, smokers, and rotisserie valves are in the OFF position and open grill lid. To connect the LP regulator/hose assembly to the tank/valve assembly, first make sure the main valve on the tank is completely closed.
INSTALLATION GAS HOOK-UP LP TANK RESTRAINT FOR BUILT-IN If the grill is to be installed in a Built-in Built-in installation guidelines. INSTALLATION application, then the grill must be installed in accordance with the If you intend to operate your Built-in grill on LP gas utilizing a 20 Ib Type 1 cylinder, then the Built-in LP tank restraint must be installed prior to initial use of the grill.
INSTALLATION GAS HOOK-UP STEP I Place the tank restraint in the island (Fig. 11). STEP 2 Locate the tank restraint in the island within the recommended area (Fig. I0 and 12). STEP 3 Once located, secure to the bottom of the island using all eight hole locations provided on the restraint. Wood screws can be used for wooden floors or I/4 inch diameter anchor screws or bolts may be used if the floor is concrete or masonry (Fig. 13). FIG.
INSTALLATION LEAK TESTING GENERAL: Although all gas connections on the grill are leak tested at the factory prior to shipment, a complete gas tightness check must be performed at the installation site due to possible mishandling in shipment, or excessive pressure unknowingly being applied to the unit. Periodically check the whole system for leaks, or immediately check if the smell of gas is detected. Before Testing: Do not smoke while leak testing. Extinguish all open flames.
INSTALLATION BURNER ADJUSTMENT GRILL BURNER AIR ADJUSTMENT: Each grill burner is tested and adjusted at the factory prior to shipment; however, variations in the local gas supply or a conversion from one gas to another may make it necessary to adjust the burners. The flames of the burners (except the rotisserie burner) should be visually checked and compared to that of the drawing in Fig.18.
INSTALLATION RADIANT ASSEMBLY RADIANT ASSSEMBLY I. Unpack ceramic 2. Unlock 3. Place 18 ceramic 4. Lock radiant 5. Place the assembled radiant INSTALLATION: rods and remove radiant end cap by pushing rods on the radiant (Fig. 21) from the unit. it up with two fingers (Fig. 22). (Fig. 23). end cap (Fig. 24). radiant in the unit (Fig. 25). FIG. 21 FIG. 22 FIG. 23 FIG. 24 FIG.
INSTALLATION INSTALLER CHECKLIST Fj rj Specified clearances maintained to combustibles. Verified proper ventilation. Fj All internal removed. rj Removed brackets rj enclosure packaging Fj Air shutters rj Low flame setting satisfactory. rj Drip pan in place properly and sliding freely. Fj Pressure regulator connected and set for 4.0" W.C. Natural, shipping Knobs turn freely, centered. adjusted. Fj User informed of gas supply shut-off valve location.
USING THE GRILL LIGHTING INSTRUCTIONS TO LIGHT THE GRILL BURNER: Open the grill lid and/or remove the top grate cover from side burner (for 48BQR) before lighting. Turn all knobs to "OFF': Turn the main gas supply on slowly. If you smell gas, shut off gas supply and call for service. Push and hold the ignition button, turn the selected burner knob to "SEAR".
USING THE GRILL GRILLING GRILL: Each grill section consists of a large stainless steel burner, stainless steel heat baffles, a series of ceramic rods encased in a stainless steel radiant, and a stainless steel heat retaining grate. Each burner is rated at 25,000Btu/hr. Below the burners there isa stainless steel heat baffle which reflects usable heat upward into the cooking area and reduces temperatures of the drip pan below.
USING THE GRILL GRILLING (Continued) Foods cooked of the cooking for a long time or basted time. 1. Check to be certain the grill the drip may need a lower heat setting near the end tray are in place. 3. Preheat 4. Place the food on the grill and cook to the desired doneness. Adjust heat setting, if necessary. The control knob may be set to any position between "SEAR" and"LO"most grilling done is between"MED"and"LO" settings.
USING THE SMOKER SYSTEM The smoker system on each grill consists of a stainless steel slide out tray which is positioned above a 3,500 Btu/hr burner. The burner is controlled by a precision brass valve which is capable of being turned down to very low heat levels. The system may be used alone for low temperature roasting and smoking or in conjunction with any combination of other burners.
USING THE ROTISSERIE The grill rotisserie system is designed to cook items from the back using infrared heat. The location of the burner allows the placement of the rotisserie basting pan (included) beneath the food to collect juices and drippings for basting and gravy. To flavor the contents of the basting pan, you can add herbs, onion, garlic, or spices. Hams are especially good with the addition of pineapple slices and brown sugar to the basting pan.
USING THE ROTISSERIE WARNING! Never have the grill burners (bottom burners) on during Rotisserie cooking. dry. Use only one section at a time, grill or rotisserie. It will burn your meat and make it very PREPARATION Recommended: Dental pads. floss or butcher Working string, scissors, broiler only), pliers, instant read thermometer, foil, and hot Area: Allow enough space to accommodate assembly in a clean environment.
USING THE ROTISSERIE TO LIGHT THE ROTISSERIE BURNER BEFORE COOKING: The location of the rotisserie burner makes it more susceptible to strong wind conditions, more so than the protected grill burners. For this reason you should avoid operating the rotisserie during windy conditions.
USING THE ROTISSERIE COOKING ON ROTISSERIE 1. Place prepared 2. Verify placement 3. Ignite 4. To check temperature of the meat, turn off motor, turn temperature to low while using your instant-read thermometer. For poultry it should read 170 ° in the breast. Thermometer should touch the breastbone, then lift up 3/4 inch from the bone to geta more accurate temperature reading. Remove thermometer and turn on motor, return heat to high if more cooking is needed. Repeat above instructions (Fig. 41).
CARE AND MAINTENANCE BATTERY REPLACEMENT: 1. Remove drip pan. 2. Open cart door (on cart model 3. Pull battery 4. Re-install upward and push to snap - Fig. 43. (Polarity shown in Fig. 44). downwards I only). (This may require use of pliers). is Note: FIG. 43 FIG. 44 Battery condition should be checked at least once a year. REGULATOR AND HOSE REPLACEMENT The pressure regulator and hose assembly supplied with the unit must be used.
CARE AND MAINTENANCE STAINLESS STEEL: The grill is made from non-rusting and non-magnetic stainless steel. After initial usage, areas of the grill may discolor from the intense heat given off by the burners, this is normal. There are many different stainless steel cleaners available. Always use the mildest cleaning procedure first, scrubbing in the direction of the grain.
CARE AND MAINTENANCE Orifice must be securely fitted inside venturi hole. '8" rain It is extremely important to center the burner onto the orifice properly before lighting the grill to prevent a fire hazard or explosion! Incorrect! x _Downandlocked Valve panel Q o Knob I Correct! V Control Valve Remove drip pen to view connection Fig. 48 Note: When replacing grill and/or smoker burners, or orifices following shown in Fig.
TROUBLESHOOTING BEFORE CALLING FOR SERVICE: If the grill does not function properly, use the following checklist before contacting your dealer for service. You may save the cost of a service call. Troubleshooting is for general purposes only. If the problem persists and you feel you require service, contact your dealer or the nearest authorized agency to perform service. Only authorized agencies can perform warranty service. Call DCS Customer Care at (888) 936-7872.
SERVICE HOW TO OBTAIN SERVICE: For warranty service, please contact your local service you call, please have the following information ready: • Model Number (can be found • Serial Number • Code (can be found • Date of installation • A brief (can be found description Your satisfaction write. on the inside, right on the inside, on the inside, right right provider or DCS Customer side panel behind side panel behind side panel behind Care at (888) 936-7872. the drip pan handle.
WARRANTY LIMITED WARRANTY When you purchase a new DCS Grill by Fisher & Paykel, you automatically receive a One Year Limited Warranty covering parts and labor for the entire product, and a Five Year Comprehensive Warranty covering the burners, grill radiant assemblies, and drip pans. for servicing within the 48 mainland United States, Hawaii, Washington D.C. and Canada. Should structural deterioration occur to the degree of non-performance, a replacement will be furnished.
WARRANTY (continued) C. Defects to the Product D. The cost of repairs caused carried E. Travel Fees and associated access (i.e. airplane F. Normal flights, recommended by accident, neglect, out by non-authorized charges ferry incurred charges, maintenance repairers when isolated as set forth misuse, fire, flood or Act of God. or the cost of correcting the product geographic is installed such unauthorized in a location with limited repairs. or restricted areas).
A L'INTENTION DE NOS CLIENTS Nous vous remercions d'avoir choisi ce gril de la s_rie professionnelle <>de DCS. Nous avons con(_u ce Manuel d'utilisation et d'entretien pour expliquer les fonctions uniques de ces appareils. Ce manuel contient des informations extr_mement utiles sur la fa(_on correcte de faire fonctionner votre nouvel appareil et d'en faire I'entretien.
TABLE DES MATli::RES MESURES DE SIeCURITIe ET DE PRIeCAUTION 3-6 MODItLES DE GRIL 7 INSTALLATION Emplacement du gril et des d_gagements D_tails d'une construction int_gr_e Branchement du gaz Test de d_tection des fuites R_glages des br01eurs Installation de I'ensemble du radiant Liste de contr61e de I'installateur UTILISATION 8-10 11-12 13-16 17 18 19 20 DU GRIL Instructions d'allumage Cuisson sur gril 21-22 22-24 UTILISATION DU SYSTI_ME A FUMOIR 25 UTILISATION DE LA ROTISSOIRE 26-29 ENTRETIE
MESURES DE SI CURITI ET DE PRI CAUTION IMPORTANTE CONSIGNE DE SECURITE! Certains fournisseurs de propane liquide peuvent remplir les bonbonnes de propane liquide du gril au-dela de leur capacitY. Ce trop-plein peut crier une situation dangereuse. Une accumulation de pression peut effet se produire s_curit_, la soupape de d_charge _vacue les vapeurs vapeurs sont combustibles et peuvent donc prendre precautions suivantes : de la bouteille, 1, Lors du remplissage capacit_ totale.
MESURES DE SI CURITI ET DE PRI CAUTION Ne rangez pas d'objets pouvant int_resser les enfants autour ou en dessous du gril, dans le chariot ou une enceinte de ma(;onnerie. Ne laissez jamais les enfants ramper _ I'int_rieur d'un chariot ou d'une enceinte. II ne faut ni attacher ni connecter une bouteille gril fonctionne ou qu'il est chaud. de propane, ni d_placer ni modifier les raccords de gaz Iorsque le Nettoyez le grill et effectuez un entretien g_n_ral deux fois par an.
MESURES DE S¢CURIT¢ ET DE PRECAUTION EMPLACEMENT DU GRIL EVACUATIONDU GRIL Le vent qui frappe le gril pendant utilisation, lierement soufflant FLUX D'EVENT DE SORTIE. j son "t_- Xl_.%_ dans il faut ou sur cet espace de hotte, FLAMME FLUX D'AIR PRI_FERE certains ajouter un coupevent. Le coupe-vent une I performance m6diocre et, dans BRULEUR | peut entrafner Si le vent est un probl_me, particules vents -- / cas, peut ,_ doit _tre sup_rieur _/£N_...._p.
MESURES DE SC:CURIT¢:ET DE PRO:CAUTION • Ayez un extincteur de classe ABC _ port_e de I'eau ou d'autres liquides. • Pour _viter • Ne d_placez • Cet appareil est con_u pour un usage en plein clos. Ce qui pourrait entraYner une accumulation blessures voire la mort. route brOlure pas I'appareil de la main - ne tentez Iors de la cuisson, durant utilisez des outils des flammes, ajuster d'_teindre de barbecue un incendie _ manches de graisse avec longs. son utilisation.
MODi::LES DE GRIL m_ BGB48-BQAR BGB48-BQR BGB36-BQAR
INSTALLATION EMPLACEMENT DU GRIL ET DES DI GAGEMENTS Important! Avant toute installation, retirez les supports d'exp6dition du gril. Pour ce faire, desserrer les 4 vis sur le dessous du gril qui maintiennent les supports au gril. Retirez les supports en les faisant glisser et resserrer les vis. EMPLACEMENT : HG.
INSTALLATION EMPLACEMENT DU GRIL ET DES DI GAGEMENTS Important! Les raccords de gaz, le r_gulateur accessibles. Espaces de d_gagement et le robinet pour d'arr_t fournis par I'installateur une construction non doivent combustible _tre facilement * Pr_voyez une distance de 7,6 cm (3 po) minimum entre I'arri_re du gril et la construction non combustible afin de pouvoir ouvrir le couvercle compl_tement.
INSTALLATION EMPLACEMENT Espaces DU GRIL ET DES DleGAGEMENTS de d_gagement pour une construction combustible _ _vacuation Ju gril 30,5 12 po __30,5 cm/12 po (d_gagement avec une construction combustible) cm/ rain. 12 po rain. " -- _t_ur , rotlSSOlre 30,5 cm/ 67,31 cm/26 1/2 po -- .......
INSTALLATION DI TAILS D'UNE CONSTRUCTION INTI GRI E evacuation du gril .......... _ 7,6 cm/3 [ po (degagement couvercle rain. pour le avec une construction non combustible) 34,93 cm/ 133/4 30,5 cm/12 po (degagement I construction combustible) avec une ! _Fond de la bride de soutien CZZ_ 5,08cm/ CZZZD 24,5 cti/10 CZZZD .......
INSTALLATION DETAILS D'UNE CONSTRUCTION LES TIROIRS - DIMENSIONS INTEGREE DES DECOUPES PORTES D'ACCES - DIMENSIONS DES DECOUPES ME Vent _ Vent* Optimal support locations _ D6coupe FIG. 07 FIG. 06 REMARQUE: La d6coupe de chaque coin doit 6tre d'un angle de 90 ° pour que les tiroirs d'acc6s rentrent correctement. * Installation en ilot pour utiliser un minimum carr6s par 6vent (type).
INSTALLATION BRANCHEMENT EXIGENCES DU GAZ CONCERNANT LE GAZ V_rifiez le type de gaz _ utiliser (gaz naturel ou propane) et assurez-vous que les indications figurant sur la plaque signal_tique de I'appareil sont conformes _ celles de I'alimentation. La plaque signal_tique est situ_e sousledessousdel'unit_. Neconnectezjamaisuntuyau_gaznon r_gul_l'appareil. Vousdevezutiliserle d_tendeur de gaz fourni avec I'unit_, m_me si I'alimentation est contr61_e.
INSTALLATION BRANCHEMENT DU GAZ Connexion : Raccord m_le 3/8 po NPT avec adaptateur _vas_ 3/8 po (inclus). rapide et des raccords sont inclus. Pression utile : 10,0 po C.E. Un tuyau de propane avec d_connexion MISE EN GARDE? Avant de connecter la bouteille de propane au r_gulateur, assurez-vous que tousles brQleurs et brQleurs lat_raux, fumoirs et valves de rOtissoire sont en position OFF,puis ouvrez le couvercle du gril.
INSTALLATION BRANCHEMENT INSTRUCTIONS DU GAZ RELATIVES A LA BOUTEILLE DE PROPANE POUR INSTALLATIONS ENCASTRI_ES Pour installer le gril dans une application encastr_e, il doit _tre install_ conform_ment aux directives lation encastr_e figurant dans le guide d'utilisation et d'entretien accompagnant le gril.
INSTALLATION BRANCHEMENT DU GAZ STEP I Placez le dispositif de retenue de bouteille dans l'ilot (Fig. 11). Situez le dispositif de retenue de bouteille la zone recommand6e (Fig. 10 et 12). dans l'ilot _ l'int6rieur STEP 2 de STEP 3 Une lois situ6, fixer sur le bas de I'ilot _ I'aide des huit emplacements de trous pr6vus sur le dispositif de retenue. Utilisez des vis _ bois pourlesplanchersen boisoudesvisd'ancrage ou des boulons pour les sols en b6ton ou en ma(_onnerie (Fig. 13). FIG.
INSTALLATION TEST DE DI TECTION GI_NI_RALITI_S DES FUITES : Bien que toutes les connexions de gaz complete doit _tre effectu_e sur le site aurait _t_ malmen_ durant le transport I'absence de fuites dans le syst_me ou Avant la v_rification du gril soient test_es en usine avant I'exp_dition, une v_rification d'installation, pour s'assurer qu'il n'y a pas de fuites, au cas o0 I'appareil ou qu'il aurait subi une pression excessive.
INSTALLATION RI GLAGES DES BRULEURS RleGLAGE D'AIR DU BRULEUR DU GRIL : Chaque br01eur du gril est test_ et r_gl_ en usine avant d'etre exp_di_; toutefois, des variations au niveau de I'alimentation en gaz locale ou de la conversion d'un gaz _ un autre peut n_cessiter un nouveau r_glage. Les flammes des br01eurs (except_ le br01eur de la r6tissoire) doivent _tre v_rifi_es visuellement et compar_es celles du schema de la figure 18.
INSTALLATION INSTALLATION INSTALLATION 1. D6ballez 2. D6verrouillez (Fig. 22). 3. Placez 18 tiges 4. Verrouillez 5. Placez le radiant DE L'ENSEMBLE DU RADIANT DE L'ENSEMBLE les tiges en c6ramique le couvercle du radiant en c6ramique le couvercle le radiant en le poussant sur le radiant du radiant assembl6 DU RADIANT et retirez : (Fig. 21) de I'appareil. de deux doigts iiiill ii!! _ iiii :iii: i : (Fig. 23). (Fig. 24). dans I'appareil (Fig. 25). FIG. 21 FIG. 22 FIG.
INSTALLATION LISTE DE CONTROLE DE L'INSTALLATEUR [3 Respect des d_gagements sp_cifi_s pour les combustibles. [3 Ventilation v_rifi_e. des enceintes [3 Emballage interne [3 Supports retires [3 Boutons librement, centr_s. retire. d'exp_dition tournant cadrans correctement, que ce soit seul ou avec le brOleur d'air [3 R_glage de flamme satisfaisant. [3 Ramasse-gouttes place correctement glissant librement. r_gl_s. faible avec [3 Utilisateur de d'arr_t manuel et accessible.
UTILISATION DU GRIL INSTRUCTIONS D'ALLUMAGE POURALLUMERLEBRULEURDUGRIL: Ouvrez le couvercle du gril et/ou retirez le couvercle de la grille sup_rieure du 6r_leur lateral (pour 48BQR) avant d'allumer. Mettez tousles boutons sur _ OFF >>. Ouvrez lentement I'alimentation en gaz. Si vous sentez une odeur de gaz, fermez le gaz et appelez le service technique. Enfoncez le bouton d'allumage et tournez le bouton du brOleur choisi & la position <>.
UTILISATION DU GRIL INSTRUCTIONS POUR ALLUMER Allumage D'ALLUMAGE/CUISSON DES BRULEURS des brQleurs lat_raux LATI_RAUX avec SUR GRIL DOUBLES une allumette (ModUles 48BQR seulement) (suite) • Tenez uneallumette de pochette allum_e pros des ports du brQleur et tournez le bouton de r_glage dans le sens antihoraire pour le mettre sur <_HI _. Retirez la main d_s que le brQleur s'allume. Mettez le bouton de r_glage sur le niveau d_sir_.
UTILISATION DU GRIL CUISSON SUR GRIL Grillade _ feu direct (Hot-dogs, hamburgers, steaks/poulet d'_paisseur Grillade _ feu indirect normale) CHALEUR CHALEUR Aliments Grille BrQleur 0 _© 0 0, I BrOleur _teint IMPORTANT Utilisation du gril : Pour traiter les grilles, versez une cuill_re _ soupe d'huile v_g_tale sur un chiffon doux et frottez les deux c6t_s des grilles. II suffit d'un l_ger film et de la fum_e risque d'etre visible pendant le pr_chauffage.
UTILISATION DU GRIL CUISSON GRILLES SUR GRIL DOUBLE FACE : Que vos invites aient envie de fruits de mer, de steak ou de I_gumes, les grilles double face offrent des surfaces vari_es pour des textures vari_es. Le c6t_ en forme de W cr_e de belles lignes de grillade pour les steaks, le poulet et les c6telettes, et _loigne I'huile et la graisse des aliments. Le c6t_ oppos_ <_arrondi _ offre plus de superficie pour supporter et manipuler les aliments d_licats tels que les coquilles Saint-Jacques.
UTILISATION DU SYSTi::ME A FUMOIR Le syst_me _ fumoir de chaque gril consiste en un plateau coulissant en acier inoxydable positionn_ au-dessus d'un br01eur de 3 500 BTUH. Le br01eur est contr61_ par une valve en laiton de precision capable d'etre r_gl_e _ tr_s bas niveau de chaleur. Ce syst_me peut _tre utilis_ seul, pour r6tir ou fumer les aliments _ basse temperature, ou conjointement avec d'autres br01eurs.
UTILISATION DE LA ROTISSOIRE Le syst_me de r6tissoire de gril est con(_u pour cuire les aliments par I'arri_re, au moyen d'une chaleur _ infrarouge. L'emplacement du br01eur permet de placer la cuvette d'arrosage de la r6tissoire (incluse) sous les aliments afin de recueillir les jus et les gouttes qui serviront _ arroser la nourriture et faire des sauces. Vous pouvez ajouter des herbes, de I'oignon, de I'ail ou des _pices pour parfumer le contenu de la cuvette d'arrosage.
UTILISATION DE LA ROTISSOIRE AVERTISSEMENT? N'allumez jamais les brQleurs du gril (brQleurs inf_rieurs) Iorsque vous utilisez la r6tissoire. Cela brQlerait la viande et la rendrait tr_s s_che. Utilisez une section a la fois seulement, soit le gril, soit la r6tissoire. PRI_PARATION Recommand_ : Soie dentaire ou corde de boucher, aluminium et poign_es isolantes.
UTILISATION DE LA ROTISSOIRE POUR ALLUMER L'emplacement proteges. Pour mentaire, nous vers le brQleur 1, Le bouton 2. Le thermocouple Ouvrez LE BRULEUR DE ROTISSERIE AVANT DE FAIRE CUIRE : du brQleur de r6tissoire le rend plus susceptible aux vents forts que les brQleurs de gril qui sont cette raison, _vitez de faire fonctionner la r6tissoire s'il vente.
UTILISATION DE LA ROTISSOIRE CUISSON SUR LA ROTISSOIRE I. Ins_rez le tournebroche pr_par_ 2. V_rifiez 3. Allumez le br01eur, d_marrez le moteur de la r6tissoireet cuire toutes les viandes sur la r6tisserie. 4. Pour v_rifier la temperature de la viande, _teignez le moteur, mettez la temperature sur bas niveau tout en utilisant le thermom_tre instantan_. Pour le poulet, la temperature doit _tre de 170 °dans le blanc.
ENTRETIEN ET NETTOYAGE REMPLACEMENT DE LA PILE : 1. Retirez le ramasse-gouttes. 2. Ouvrez 3. Tirez la pile vers le bas (servez-vous 4. Remettez-la en place vers le haut et poussez jusqu'_ entendre un d_clic, Fig. 43 (La polarit_ est indiqu_e _ la Fig. 44). la porte du chariot Remarque (modUle _ chariot d'une seulement). pince aubesoin). : V_fifiez I'_tat de la pile au moins une fois par an. REMPLACEMENT DU RI_GULATEUR FIG. 43 ET DU TUYAU FIG.
ENTRETIEN ET NETTOYAGE ACIER INOXYDABLE : t_LECTRODE Le gril est fait d'acier inoxydable non magn_tique. Apr_s I'utilisation initiale, certaines parties du gril peuvent se d_colorer _ cause de la chaleur intense d_gag_e par les brQleurs. Ceci est normal. On trouve route sorte de nettoyants pour acier inoxydable sur le march_. Employez toujours la m_thode de nettoyage la plus douce au d_but, en frottant dans le sens du grain.
ENTRETIEN ET NETTOYAGE L'orifice doit 6tre bien plat6 I'int_rieur du trou du venturi. II est extr_mement brl)leur sur le gril pour le le bas cm/3/8 et po min. Panneau l'orifice _viter d'explosion Vers tout risque d'incendie ou Bouton ! Incorrect! Correct! ,/ Retirez le ramasse-gouttes pour I voir Valve de r6glage la connexion Fig.
DI PANNAGE AVANT D'APPELER LE SERVICE TECHNIQUE : Si le gril ne fonctionne pas correctement, utilisez cette liste de contr61e avant de contacter votre distributeur. Vous pourriez ainsi vous _pargner le coot d'une demande de service. Le d_pannage couvre les probl_mes d'ordre g_n_ral seulement. Si le probl_me persiste et que vous avez besoin d'assistance, contactez votre distributeur ou le centre de service agr_ le plus proche.
SERVICE POUR L'OBTENTION DU SERVICE DE GARANTIE : Pour le service sous garantie, contactez votre distributeur ou le Centre de service _ la clientele (888) 936-7872. Avant d'appeler, veuillez avoir les informations suivantes _ port_e de main : Num_ro de module Voir page 20.) (peut se trouver Num_ro de s_rie (peut se trouver Voir page 20.) Code (peut se trouver 2O.
GARANTIE GARANTIE LIMITI_E Lorsque vous faites I'achat d'un DCS Grill by Fisher & Paykel neuf, vous recevez automatiquement une Garantie limit_e d'un an couvrant les pi_ces et la main d'?uvre pour tout le produit, et une Garantie extensive de cinq ans couvrant les br01eurs, les ensembles de radiants de gril et le ramasse-gouttes. Pour entretien dans les 48 letats continentaux, Hawai, Washington D.C. et le Canada.
GARANTIE (suite) B. D_fauts causes par des facteurs 1. Utilisation domestique 2. Utilisation conform_ment autres que : normale ou aux indications d'utilisation n_gligence, mauvaise et d'entretien D_fauts du produit naturelle. D, Les coots des r_parations effectu_es r_parations non autoris_es. E, Les frais de voyage et les frais connexes encourus Iorsque le produit est install_ dans un lieu & acc_s illimit_ restreint (d_placement par avion ou par bateau, r_gions g_ographiques isol_es, etc.
REMARQUE 37