Dynamic Cooking Systems, Inc.
A Message To Our Customers Thank you for selecting this DCS Professional 30” Five Burner Self Cleaning Gas Range. Because of this appliance’s unique features we have developed this Care and Use Guide. It contains valuable information on how to properly operate and maintain your new appliance for years of safe and enjoyable cooking.
Table Of Contents SAFETY PRACTICES TO AVOID PERSONAL INJURY Read Before Using your new appliance..................................................................................4-6 PARTS IDENTIFICATION.............................................................................................................7-8 BEFORE USING YOUR APPLIANCE.........................................................................................9 COOKTOP USE Burners .........................................................
Table of Contents OVEN SELF-CLEANING Oven Self-cleaning.........................................................................................................................22 Oven Door Lock During Self-clean..........................................................................................22 Before Self-cleaning The Oven ...................................................................................................22 Setting The Oven For Self-clean ...........................................
Safety Practices To Avoid Personal Injury When properly cared for, your new DCS Appliance has been designed to be a safe, reliable cooking appliance.When using this restaurant caliber appliance, use it with extreme care, as this type appliance provides intense heat and can increase the accident potential. Basic safety precautions must be followed when using kitchen appliances, including the following: Read this Care and Use Manual thoroughly before using your new appliance.
Safety Practices To Avoid Personal Injury Never let clothing, pot holders, or other flammable materials come in contact with, or too close to, any burner or burner grate until it has cooled. Fabric may ignite and result in personal injury. Be certain to use only dry pot holders: moist or damp pot holders on hot surfaces may cause burns from steam. Do not use a towel or other bulky cloth in place of pot holders. Do not let pot holders touch hot burners, or burner grates.
Safety Practices To Avoid Personal Injury Hold the handle of the pan to prevent movement of the utensil when stirring or turning food. GREASE IS FLAMMABLE. Let hot grease cool before attempting to handle it. Avoid letting grease deposits collect around the cooktop burners. Clean after each use or boil over. For proper lighting and performance of the cooktop burners, keep the burner ports clean.
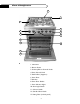
Parts Identification 13 1 2 11 3 10 9 4 5 8 12 6 7 PARTS LIST: 1. Island Trim 2. Burner Grates 3. Cooktop Burner Control Knobs 4. Oven Control Knob 5. Rack Rollers (Supports) 6. Oven Door 7.Window 8. Oven Door Gasket 9. Oven Indicator Lights 10. Oven Light Switch 11. Selector Switch 12. Standard Oven Racks 13.
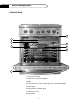
Parts Identification OVEN INTERIOR 8 7 2 5 6 3 4 1 1. Oven Door Handle 2. Oven Thermostat Sensing Bulb 3. Baffle 4. Convection Fan (center back wall of oven can behind baffle) 5. Oven Lights 6. Broiler Burner (behind glass) 7. Oven Door Lock 8.
Before Using Your Appliance 1. Remove all packaging materials and labels from your appliance. If the installer has not set up your appliance, do it now. Check that you have the following items: COOKTOP 5 burner head assemblies, burner caps and grates Backguard (if other than island installation) OVEN OFF 4 standard oven racks 1 two-piece broil pan BAKE BAKE BROIL CLEAN OVEN ON HEATING DOOR LOCKED 2. Place the oven racks in the proper position before turning on the oven.
Cooktop Use BURNERS Cap Simmer Flame Brass Port Ring Your new professional gas range is equipped with burners typical of those used in restaurants.These burners are designed for maximum cleanability and controllability.The large cap spreads the simmer burner heat out to avoid too much heat being concentrated on the center of the pan.The simmer burner is always on when the burner is in use.The burner should never be operated if the cap is not in place.
Cooktop Use ELECTRONIC IGNITERS IGNITER (keep clean) If a burner does not ignite, listen for the clicking sound. If the igniter is not clicking,TURN OFF THE BURNER. Check the circuit breaker for a blown fuse or a tripped circuit breaker. If the igniter still fails to operate, see page 28, “Before Calling For Service”.To light the burner manually, see page 27. NOTE: If you are using propane gas, a slight pop or flash may occur at the burner ports a few seconds after the burner has been turned “off ”.
Cooktop Use FLAME HEIGHT The correct height of the flame mainly depends on the size of the bottom of the cooking utensil, the material of the cooking utensil, the amount and type of food and the amount of liquid in the utensil. Following are some basic rules for selecting flame height. • For safety reasons the flame must never extend beyond the bottom of the cooking utensil. Never allow flames to curl up the side of the pan.
Cooktop Use COOKING UTENSILS For best results we recommend using Professional Cookware.This type of utensil can be found at your finer department stores, specialty cooking shops, or Restaurant Supply Stores. If using regular cookware be very careful if the pans have plastic handles, as these large professional size burners can flame up on the outside of the pan and melt or bubble the handles. CONTROL KNOBS The control knobs are readily associated with the burners they control.
Oven Use BURNERS Your new professional gas range is equipped with bake and broil burners typical of those used in restaurants.The oven broiler burner is 15,000 Btu/hr and the oven baking burner is 28,000 Btu/hr. ELECTRIC GLOW IGNITER COIL The oven bake and broil burners are equipped with an electric glow igniter and safety system which lights the gas.There will be a delay after the control knob has been turned on to when you actually hear gas arrive at the burner.
Oven Use REGULAR BAKING Bake is baking with hot air; there is no fan.The air movement comes from natural convection - as the air heats, it moves to the top of the oven.This oven mode is the same as you have been using for baking on one or two racks.
Oven Use Converting Recipes to Convection Baking Low sided baking utensils will give the best results as the hot air can reach all sides of the food easier.The oven temperature can be left the same as the recipe and the food cooked a shorter period of time.The temperature can be lowered 25ºF to 50ºF and the food will probably take the same length of time to cook as the recipe states.
Oven Use PREHEATING Preheating takes about 10 to 15 minutes depending on the temperature set. Preheating is usually necessary for foods baked at high temperature for a short period of time, i.e. drop cookies.The oven heating light will turn off when the oven has reached temperature. CONDENSATION During any cooking process there is a certain amount of moisture that evaporates from the food.The amount of moisture that condenses on the oven depends on the moisture content of the food.
Oven Use OVEN RACKS CAUTION: Aluminum foil should never be used to cover the oven racks or to line the oven bottom.The trapped heat can damage the porcelain and the heated air cannot adequately reach the food being baked. Baking One or two racks can be used simultaneously during bake. Place the rack(s) in the desired position before turning the oven on. Store any unused racks out of the oven. Rack position 2 (second from bottom) will probably be used the most for single rack baking.
Oven Use HIGH ALTITUDE BAKING Recipes and baking times vary if you are baking at a high altitude. For accurate information write to the Agriculture Extension Service, Colorado State University, Fort Collins, Colorado 80521. Specify the type of information and the baking mode (convection bake or bake) you need i.e. cakes, cookies, breads, etc.There may be a cost for the bulletins.
Oven Use OVEN RACK POSITION The rack position depends on the type and thickness of the food. Thick pieces of meat or poultry (1” or more) would typically be broiled or convection broiled on rack position 3. Steaks, chops and hamburger would typically be broiled on rack position 4. If top browning casseroles or bread the thickness of the food would indicate the rack position. Casseroles and bread would typically be browned on rack position 3 (see page 15 for more information).
Oven Use SUGGESTED TEMPERATURES TO KEEP FOOD HOT Food Oven Temperature (oF) Beef Rare Medium Well Done Bacon Biscuits and Muffins (covered) Casserole (covered) Fish and Seafood French Fried Foods Gravy or Cream Sauces (covered) 150º 155º 170º 200º 170º 170º 170º 200º 170º - 155º 170º 180º 225º 185º 200º 200º 225º 180º Oven Temperature (oF) Food Lamb and Veal Roasts Pancakes and Waffles (covered) Potatoes Baked Mashed (covered) Pies and Pastries Pizza (covered) Pork Poultry (covered) Vegetables (co
Oven Self-cleaning OVEN SELF-CLEANING The self-cleaning oven of your new range features pyrolytic self-cleaning. When set in the CLEAN mode, the oven reaches a high temperature that burns off the food soil. When the oven is set for CLEAN, only the cooktop burners may be used. It is common to see smoke and/or flames during the CLEAN cycle, depending on the content and amount of soil remaining in the oven.
Oven Self-cleaning SETTING THE OVEN FOR SELF-CLEAN 1) Push the “CLEAN” Selector Button. 2) Set Oven Control Knob to “CLEAN”. Cooling Blower turns on, OVEN ON light and HEATING light turn on, LOCK light turns on, The door closing process takes approximately 60 seconds to complete, at which time the door becomes locked. AT THE END OF THE CLEAN CYCLE: The Clean cycle takes 5 hours to complete. The OVEN ON light turns off once the cycle has finished. 1) Push the OFF Selector Button.
Care and Maintenance All parts of the appliance can be cleaned with hot soapy water, rinsed, dried and buffed to a shine with a soft, heavy pile cloth. Be careful cleaning any part of this appliance while hot. When cleaning this range or cooktop: 1. Always use the mildest cleaning procedure first. Some brands of cleaners of the same type are harsher than others, read their directions. A scent or a propellant can make a difference in the product. Read the ingredients.Try on a small area first. 2.
Care and Maintenance BURNERS For proper lighting and performance keep the burners clean. It is necessary to clean the burners if they do not light even though the igniter clicks, if there has been a severe boil over, or when the flame does not burn blue. Be certain all burner knobs are in the OFF position before attempting to clean the burners.The burners have been designed for ease in cleaning.When the grates and burners are cool, remove the grate.
Care and Maintenance BACKGUARD This is made of stainless steel. Use the mildest cleaning procedure first - hot soapy water, rinse and dry. If the panel has food soil remaining, try a general kitchen cleaner, such as Fantastik®, Simple Green® or Formula 409®. For hard to clean soil use a stainless steel cleaner such as, Bon-Ami®, Cameo®, or Bar Keepers Friend. Apply cleaner with a damp sponge, rinse thoroughly and dry. Always scrub lightly in the direction of the grain.
Care and Maintenance OVEN RACKS AND ROLLERS The oven racks and rollers are chrome plated steel. Chrome cleaners, such as Soft Scrub®, Cameo or Bar Keepers Friend can be applied with a damp sponge following package directions. Rinse and dry. Powdered cleaners such as Bon-Ami® or Comet are applied with a damp sponge or cloth, rubbed lightly, rinsed and dried. For hard to remove food soil use a dampened soap filled steel wool pad, rinsed and dried.
Care and Maintenance BEFORE YOU CALL FOR SERVICE • Is the circuit breaker tripped or the fuse blown? • Is there a power outage in the area? IF THE COOKTOP BURNERS DO NOT LIGHT • Is the two piece burner put together correctly? • Is the burner head assembly aligned correctly? • Is the manual shut-off valve open? This is usually located where the gas comes out of the wall. SERVICE INFORMATION Copy the information below from the data rating plate. Keep your invoice for warranty validation.
Warranty LENGTH OF WARRANTY One (1) Year Full – Covers the entire product Five (5) Years Limited – Surface burners, Oven burner Ten (10) Years Limited – Porcelain oven, Porcelain inner door panel DCS WILL PAY FOR: All repair labor and replacement parts, for parts found to be defective due to materials or workmanship. Service must be provided by Authorized Factory Agent during normal working hours. DCS WILL NOT PAY FOR: Installation or start-up Shipping damage.
Service HOW TO OBTAIN SERVICE: For warranty service, contact DCS Customer Service at (888) 281-5698. Before you call, please have the following information ready: • Model Number • Serial Number • Date of installation • A brief description of the problem Your satisfaction is of the utmost importance to us.
Notes 31
Notes 32
As a product improvement in an ongoing process at DCS, we reserve the right to change specifications or design without notice. 5800 Skylab Road, Huntington Beach, CA 92647 Tel: (714) 372-7000 Fax: (714) 372-7001 Customer Service: (888) 281-5698 www.dcsappliances.com Part No. 17430 Rev.