
Installation guide


9
PLANNING THE INSTALLATION
RECOMMENDED INSTALLATION SEQUENCE
Install components in the following order:
1. Locate and level range according to range installation instructions.
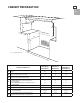
Steps 2,3 & 4 are only relevant if you are installing a Wall Mount Full Backguard:
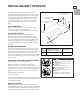
2. Measure distance from floor to top of island trim on range, adding 1/4” for
backguard clearance.
3. Transfer this measurement to the wall. This will mark the bottom of your
backguard.
4. From this line measure 26-1/4” up wall to mark the top of a Wall Mount Full
backguard. This is the minimum height that the bottom of your vent hood can
be installed.
5. Follow vent hood manufacturer’s installation instructions to install vent hood.
6. Follow backguard installation instructions to install backguard.
7. Connect gas and electric connections and slide range into position.
NOTE:
A manual gas shut-off valve must be installed. See section ‘Gas Hook-up’.
WARNING:
DO NOT lift range by the oven door handles!!
WARNING:
DO NOT remove the grill or griddle assemblies!!
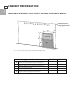
MOVING AND PLACING THE RANGE
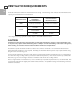
The ranges have shipping weights varying from 420 lbs. to 630 lbs less approx. 50lbs. after removal of packing
material. It is recommended that the door(s), grates, and front kick panel be removed to facilitate handling. This
will reduce the weight for ease of handling.
It may be necessary to remove the oven door(s) to pass through some doorways. With the door(s) removed, a
29-1/2” wide opening is required. Without removing the door, a 32” wide opening is required. Remove the outer
carton and packing material from the shipping base.
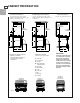
UNPACKING AND HANDLING
US
CA
WARNING!
Extremely Heavy
Proper equipment and adequate manpower must be used in moving
the range to avoid personal injury or damage to the unit or the
oor. The unit is heavy and rests on adjustable steel legs.
Failure to follow this advice may result in damage or personal injury.
420-630 lb
190-285 kg
Island Trim
Floor
0”