
Operation Manual


16GB
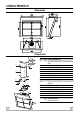
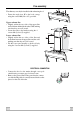
Flue assembly
The chimney can only be installed with exhausting hood
• Fasten the angle iron 15 to the hood canopy
using the screws 12d (2,9 x 9,5) provided.
Upper exhaust flue
• Slightly widen the two sides of the upper flue
and hook them behind the brackets 7.2.1, making
sure that they are well seated.
• Secure the sides to the brackets using the 4
screws 12c (2,9 x 6,5) supplied.
Lower exhaust flue
• Slightly widen the two sides of the flue and
hook them between the upper flue and the wall,
making sure that they are well seated.
• Fix the lower part laterally to the hood body
using the 2 screws 12c (2,9 x 6,5) supplied.
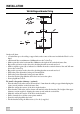
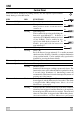
ELECTRICAL CONNECTION
• Connect the hood to the mains through a two-pole
switch having a contact gap of at least 3 mm.
• Remove the grease filters being sure that the connec-
tor of the feeding cable is correctly inserted in the socket
placed on the side of the fan.
12c
2.1
2.2
2
7.2.1
12c