FR Four De Dietrich DOE 900 X GUIDE D'INSTALLATION ET INSTRUCTIONS D’EMPLOI ES Horno De Dietrich DOE 900 X MANUAL DE INSTALACIÓN Y UTILIZACIÓN IT Forno De Dietrich DOE 900 X MANUALE PER L’INSTALLAZIONE E L’UTILIZZO EN De Dietrich Oven DOE 900 X GUIDE TO INSTALLATION AND USE DE De Dietrich Ofen DOE 900 X EINBAU- UND BETRIEBSANLEITUNG DA Ovn De Dietrich DOE 900 X INSTALLATIONS- OG BRUGERVEJLEDNING NL De Dietrich Oven DOE 900 X INSTALLATIEGIDS EN GEBRUIKSAANWIJZINGEN PT Forno De Dietrich DOE
EN TABLE OF CONTENTS 1 / NOTICES TO THE USER • Safety instructions _________________________________________ • Caring for the Environment __________________________________ 38 39 2 / INSTALLING YOUR APPLIANCE • Build-in ___________________________________________________ • Electrical connection _______________________________________ • Changing the power supply cable ____________________________ 40 42 43 3 / CARING FOR AND CLEANING YOUR APPLIANCE • Cleaning the door º Disassembling the door __________
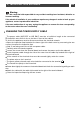
EN 1 / NOTICES TO THE USER — When in use, the appliance becomes hot. Be careful not to touch the heating elements located inside the oven. Important Keep this user guide with your appliance. If the appliance is ever sold or transferred to another person, ensure that the new owner receives the user guide. Please become familiar with these recommendations before installing and using your oven. They were written for your safety and the safety of others.
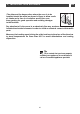
EN 1 / NOTICES TO THE USER — For your safety, your oven is equipped with an AUTOMATIC STOP, if you forget to turn off your oven by mistake. After 23 hours and 30 minutes of continuous use, the AS (Automatic Stop) feature will be activated and your oven will turn itself off. AS or Auto Stop will be displayed instead of the time and a series of successive beeps will be emitted for a short time. Before maintenance or cleaning disconnect the appliance from the mains and wait for it to cool down.
EN 2 / INSTALLING YOUR APPLIANCE 100 580 500 560 min 600 100 865 864 580 16 596 572 896 560 min 865 600 340 8 542 23 • BUILD-IN Insert the oven into the opening of the furniture, resting it on the base and pushing it as far as the ledge of the side stanchions against the shoulder of the piece of furniture. For the dimensions of the oven see above.
EN 2 / INSTALLING YOUR APPLIANCE •The sides and the base surface where the oven is to be installed should be milled as shown in figure to allow a safe air intake and a free air circulation around the oven, thus granting its good operation and avoiding damages to the furniture. Pay attention to fix the ovens in an absolutely firm way, as above indicated, and to insulate the electrical elements in order to avoid an eventual contact with metallic parts.
EN 2 / INSTALLING YOUR APPLIANCE Single-phase 20A Meter 220-240V~ 50Hz 220-240 V~ Single-phase line 16A fuse or differential circuit breaker Electrical outlet 2 poles + earth standard CEI 60083 Power supply cable length 1.50 m approx. • ELECTRICAL CONNECTION grid by means of a 1 live + 1 neutral + earth CEI 60083 standard power socket or via an all-poles cut-off device, with minimum opening between contacts of 3 mm, all-poles cut-off device in compliance with the installation rules.
2 / INSTALLING YOUR APPLIANCE EN Warning We cannot be held responsible for any accident resulting from inexistent, defective or incorrect earthing. If the electrical installation in your residence requires any changes in order to hook up your appliance, contact a professional electrician. If the oven malfunctions in any way, unplug the appliance or remove the fuse corresponding to the sector where the oven is hooked up.
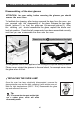
EN 3 / CARING FOR AND CLEANING YOUR APPLIANCE • CLEANING THE DOOR • Disassembling the door Warning Before removing the door, allow the appliance to cool down. Warning Do not use abrasive cleaning products or hard metallic scrapers for cleaning the oven’s glass door, as they could scuff the surface and cause the glass to shatter. 1. Set the oven door wide open. 2. Lift the hinge jumpers with your thumb and index fingers, then turn them fully outwards to the end of stroke (Fig.A). 3.
EN 3 / CARING FOR AND CLEANING YOUR APPLIANCE Disassembling of the door glasses ATTENTION: for your safety, before removing the glasses you should remove the oven door. To facilitate the cleaning, after having removed the door from the oven, you can proceed with the disassembly of the glass. Release the two upper blocks (picture C) so that the glass can be removed (picture D). After the cleaning you should reassemble the glass, replace the blocks and lock into position.
EN 4 / TROUBLESHOOTING If you have a doubt about the correct functioning of your oven, this does not necessarily mean that there is a malfunction. In any event, check the following points: YOU OBSERVE THAT… The oven is not heating. POSSIBLE CAUSES WHAT SHOULD YOU DO? - The oven is not connected to ➡ Plug in your oven. the power supply. ➡ Replace the fuse in your electrical - Your fuse is not working. set-up and check its capacity (16A).
EN 5 / AFTER-SALES SERVICE • SERVICE CALLS Any repairs that are made to your appliance must be handled by a qualified professional authorised to work on the brand. When you call, mention your appliance’s complete reference (model, type, serial number). This information appears on the manufacturer’s nameplate (fig.1). BRANDT APPLIANCES SAS 7 rue Henri Becquerel 92500 RUEIL MALMAISON 230V ~ 50 Hz fig.