REFRIGERATORFREEZER DRC725JE LES NOUVEAUX OBJECT DE VALEUR 2223 390-71
IMPORTANT SAFETY INFORMATION It is most important that this instruction book should be retained with the appliance for future reference. Should the appliance be sold or transferred to another owner, or should you move house and leave the appliance, always ensure that the book is left with the appliance in order that the new owner can get to know the functioning of the appliance and the relevant safety information. This information has been provided in the interest of safety.
Disposal of old Appliances The symbol on the product or on its packaging indicates that this product may not be treated as household waste. Instead it shall be handed over to the applicable collection point for the recycling of electrical and electronic equipment. By ensuring this product is disposed of correctly, you will help prevent potential negative consequences for the environment and human health, which could otherwise be caused by inappropriate waste handling of this product.
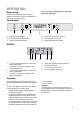
OPERATION Do not use soap or detergent as the smell may linger. Dry thoroughly. Before using Remove all securing tapes. Wash inside the appliance with lukewarm water and bicarbonate of soda (5 ml to 0.5 litre of water). Control panel A B C E D F D - Temperature and function indicator E - Function button/ reset alarm F - Fridge Thermostat control knob A - Appliance button ON/OFF B - Freezer Thermostat control knob C - Temperature indication button DISPLAY 12 3 1. 2.
Temperature indication Activation of functions In normal conditions, the display indicates the freezer temperature (symbol 2). Each time button E is pressed, the following functions are activated in a clockwise direction: Each time button C is pressed, the display indicates in sequence: Symbol 5 : fast freeze function 1. symbol 1 turns on and indicator 4 shows the temperature of the fridge compartment; No Symbol: Normal operation Symbol 6 : shopping function 2.
wrap in polythene bags and place on the glass shelf above the salad drawers. Normal Operating Sounds Meat can only be stored safely in this way for one or two days at the most. • You may hear faint gurgling or bubbling sounds when the refrigerant is pumped through the coils or tubing at the rear, to the cooling plate/evaporator. • When the compressor is on, the refrigerant is being pumped round, and you will hear a whirring sound or pulsating noise from the compressor.
Frozen food storage Making ice cubes When you first start the freezer or if the freezer has been out of use for some time, we advise you to run your appliance for at least 24 hours in the «fast freeze» mode before storing frozen food. The appliance is provided with one or more trays for ice-cubes trays. Do not exceed the storage period indicated by the manufacturer. To release the ice cubes simply give the tray a slight twist.
Moveable shelves The walls of the refrigerator have runners so that the shelves can be positioned as desired . For better use of space, the front half-shelves can lie over the rear ones. D338 Positioning the door shelves To permit storage of food packages of various sizes, the door shelves can be adjusted in height.To make these adjustments proceed as follows: Gradually pull the shelf in the direction of the arrows until it comes off, then reposition as required.
HINTS AND TIPS Food Storage • To obtain the best results from your appliance, neither hot foods nor liquids which may evaporate, should be placed in the larder compartment. Food which is to be frozen (when cool) should be placed in the fridge before being transferred to the freezer. • • Keep the time between buying chilled food and placing it in your fridge as short as possible. Thaw frozen food in the fridge. This will ensure safer defrosting of foods and reduce the work of the refrigeration unit.
MAINTENANCE AND CLEANING Before any maintenance or cleaning work is carried out, DISCONNECT the appliance from the ELECTRICITY supply. Internal cleaning Changing the light bulb Should the interior light fail to work, first switch off the appliance and disconnect from the electricity supply, then replace the bulb as follows; Clean the inside and accessories with warm water and bicarbonate of soda (5ml to 0.5 litre of water). Rinse and dry thoroughly.
CUSTOMER SERVICE AND SPARE PARTS If the appliance is not functioning properly, check that: • the plug is firmly in the wall socket and the mains power switch is on; • there is an electricity supply (find out by plugging in another appliance); • the thermostat knob is in the correct position. • If there are water drops on the bottom of the cabinet, check that the defrost water drain opening is not obstructed (see “Defrosting” section).
INSTALLATION Important Warning IF YOU ARE DISCARDING AN OLD APPLIANCE THAT HAS A LOCK OR CATCH ON THE DOOR, YOU MUST ENSURE THAT IT IS MADE UNUSABLE TO PREVENT YOUNG CHILDREN BEING TRAPPED INSIDE. It must be possible to disconnect the appliance from the mains power supply; the plug must therefore be easily accessible after installation. Depending upon the position which you choose for your appliance, you may wish to reverse the way in which the door opens.
Electrical connections The plug moulded onto the lead incorporates a fuse. For replacement, use a 13amp BSI362 fuse. Only ASTA or BSI approved fuses should be used. Any electrical work required to install this appliance should be carried out by a qualified electrician or competent person. The plug must not be used if the fuse cover/carrier is lost. The cover/carrier is indicated by the coloured insert at the base of the plug. WARNING: THIS APPLIANCE MUST BE EARTHED.
Instructions for totally built-in appliances Door reversal The appliance is supplied with the right or left door opening. To change the opening direction of the door proceed as in the following instructions before installing it. 1. Unscrew the upper pin and remove the spacer 2. Remove the upper door 3. Unscrew the middle hinge and the brackets and refit them on the opposite side 4. Refit the upper door, the upper pin and the spacer on the opposite side 5.
Fit the appliance in the niche by making sure that it stands against the interior surface of the unit on the side where the door hinges of the appliances are fitted. Insert the appliance until the upper strip butts up against the unit (1) and make sure that the lower hinge is in line with the surface of the unit (2). 1 2 D023 Fasten the appliance with 4 screws provided in the kit included with the appliance.
Place guide (Ha) on the inside part of the furniture door, up and down as shown in the figure and mark the position of external holes. After having drilled holes, fix the guide with the screws supplied. ca. 50 mm 90° 21 m m 90° ca. 50 mm 21 m m Fix cover (Hc) on guide (Ha) until it clips into place Ha Hc PR33 8mm Open the appliance door and the furniture door at 90°. Insert the small square (Hb) into guide (Ha).
Fix cover (Hd) on guide (Hb) until it clips into place. Hb Hd PR167/1 If the appliance is fixed to the side of the kitchen unit, simply slacken the screws in fixing brackets (E), move the brackets as shown in the figure and retighten the screws. Fit the cover (D). After completion of the door reversing operation, check that the door gasket adheres to the cabinet. If the ambient temperature is cold (i.e. in Winter), the gasket may not fit perfectly to the cabinet.
SAV After sales service Brandt UK In the unlikely event of there being a problem with your appliances please call the number below quoting the model number of your appliance - this can be found on the ratings plate. Our trained staff are available to advise or book a service call with one of our authorized service agents.
Service Consommateurs De Dietrich BP 9526 - 95069 Cergy Pontoise Cedex - France Tel : +33 (0) 825 06 16 04 0,15Eur TTC/MN Service Après vente De Dietrich Tel : +33 (0) 801 63 25 25 Prix appel local Brandt Appliances - 7 rue Henri Becquerel 92854 Rueil-Malmaison cedex - France S.A.S.