Fridge-Freezer DRC927JE LES NOUVEAUX OBJETS DE VALEUR
Contents Safety information Operation First use Daily use Helpful hints and tips 2 4 4 4 7 Care and cleaning What to do if… Technical data Installation Environmental concerns 8 10 12 12 16 Subject to change without notice Safety information In the interest of your safety and to ensure the correct use, before installing and first using the appliance, read this user manual carefully, including its hints and warnings.
• It is dangerous to alter the specifications or modify this product in any way. Any damage to the cord may cause a short-circuit, fire and/or electric shock. Warning! Any electrical component (power cord, plug, compressor) must be replaced by a certified service agent or qualified service personnel. 1. Power cord must not be lengthened. 2. Make sure that the power plug is not squashed or damaged by the back of the appliance. A squashed or damaged power plug may overheat and cause a fire. 3.
Service • Any electrical work required to do the servicing of the appliance should be carried out by a qualified electrician or competent person. • This product must be serviced by an authorized Service Centre, and only genuine spare parts must be used. Environment Protection This appliance does not contain gasses which could damage the ozone layer, in either its refrigerant circuit or insulation materials. The appliance shall not be discarded together with the urban refuse and rubbish.
Important! In this condition, the refrigerator compartment temperature might drop below 0°C. If this occurs reset the temperature regulator to a warmer setting. Cold accumulators The freezer contains at least one cold accumulator which increases storage time in the event of a power cut or breakdown. Place the fresh food to be frozen on the top compartment.
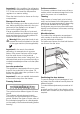
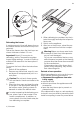
A Important! this appliance is sold in France. In accordance with regulations valid in this country it must be provided with a special device (see figure) placed in the lower compartment of the fridge to indicate the coldest zone of it. Air recycling The refrigerator compartment is equipped with a special D.A.C. (Dynamic Air Cooling) fan which can be turned on with the D.A.C.switch. A A green light The green light, when on, means that the fan is working.
It is suggested that the device be used when the ambient temperature exceeds 25°C . This device allows rapid cooling of foods and a more uniform temperature in the compartment. Helpful hints and tips Hints for energy saving • Do not open the door frequently or leave it open longer than absolutely necessary.
• water ices, if consumed immediately after removal from the freezer compartment, can possibly cause the skin to be freeze burnt; • it is advisable to show the freezing in date on each individual pack to enable you to keep tab of the storage time.
Defrosting the freezer A certain amount of frost will always form on the freezer shelves and around the top compartment. Defrost the freezer when the frost layer reaches a thickness of about 3-5 mm. Important! About 12 hours prior to defrosting, set the Temperature regulator toward higher settings , in order to build up sufficient chill reserve for the interruption in operation. To remove the frost, follow the instructions below: 1. Switch off the appliance. 2.
What to do if… Warning! Before troubleshooting, disconnect the mains plug from the mains socket. Only a qualified electrician or competent person must do the troubleshooting that is not in this manual. Problem Important! There are some sounds during normal use (compressor, refrigerant circulation). Possible cause Solution The appliance is switched off. Switch on the appliance. The mains plug is not connected to the mains socket correctly. Connect the mains plug to the mains socket correctly.
Problem Possible cause Solution The temperature in the freezer is too high. Products are too near to each other. Store products so that there is cold air circulation. There is too much frost. Food is not wrapped correctly. Wrap the food correctly. The door is not closed correctly. Refer to "Closing the door". The temperature regulator is not set correctly. Set a higher temperature. Replacing the lamp 1. Disconnect the mains plug from the mains socket. 2. Remove the screw from the lamp cover.
Technical data Dimension of the recess Height 1780 mm Width 560 mm Depth 550 mm Rising Time 24 h The technical information are situated in the rating plate on the internal left side of the appliance and in the energy label. Installation Read the "Safety Information" carefully for your safety and correct operation of the appliance before installing the appliance.
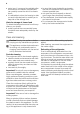
min. 200 cm2 min. 200 cm2 Installing the appliance On the opposite side: 1. Tighten the lower pin. 2. Install the lower door. 3. Tighten the middle hinge. 4. Install the spacer. 5. Install the upper door. 6. Tighten the upper pin. Caution! Make sure that the mains cable can move freely. Do these steps. 1. Install the appliance in the niche. Push the appliance in the direction of the arrows (1) until the upper gap cover stops against the kitchen furniture.
The lower hinge cover (in the accessories bag) makes sure that the distance between the appliance and the kitchen furniture is correct. Open the door. Put the lower hinge cover in position. 4mm 5. Remove the correct part from the hinge cover (E). Make sure to remove the part DX, in the case of right hinge, SX in opposite case. 44mm 3. Attach the appliance to the niche with 4 screws. I 6. Attach the covers (C, D) to the lugs and the hinge holes. Install the vent grille (B).
7. Connect the appliance laterally to the kitchen furniture sidewall: a) Loosen the screws of the part (G) and move the part (G) till the furniture sidewall. b) Tighten the screws of the part (G) again. c) Attach the part (H) to the part (G). ca. 50 mm 90° 21 mm 90° ca. 50 mm 21 mm G H 10. Push the part Hc on the part Ha. Ha 8. Disconnect the parts Ha, Hb, Hc and Hd Ha Hc Hb 11. Open the appliance door and the kitchen furniture door at an angle of 90°.
12. Remove the brackets and mark a distance of 8 mm from the outer edge of the door where the nail must be fitted (K). 14. Press the part Hd on the part Hb. 8 mm Hb K Ha 13. Place the small square on the guide again and fix it with the screws supplied. Align the kitchen furniture door and the appliance door by adjusting the part Hb. Hd Do a final check to make sure that: • All screws are tightened. • The magnetic sealing strip is attached tightly to the cabinet.
Service Consommateurs De Dietrich BP 9526 95069 CERGY PONTOISE CEDEX Tel : +33 (0) 892 02 88 04 *0,34 Eur TTC / min à partir d’un poste fixe • Service fourni par FagorBrandt SAS, locataire-gérant, Etablissement de Cergy, • 5/7 avenue des Béthunes, 95 310 Saint Ouen L’Aumône www.dedietrich-electromenager.
FagorBrandt SAS, locataire-gérant - SAS au capital social de 20 000 000 euros RCS Nanterre 440 303 196.