FR EN NL DE ES PT GUIDE D’INSTALLATION & D’UTILISATION INSTRUCTIONS FOR USE GEBRUIKS AANWIJZING BEDIENUNGSANLEITUNG MANUAL DE INSTRUCCIONES MANUAL DE INSTRUCOES Réfrigérateur Refrigerator Ijkast Kühlschrank Frigorifico Frigorífico 2222680-25
Ch•re Cliente, Cher Client, Vous venez d'acquŽrir un congŽlateur DE DIETRICH et nous vous en remercions. Nos Žquipes de recherche ont con•u pour vous cette nouvelle gŽnŽration d'appareils, qui par leur qualitŽ, leur esthŽtique, leurs fonctions et leurs Žvolutions technologiques en font des produits d'exception, rŽvŽlateurs de notre savoir-faire.
Comment lire votre notice dÕemploi Les symboles ci-dessous vous guideront au long de la lecture de votre notice: F Instructions liées à la sécurité lors de l’utilisation de l’appareil. Conseils pour une utilisation correcte de l’appareil afin d’obtenir les meilleures performances. Informations liées à la protection de l’environnement. Avertissements importants Ce sont des avertissements de sŽcuritŽ. Nous vous prions donc de les lire attentivement avant dÕinstaller et dÕutiliser votre appareil.
Protection de lÕenvironnement Cet appareil ne contient pas, dans son circuit rŽfrigŽrant et ses mati•res isolantes, de gaz rŽfrigŽrants nocifs ˆ la couche d'ozone. Il ne doit pas •tre mis au rebut avec les ordures urbaines et la ferraille afin d'Žviter d'endommager le circuit rŽfrigŽrant, plus particuli•rement ˆ l'arri•re de l'appareil. Contactez votre mairie afin de vous renseigner sur la collecte de ce type d'appareils.
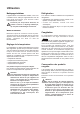
Utilisation Nettoyage intŽrieur RŽfrigŽration L'appareil Žtant convenablement installŽ, nous vous conseillons de le nettoyer soigneusement avec de l'eau ti•de savonneuse, pour enlever l'odeur caractŽristique de ÇneufÈ. Pour obtenir le meilleur rendement du compartiment rŽfrigŽrateur: ¥ n'introduisez pas d'aliments encore chauds ou de liquides en Žvaporation dans la cuve; ¥ couvrez les aliments, surtout s'ils sont aromatiques; ¥ placez les denrŽes de fa•on ˆ ce que l'air puisse circuler tout autour.
DŽcongŽlation Tablettes amovibles Les aliments congelŽs ou surgelŽs doivent •tre dŽcongelŽs avant leur utilisation, dans le compartiment rŽfrigŽrateur (viande, volaille, poissons, etc.) ou ˆ tempŽrature ambiante (pour les autres aliments), selon le temps dont on dispose pour cette opŽration. S'il s'agit de produits minces ou divisŽs, placez-les directement ˆ cuire: dans ce cas, le temps de cuisson sera plus long.
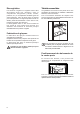
Explication signalŽtique de la zone froide Le symbole ci-contre indique lÕemplacement de la zone la plus froide de votre rŽfrigŽrateur.
¥ ne placez ni bouteilles ni bo”tes de boissons gazeuses dans le congŽlateur, elles pourraient Žclater; ¥ n'introduisez jamais de liquides ou d'aliments chauds; ¥ ne remplissez jamais les rŽcipients avec couvercle jusqu'au bord; ¥ ne consommez pas certains produits tels que les b‰tonnets glacŽs des leur sortie du congŽlateur. La tempŽrature tr•s basse ˆ laquelle ils se trouvent peut provoquer des bržlures; ¥ indiquez sur chaque paquet la date de congŽlation, afin de pouvoir contr™ler le temps d'entreposage.
5. ramenez le bouton du thermostat sur la position dŽsirŽe ou rebranchez lÕappareil. Pour cette opŽration nÕutilisez jamais dÕobjet mŽtallique qui risquerait de dŽtŽriorer lÕappareil. NÕutilisez jamais de dispositifs mŽcaniques ou autres moyens artificiels pour accŽlŽrer le dŽgivrage, ˆ part ceux prŽconisŽs. LÕŽlŽvation de tempŽrature des denrŽes congelŽes peut diminuer leur durŽe de conservation.
Service apres-vente et pieces de rechange Si l'appareil marche mal, il faut contr™ler: DŽrangement Rem•de LÕappareil ne fonctionne pas. - LÕappareil nÕest pas mis en service; mettre lÕappareil en service. - La fiche nÕest pas branchŽe ou ne donne pas de contact; brancher la fiche secteur. - Le fusible a dŽclenchŽ ou est dŽfecteux; vŽrifier le fusible, remplacer le cas ŽchŽant. - La prise de courant est dŽfectueuse; les dŽrangements du rŽseau Žlectrique doivent •tre supprimŽs par votre Žlectricien.
RŽversibilitŽ de la porte Pour l'inversion opŽrer comme suit: 6 6 4 1 7 8 5 2 1 6 3 2 Attention! La rŽversibilitŽ de la porte une fois effectuŽe, contr™lez ensuite que le joint magnŽtique adh•re ˆ la carrosserie. Si la tempŽrature ˆ l'intŽrieur de la pi•ce est trop basse (en hiver, p.ex.), il se peut que le joint n'adh•re pas parfaitement.
RŽversibilitŽ de la porte du compartiment congŽlateur 1 2 3 180° 4 5 Installation Emplacement Placez de prŽfŽrence votre appareil loin d'une source de chaleur (chauffage, cuisson ou rayons solaires trop intenses). Pour le bon fonctionnement de votre appareil, la tempŽrature ambiante du local doit •tre comprise entre +18¡C et +43¡C (classe T); +18¡C et +38¡C (classe ST); +16¡C et +32¡C (classe N); +10¡C et +32¡C (classe SN). La classe d'appartenance est indiquŽe sur la plaque signalŽtique.
PrŽparation de la grille Ouverture de la porte ˆ gauche: Ouverture porte ˆ droite: - enlevez le c™tŽ gauche (A) de la grille en le coupant de l'arri•re. - enlevez le c™tŽ droit (B) de la grille en le coupant de l'arri•re. ProcŽdez ensuite comme suit pour remettre la grille sur l'appareil: - glissez la grille ˆ la base de l'appareil puis appuyer sur les crochets (a) jusqu'au dŽclic. A B a DO002/2 a DO001 Encastrement sous un plan de travail Dimensions de la niche 1.
3. Mettre en place lÕappareil. La prise murale doit se trouver impŽrativement hors de la niche dÕencastrement de lÕappareil. b) I 596 5 55 x ma 5 + - + E 5. Visser l’appareil. 3 LÕappareil est ŽquipŽ de pieds rŽgables; pour rŽgler lÕappareil ˆ la hauteur souhaitŽe (870 mm max.), il est nŽcessaire dÕagir sur les 4 pieds rŽglables.
a 1 b 2 45° C click 3 click c 8 Partie supérieure de la porte du meuble Innenseite Möbeltür 11 a I = 1 = = c 2 b 9 10 = 12 m m 8 I F F 27 ,5 I K m 5c cm 5 27 ,5 cm G 10 13 15
Montage de la plinthe Attention! Pour ne pas compromettre le bon fonctionnement de lÕappareil, il est nŽcessaire dÕutiliser la grille dÕaŽration dÕorigine. ¥ Si la niche dÕencastrement de lÕappareil a une hauteur de A=820 mm et une hauteur de plinthe a=100 mm, la plinthe peut •tre montŽe sans modification. Il en est de m•me pour une hauteur dÕencastrement de B=870 mm et une hauteur de plinthe b=150 mm.
Instructions for the use of the instructions booklet t Notes which are important for your safety or for the proper functioning of the appliance Supplementary information regarding operation and practical applications of the appliance. Tips and notes concerning economical and environmentally sound use of the appliance Safety Instructions This information has been provided in the interests of your safety. Please read it before installing or using the appliance.
Contents Important Safety Instructions . . . . . . . . . . . . . . . . . . . . . . . . . . . . . . . . . . . . . . . . . . . . . . . . . . . . . . . . . . . . .17 Use Cleaning the interior / Starting-up / Temperatur control / Fresh food refrigeration . . . . . . . . . . . . . . . . . .19 Freezing fresh food / Storage of frozen food / Thawing . . . . . . . . . . . . . . . . . . . . . . . . . . . . . . . . . . . . . . . . . .
Use Cleaning the interior Fresh food refrigeration Before using the appliance for the first time, wash the interior and all internal accessories with lukewarm water and some neutral soap so as to remove the typical smell of a brand-new product, then dry thoroughly. The refrigerator compartment is suitable for cooling drinks and for normal food storing.
Ice-cube production This appliance is equipped with one or more trays for the production of ice-cubes. Fill these trays with water, then put them in the freezer compartment. Do not use metallic instruments to remove the trays from the freezer. The glass shelf above the vegetable drawers and the bottle shelf should always remain in position, to ensure correct air circulation.
Hints Hints for refrigeration To help you use your refrigerator correctly, here are some useful hints: ¥ Cooked food, cold cuts, jelly, etc.: these should be well covered and can be stored on any of the glass shelves. ¥ Fruit & vegetables: these should be thoroughly cleaned and placed in the bottom drawer. ¥ Butter & cheese: these should be placed in special airtight containers or wrapped in aluminium foil or polythene bags to keep out as much air as possible.
It is important to periodically clean the defrost water drain hole (F) situated under the salad drawers to prevent the water overflowing and dripping onto the food inside. Use the special cleaner provided (P), which you will find already inserted into the drain hole. process other than those recommended by the manufacturer. A temperature rise of the frozen food packs, during defrosting, may shorten their safe storage life.
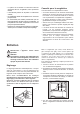
Interior light The light bulb inside the refrigerator compartment can be reached as follows: 1. unscrew the light cover securing screws; 2. unhook the moving part by pressing it as shown in the figure. If the door is open and the light does not come on, check that the bulb is properly screwed in; if it still does not work, replace the bulb with one of the same power. The maximum rating is shown on the light cover.
Warning! If the ambient temperature is cold (i.e. in Winter), the gasket may not fit perfectly to the cabinet. In that case, wait for the natural fitting of the gasket or accelerate this process by heating up the part involved with a normal hairdrier. 6 10 13 9 6 12 11 3 Inner door reversal 1 2 3 180° 4 5 Installation Positioning Electrical connection The appliance should be installed well away from sources of heat such as radiators, boilers, direct sunlight etc.
Important The appliance must be earthed. The power supply cable plug is provided with a contact for this purpose. If the domestic power supply socket is not earthed. connect the appliance to a separate earth in compliance with current regulations, consulting a specialist technician. The Manufacturer declines all responsibility if the above safety precautions are not observed. Grid preparation Left door opening: Remove the left side (A) of the grid cutting it from the rear (see figure).
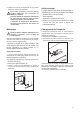
2. Two cabinet securing brackets (D) are supplied with the installation pack. They need to be assembled onto the cabinet prior to cabinet being pushed into the Kitchen aperture. If required, the dimensions of these pads can be reduced by breaking them where marked. 1 Right hand bracket Left hand bracket 2 - To fit these brackets remove the two screws at the top left and right hand front corners of the cabinet. - Position the two brackets as shown in the figure and replace the two securing screws.
6.
1 L = 90° 115° L 2 10 = 12 15 Fitting the plinth m m 8 I F K Important For the efficient operation of the appliance, it is important that the original ventilation grid is used. ¥ For an opening height dimension A=820 mm and a plinth height dimension a=100 mm, the plinth may be fitted without adjustments. The same applies to an opening height dimension B=870 mm and a plinth height dimension b=150 mm.
Aanwijzing voor het gebruik van het instructieboekje N Met de waarschuwingsdriehoek en/of door signaalwoorden wordt de aandacht gevestigd op aanwijzingen die belangrijk zijn voor uw veiligheid of voor het juist functioneren van het apparaat. Na dit symbool wordt uitleg gegeven over de bediening en het praktisch gebruik van het apparaat. Tips en aanwijzingen voor een economisch en milieuvriendelijk gebruik van het apparaat.
¥ ¥ ¥ ¥ mogen, om gezondheidsredenen, niet wederom ingevroren worden. De vriezende binnenwanden of -vlakken in het apparaat bevatten koelmiddel. Plaats geen scherpe voorwerpen tegen zoÕn wand of vlak en schraap evenmin met metalen voorwerpen rijp of ijs af. Lekkage kan het gevolg zijn, hetgeen een onherstelbare schade aan het apparaat en bederf van de levensmiddelen veroorzaakt. Geen voorwerpen of methodes gebruiken om het ontdooiproces te versnellen die niet door de fabrikant zijn aangegeven.
Gebruik Reiniging van de binnenkant Koelen van levensmiddelen Voor u de kast in gebruik neemt, dient u de binnenkant met lauw water en een neutraal schoonmaakmiddel te reinigen om de typische geur van een nieuw apparaat weg te nemen. Droog vervolgens de wanden goed af.
IJslaatjes Verplaatsen van deurvakken Bij het apparaat worden 1 of meerdere ijslaatjes voor het maken van ijsblokjes geleverd. Vul ze met drinkwater en plaats ze in het vriesvak. Het toetsel hebbe een variabele box dat naar de zijkant verschoven kan worden en onder een deurvak is aangebracht. Gebruik geen metalen voorwerpen om de laatjes los te wrikken. De indeling van de koeler De rekken zijn naar verschillende hoogten verplaatsbaar. Trek ze daartoe een stukje naar voren en kantel ze omlaag.
Tips Tips voor het koelen Enkele praktische tips: ¥ Vlees (alle soorten): wordt in plastic zakjes op de rek boven de groentelade geplaatst. Bewaar vlees niet langer dan ŽŽn of twee dagen. ¥ Gekookt voedsel, koude schotels enz.: kunnen, goed afgedekt, op elk rooster geplaatst worden. ¥ Fruit en groente: worden schoongemaakt in de groentelade(n) gelegd. ¥ Boter en kaas: worden, om blootstelling aan de lucht te voorkomen, in speciale koeldozen bewaard of in plastic- of aluminiumfolie verpakt.
In het vriesvak dient u echter de rijp te verwijderen, wanneer deze een laag van circa 4 mm vormt. Gebruik hiervoor de plastic spatel. Voor het uitvoeren van deze handeling hoeft u het apparaat niet uit te schakelen of het vriesvak leeg te maken. Wanneer zich een dikke laag ijs gevormd heeft, dient u het gehele apparaat te ontdooien. Ga als volgt te werk: 1. draai de thermostaatknop op ÇOÈ of trek de steker uit het stopkontakt; 2.
Servicedienst en onderdelen Indien het apparaat niet goed funktioneert, kontroleer dan: ¥ of de stekker goed in het zit; ¥ of de elektriciteit soms uitgevallen is; ¥ of de thermostaatknop op de juiste stand staat; ¥ en indien er water op de bodem van de koeler ligt, of het afvoerkanaaltje soms verstopt is (zie hoofdstuk ÒOntdooienÓ). Kunt u de storing niet zelf lokaliseren en verhelpen, raadpleeg dan de dichtsbijzijnde servicedienst. Geef daarbij altijd het model en het typenummer van de kast op.
Attentie! Bij een lage omgevingstemperatuur (bijv. in de winter) kan het voorkomen dat de deurafdichting niet perfect aan de kast hecht. De afdichting wordt na een bepaalde tijd vanzelf in vorm getrokken. Als u dit proces wilt bespoedigen, is het voldoende om de afdichting m.b.v. een haardroger te verwarmen.
Belangrijk De stekker mag alleen geplaatst worden in een geaard stopcontact. De kast is daarom voorzien van een speciaal drieaderig snoer, geschikt voor een geaard stopcontact. Mocht het stopcontact in uw woning niet geaard zijn, dan dient een erkend installateur het apparaat volgens de geldende normen te aarden. Wij wijzen u er op dat schade of letsel, veroorzaakt door het niet voldoen aan dit veiligheidsvoorschrift, niet onder de verantwoordelijkheid van de fabrikant valt.
1 Links 2 Rechts B 2. De bijgeleverde hoeken (D) aan de kast bevestigen (zie afb.). 4 3. Apparaat naar binnen schuiven. Het stopcontact met randaarde dat het apparaat voor aansluiting nodig heeft, moet zodanig ge•nstalleerd zijn dat het niet door het apparaat wordt bedekt. 4. Voegafdekprofiel (B) op het apparaat plakken (zie afb.). b) 596 I 5 55 x ma + - + E 3 Het apparaat is voorzien van verstelbare voeten; u brengt het apparaat op de gewenste hoogte (max.
I F 27 ,5 cm 27 55 ,5 cm cm 10 7 1 2 45° a b 3 C click 11 click c 8 1 Boven Möbeltür Innenseite a I = = = 2 c 9 10 = 12 b 39
m 8m I F L K 90° G 13 15 A 14 Montage van het sokkelpaneel Belangrijk Het originele ventilatie-rooster dient gebruikt te worden opdat de functionaliteit van het apparaat niet belemmerd wordt. ¥ Bij een binnenwerkse inbouwhoogte maat A=820 mm en een sokkelpaneelhoogte maat a=100 mm kan het sokkelpaneel ongewijzigd worden gemonteerd. Dat is ook zo bij een binnenwerkse inbouwhoogte maat B=870 mm en een sokkelpaneelhoogte maat b=150 mm.