
User manual


6
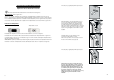
Explicación de las señales de la zona fría
El símbolo de al lado indica la ubicación de la zona más fría en su frigorífico.
Zona más fría: inferior o igual a +4°C
Carnes, aves, pescado, embutidos, platos preparados, ensaladas mixtas, preparados y dulces a base de
huevos o nata, pasta fresca, masa para tartas, pizzas/empanadas, productos frescos y quesos a base de leche
fresca, verduras preparadas para el uso envasadas en bolsas de plástico y más en general todos los productos
frescos cuya fecha de caducación está acoplada con una temperatura de conservación inferior o igual a +4° C.
Indicador de temperatura
Termostato a regular Temperatura correcta
El indicador de temperatura consiente controlar el funcionamiento correcto de su frigorífico.
El indicador muestra el símbolo "OK" cuando la zona más fría alcanza una temperatura inferior o igual a 4°C.
Si la temperatura es superior a 4°C, el indicador es negro. Por tanto el usuario debe bajar la temperatura de su
frigorífico regulando el termostato.
ATENCIÓN: La apertura protraída de la puerta del frigorífico implica el aumento de la temperatura interior. Para
la medición correcta de la temperatura, la lectura del indicador se debe hacer en el plazo de 30 segundos.
PROTECCIÓN DE LOS ALIMENTOS
43
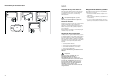
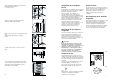
After having reversed the opening direction of
the doors check that all the screws are properly
tightened and that the magnetic seal adheres to
the cabinet. If the ambient temperature is cold
(i.e. in Winter), the gasket may not fit perfectly to
the cabinet. In that case, wait for the natural
fitting of the gasket or accelerate this process by
heating up the part involved with a normal
hairdrier.
PR168
Hb
Should the lining up of the furniture door be
necessary, use the clearance of slots.
At the end of operations, it is necessary to check if
the door of the furniture closes properly.
PR167/1
Hd
Hb
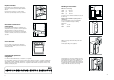
Fix cover (Hd) on guide (Hb) until it clips into place.
Fix cover (Hc) on guide (Ha) until it clips into place
PR33
Hc
Ha
PR167
Ha
Hb
8mm
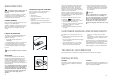
Open the appliance door and the furniture door at
90°. Insert the small square (Hb) into guide (Ha).
Put together the appliance door and the furniture
door and mark the holes as indicated in the figure.
Remove the squares and drill holes with ø 2 mm at 8
mm from the outer edge of the door. Place the small
square on the guide again and fix it with the screws
supplied.