ES PT EN DK MANUAL DE INSTRUCCIONES MANUAL DE INSTRUCOES INSTRUCTIONS FOR USE BRUGSANVISNING DRS635JE Frigorífico Frigorífico Refrigerator Køleskab LES NOUVEAUX OBJETS DE VALEUR
ÍNDICE DE MATERIAS Instrucciones de seguridad Panel de mandos Primer uso Uso diario Consejos útiles 2 4 5 5 7 Cuidado y limpieza 7 Qué hacer si… 8 Datos técnicos 10 Instalación 10 Aspectos medioambientales 14 Salvo modificaciones. INSTRUCCIONES DE SEGURIDAD Por su seguridad y para garantizar el funcionamiento correcto del aparato, antes de instalarlo y utilizarlo por primera vez lea atentamente este manual del usuario, incluidos los consejos y advertencias.
– mantenga el aparato alejado de las llamas y de cualquier fuente de encendido – ventile bien la habitación en la que se encuentra el aparato • Es peligroso alterar las especificaciones o modificar este producto en modo alguno. Cualquier daño en el cable de alimentación puede provocar un cortocircuito, un incendio o una descarga eléctrica.
circuito de refrigerante ni en los materiales aislantes. El aparato no se debe desechar junto con los residuos urbanos. La espuma aislante contiene gases inflamables: el aparato se debe desechar de acuerdo con la normativa vigente, que puede solicitar a las autoridades locales. No dañe la unidad de refrigeración, en especial la parte trasera, cerca del intercambiador de calor. Los materiales de este aparato marcason reciclables.
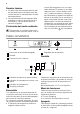
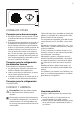
Comenzará la cuenta atrás de la temperatura (-3 -2 -1). El indicador se apaga a la misma vez que el aparato. Regulación de la temperatura La temperatura del interior del aparato se controla mediante el regulador de temperatura situado en la parte superior de la unidad. Para utilizar el aparato, proceda de la manera siguiente: • Gire el regulador hacia la derecha para obtener el frío máximo. • Gire el regulador hacia la izquierda para obtener el frío mínimo.
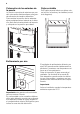
Colocación de los estantes de la puerta La puerta va provista de estantes que pueden colocarse a distintas alturas para guardar alimentos de tamaños diferentes. Para cambiar la posición de los estantes: eleve paulatinamente el estante en la dirección de la flecha hasta retirarlo del soporte y colóquelo en la posición que desee. Cajón extraíble En el cajón especial inferior se deben colocar la fruta, la verdura y las botellas (consulte el diagrama).
CONSEJOS ÚTILES Consejos para ahorrar energía • No abra la puerta con frecuencia ni la deje abierta más tiempo del estrictamente necesario. • Si la temperatura ambiente es elevada, la temperatura del aparato se ha ajustado en los valores más altos y está totalmente lleno, el compresor podría funcionar de manera continua, provocando la formación de escarcha o hielo en el evaporador.
• Aclare y seque a fondo. Importante No mueva, dañe ni tire de los conductos o cables del interior del armario. No utilice detergentes, polvos abrasivos, productos de limpieza perfumados ni cera para limpiar el interior, ya que dañarán la superficie y dejarán un fuerte olor. desborde y caiga sobre los alimentos del interior. Utilice el limpiador especial suministrado, que hallará ya colocado en el orificio de desagüe.
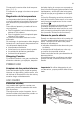
Problema Posible causa Solución El aparato no está correctamente enchufado a la toma de corriente. Enchufe el aparato correctamente a la toma de corriente. El aparato no recibe suministro eléctrico. No hay tensión en la toma de corriente. Enchufe un aparato eléctrico diferente a la toma de corriente. Llame a un electricista cualificado. La bombilla está en espera. Cierre y abra la puerta. La bombilla es defectuosa. Consulte la sección "Cambio de la bombilla".
Cierre de la puerta 1. Limpie las juntas de la puerta. 2. Si es necesario, ajuste la puerta. Consulte "Instalación". 3. Si es necesario, cambie las juntas defectuosas. Póngase en contacto con el servicio técnico. DATOS TÉCNICOS Medidas de la cavidad Altura 1780 mm Anchura 560 mm Fondo 550 mm Voltaje 230-240 V Frecuencia 50 Hz La información técnica se encuentra en la placa de datos técnicos en el lado interior izquierdo del aparato y en la etiqueta de energía.
Puerta reversible La puerta del aparato se abre hacia la derecha. Si desea abrir la puerta hacia la izquierda, siga estas instrucciones antes de instalar el aparato: 1. Afloje y retire el perno superior. 2. Retire la puerta. 3. Retire el separador. 4. Afloje el perno inferior con una llave. En el lado opuesto: 1. Apriete el perno inferior. 2. Instale el separador. 3. Instale la puerta. 4. Apriete el perno superior.
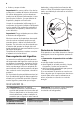
x 2 1 x 2. Taladre la unidad con una broca de Ø 2,5 mm (10 mm de penetración máxima). Monte el cuadrado de fijación en el aparato. 13mm 2,5 4. Ajuste el aparato en el hueco. Asegúrese de que haya una distancia de 44 mm entre el aparato y el borde delantero del mueble. La tapa de la bisagra inferior (incluida en la bolsa de accesorios) garantiza que la separación entre el aparato y el mueble de cocina sea la adecuada. Asegúrese de que quede un espacio de 4 mm entre el aparato y el mueble.
8. Desconecte las piezas (Ha), (Hb), (Hc) y (Hd). Ha I Hb Hc 6. Retire la parte correcta de la tapa de la bisagra (E). No olvide extraer la pieza DX, en el caso de la bisagra derecha, y la pieza SX en el caso contrario. Hd 9. Instale la pieza (Ha) en el lado interno del mueble de cocina. ca. 50 mm 21 m m 7. Fije las tapas (C, D) a las lengüetas y a los orificios de la bisagra. Instale la rejilla de ventilación (B). Fije las tapas (E) a la bisagra. D C E E B ca. 50 mm 21 m m 10.
12. Alinee las puertas del mueble de cocina y del aparato mediante el ajuste de la pieza Hb. Ha Hc 11. Abra la puerta del aparato y la puerta del mueble de cocina en un ángulo de 90°. Introduzca el cuadrado pequeño (Hb) en la guía (Ha). Coloque juntas las puertas del aparato y del mueble y marque los orificios. Quite los cuadrados pequeños y taladre orificios con un diámetro (ø) de 2 mm a 8 mm de distancia del borde externo de la puerta.
negativas para el medio ambiente y la salud pública, lo cual podría ocurrir si este producto no se gestionara de forma adecuada. Para obtener información más detallada sobre el reciclaje de este producto, póngase en contacto con el Ayuntamiento de su Municipio, ó con la tienda donde lo compró.
ÍNDICE Instruções de segurança Painel de controlo Primeira utilização Utilização diária Sugestões e conselhos úteis 16 18 19 19 21 Limpeza e manutenção 21 O que fazer se… 22 Dados técnicos 24 Instalação 24 Preocupações ambientais 28 Sujeito a alterações sem aviso prévio.
– ventile totalmente a divisão onde o aparelho se encontra • É perigoso alterar as especificações ou modificar este produto de qualquer forma. Quaisquer danos no cabo poderão provocar um curto-circuito, incêndio e/ou choque eléctrico. Advertência A substituição de qualquer componente eléctrico (cabo de alimentação, ficha, compressor) tem de ser efectuada por um agente de assistência certificado ou por pessoal técnico qualificado, para evitar perigo. • • • • 1.
• A manutenção deste produto deve ser efectuada por um Centro de Assistência autorizado, o qual deverá utilizar apenas peças sobressalentes originais. com o lixo doméstico. A espuma de isolamento contém gases inflamáveis: o aparelho deverá ser eliminado de acordo com as normas aplicáveis que pode obter junto das autoridades locais. Evite danificar a unidade de arrefecimento, especialmente na parte traseira, perto do permutador de calor.
Regulação da temperatura A temperatura no interior do aparelho é controlada pelo regulador de Temperatura situado na parte superior do armário. Para utilizar o aparelho, proceda do seguinte modo: • rode o botão para a direita para obter a frescura máxima • rode o botão para a esquerda para obter a frescura mínima. Normalmente, a posição intermédia é a mais adequada.
Posicionar as prateleiras da porta Para permitir o armazenamento de embalagens de alimentos de vários tamanhos, as prateleiras da porta podem ser colocadas a diferentes alturas. Para fazer estes ajustes, proceda do seguinte modo: puxe gradualmente a prateleira na direcção das setas até se soltar, de seguida, reposicione como quiser. Gaveta removível Coloque a fruta, os legumes e as garrafas na gaveta inferior fornecida (ver diagrama).
SUGESTÕES E CONSELHOS ÚTEIS Conselhos para poupar energia Conselhos para a refrigeração • Não abra muitas vezes a porta nem a deixe aberta mais tempo do que o necessário. • Se a temperatura ambiente for alta e o regulador de temperatura se encontrar na definição de baixa temperatura com o aparelho completamente cheio, o compressor pode funcionar continuamente, causando gelo no evaporador.
Importante Não puxe, desloque nem danifique quaisquer tubos e/ou cabos dentro do armário. Nunca utilize detergentes, pós abrasivos, produtos de limpeza muito perfumados ou cera de polir para limpar o interior, pois isto irá danificar a superfície e deixar um odor forte. timento do frigorífico para evitar que um fluxo excessivo de água pingue sobre os alimentos. Utilize o agente de limpeza fornecido, que irá encontrar já inserido no orifício de descarga.
Problema Possível causa Solução A ficha não está correctamente inserida na tomada. Ligue a ficha do aparelho correctamente à tomada de alimentação. O aparelho não tem alimentação. Não existe tensão na tomada. Ligue um aparelho eléctrico diferente à tomada. Contacte um electricista qualificado. A lâmpada está no modo de espera. Feche e abra a porta. A lâmpada está defeituosa. Consulte "Substituir a lâmpada". A temperatura não está regulada correctamente. Defina uma temperatura mais elevada.
Fechar a porta 1. Limpe as juntas da porta. 2. Se necessário, ajuste a porta. Consulte "Instalação". 3. Se necessário, substitua as juntas defeituosas da porta. Contacte o Centro de Assistência Técnica. DADOS TÉCNICOS Dimensão do nicho de instalação Altura 1780 mm Largura 560 mm Profundidade 550 mm Tensão 230-240 V Frequência 50 Hz As informações técnicas encontram-se na placa de características no lado esquerdo do interior do aparelho e na etiqueta de energia.
Reversibilidade da porta A porta do aparelho abre para a direita. Se pretender abrir a porta para a esquerda, efectue estes passos antes de instalar o aparelho: 1. Desaperte e retire o pino superior. 2. Remova a porta. 3. Retire o espaçador. 4. Com uma chave, desaperte o pino inferior. No lado oposto: 1. Aperte o pino inferior. 2. Instale o espaçador. 3. Instale a porta. 4. Aperte o pino superior. Requisitos de ventilação A circulação de ar na parte posterior do aparelho tem de ser suficiente. min.
x 2 1 x 2. Perfure a unidade utilizando uma broca com um diâmetro de 2,5 mm (10 mm de penetração máxima). Fixe a esquadria ao aparelho. 13mm 2,5 4. Ajuste o aparelho no nicho. Certifique-se de que a distância entre o aparelho e a extremidade dianteira do armário é 44 mm. A tampa da dobradiça inferior (incluída no saco de acessórios) garante que a distância entre o aparelho e o móvel de cozinha está correcta. Certifique-se de que a folga entre o aparelho e o armário é de 4 mm. Abra a porta.
I D C E E 6. Retire a peça correcta da tampa da dobradiça (E). Certifique-se de que retira a peça DX, no caso da dobradiça direita, SX no lado oposto. B 8. Desligue as peças (Ha), (Hb), (Hc) e (Hd). Ha Hb Hc Hd 7. Encaixe as tampas (C, D) nas cavilhas e nos orifícios da dobradiça. Instale a grelha de ventilação (B). Encaixe as tampas da dobradiça (E) na dobradiça. 9. Instale a peça (Ha) no lado interior do móvel de cozinha. ca. 50 mm 21 m m ca.
10. Pressione a peça (Hc) contra a peça (Ha). 12. Alinhe a porta do móvel da cozinha e a porta do aparelho ajustando a peça Hb. Ha Hc Hb 11. Abra a porta do aparelho e a porta de armário de cozinha num ângulo de 90°. Insira a esquadria pequena (Hb) na calha (Ha). Monte a porta do aparelho e a porta do móvel e assinale os orifícios. Retire os quadrados pequenos e perfure orifícios com um diâmetro de 2 mm, a 8 mm do lado exterior da porta.
um tratamento incorrecto do produto. Para obter informações mais pormenorizadas sobre a reciclagem deste produto, contacte os serviços municipalizados locais, o centro de recolha selectiva da sua área de residência ou o estabelecimento onde adquiriu o produto.
Dear Customer, You have just acquired a DE DIETRICH fridge and we would like to thank you. Our research teams have created this new generation of appliances for you. Their quality, design, features and technological advances make them exceptional products, and reveal our unique know-how. Your new DE DIETRICH fridge will blend harmoniously into your kitchen and will perfectly combine food preservationperformance and ease of use. We wanted to offer you a product of excellence.
CONTENTS Safety instructions Control panel First use Daily use Helpful hints and tips 31 33 34 34 36 Care and Cleaning 36 What to do if… 37 Technical data 39 Installation 39 Environmental concerns 43 Subject to change without notice. SAFETY INSTRUCTIONS In the interest of your safety and to ensure the correct use, before installing and first using the appliance, read this user manual carefully, including its hints and warnings.
damage to the cord may cause a shortcircuit, fire and/or electric shock. Warning! Any electrical component (power cord, plug, compressor) must be replaced by a certified service agent or qualified service personnel to avoid hazard. • • • • 1. Power cord must not be lengthened. 2. Make sure that the power plug is not squashed or damaged by the back of the appliance. A squashed or damaged power plug may overheat and cause a fire. 3. Make sure that you can come to the mains plug of the appliance. 4.
ance shall be disposed according to the applicable regulations to obtain from your local authorities. Avoid damaging the cooling unit, especially at the rear near the heat exchanger. The materials used on this appliance marked are recyclable. by the symbol Environment Protection This appliance does not contain gasses which could damage the ozone layer, in either its refrigerant circuit or insulation materials. The appliance shall not be discarded together with the urban refuse and rubbish.
• turn the knob clockwise to obtain the maximum coldness • turn the knob counter- clockwise to obtain the minimum coldness. The intermediate position is usually the most suitable. However, the exact setting should be chosen keeping in mind that the temperature inside the appliance depends on: • room temperature • how often the door is opened • the quantity of food stored • the location of the appliance.
Removable Drawer Place fruit, vegetables and bottles in the special bottom drawer provided (see the diagram). Air cooling A B The Dynamic Air Cooling (DAC) fan let food cool quickly and a more uniform temperature in the compartment. Press the switch (A) to switch on the fan. The green light (B) comes on. This device allows for rapid cooling of foods and a more uniform temperature in the compartment. Important! Switch on the fan when the ambient temperature exceeds 25°C.
HELPFUL HINTS AND TIPS Hints for energy saving • Do not open the door frequently or leave it open longer than absolutely necessary. • If the ambient temperature is high and the Temperature Regulator is set to low temperature and the appliance is fully loaded, the compressor may run continuously, causing frost or ice on the evaporator. If this happens, set the Temperature Regulator toward warmer settings to allow automatic defrosting and so a saving in electricity consumption.
er at the back of the appliance, over the motor compressor, where it evaporates. It is important to periodically clean the defrost water drain hole in the middle of the refrigerator compartment channel to prevent the water overflowing and dripping onto the food inside. Use the special cleaner provided, which you will find already inserted into the drain hole.
Problem Possible cause Solution The door has been opened too frequently. Do not keep the door open longer than necessary. The product temperature is too high. Let the product temperature decrease to room temperature before storage. The room temperature is too high. Decrease the room temperature. Water flows on the rear plate of the refrigerator. During the automatic defrosting process, frost defrosts on the rear plate. This is correct. Water flows into the refrigerator.
TECHNICAL DATA Dimension of the recess Height 1780 mm Width 560 mm Depth 550 mm Voltage 230-240 V Frequency 50 Hz The technical information are situated in the rating plate on the internal left side of the appliance and in the energy label. INSTALLATION Read the "Safety Information" carefully for your safety and correct operation of the appliance before installing the appliance.
Ventilation requirements The airflow behind the appliance must be sufficient. min. 200 cm2 min. 200 cm2 Installing the appliance Caution! Make sure that the mains cable can move freely. x Do the following steps: 1. If necessary cut the adhesive sealing strip and then apply it to the appliance as shown in figure. x 2. Drill the unit using a Ø 2.5 mm drill (10 mm max. penetration). Fix the square fitting to the appliance.
13mm 2,5 between the appliance and the kitchen furniture is correct. Make sure that the clearance between the appliance and the cupboard is 4 mm. Open the door. Put the lower hinge cover in position. 4mm 44mm 3. Install the appliance in the niche. Push the appliance in the direction of the arrows (1) until the upper gap cover stops against the kitchen furniture. Push the appliance in the direction of the arrows (2) against the cupboard on the opposite side of the hinge. 5.
ca. 50 mm 21 m m 7. Attach the covers (C, D) to the lugs and the hinge holes. Install the vent grille (B). Attach the hinge covers (E) to the hinge. ca. 50 mm 21 m m 10. Push the part (Hc) on the part (Ha). Ha D C E E Hc B 8. Disconnect the parts (Ha), (Hb), (Hc) and (Hd). Ha Hb Hc Hd 9. Install the part (Ha) on the inner side of the kitchen furniture. 11. Open the appliance door and the kitchen furniture door at an angle of 90°. Insert the small square (Hb) into guide (Ha).
13. Press the part (Hd) on the part (Hb). 8 mm Hb Ha Hb 12. Align the kitchen furniture door and the appliance door by adjusting the part Hb. Hd Do a final check to make sure that: • All screws are tightened. • The sealing strip is attached tightly to the cabinet. • The door opens and closes correctly. Hb ENVIRONMENTAL CONCERNS The symbol on the product or on its packaging indicates that this product may not be treated as household waste.
INDHOLD Sikkerhedsanvisninger Betjeningspanel Ibrugtagning Daglig brug Nyttige oplysninger og råd 44 46 47 47 49 Vedligeholdelse og rengøring 49 Hvis noget går galt 50 Tekniske data 52 Installation 52 Skån miljøet 56 Ret til ændringer uden varsel forbeholdes. SIKKERHEDSANVISNINGER Læs denne brugsanvisning igennem (inkl. tips og advarsler), før apparatet installeres og tages i brug. Det forebygger ulykker og sikrer, at apparatet bruges korrekt.
Advarsel Enhver elektrisk komponent (netledning, stik, kompressor) skal udskiftes af et autoriseret serviceværksted eller en autoriseret montør for at undgå fare. • • • • 1. Netledningen må ikke forlænges. 2. Pas på, at stikket ikke bliver klemt eller beskadiget af apparatets bagpanel. Et klemt eller beskadiget stik kan blive overophedet og starte en brand. 3. Sørg for, at apparatets eltilslutning er let at komme til. 4. Træk ikke i elledningen. 5.
henhold til gældende bestemmelser. Nærmere oplysninger fås hos kommunens tekniske forvaltning. Undgå at beskadige køleenheden, især på bagsiden ved siden af varmeveksleren. De materialer i apparatet, der er mærket , kan genvanvendes. med symbolet Miljøhensyn Apparatet indeholder ikke gasser, der kan nedbryde ozonlaget, hverken i kølekreds eller isoleringsmaterialer. Apparatet må ikke bortskaffes sammen med husholdningsaffald og jordfyld.
• Drej termostatknappen mod uret for at vælge minimum køling. Midterpositionen er normalt den mest passende. Når den præcise indstilling vælges, skal du dog huske på, at temperaturen i apparatet afhænger af: • rumtemperaturen • hvor tit døren åbnes • mængden af mad • fryserens placering.
Udtagelig skuffe Frugt, grøntsager og flasker bør anbringes i den specielle nederste skuffe (se tegning). Luftkøling A B Blæseren til dynamisk luftkøling (DAC) afkøler maden hurtigt og giver en mere ensartet temperatur i rummet. Tryk på kontakten (A) for at tænde for blæseren. Den grønne lampe (B) lyser. Denne anordning giver mulighed for hurtig afkøling af madvarer og for en mere jævn temperatur i rummet. Vigtigt Tænd for blæseren, når omgivelsestemperaturen er over 25 °C.
NYTTIGE OPLYSNINGER OG RÅD Energisparetips Råd om køling • Åbn døren så lidt som muligt, og lad den ikke stå åben længere end højst nødvendigt. • Hvis den omgivende temperatur er høj, termostatknappen står på det koldeste trin, og skabet er helt fyldt, kan kompressoren køre konstant, så der dannes rim eller is på fordamperen. Hvis det sker, sættes knappen på en lavere indstilling, så den automatiske afrimning starter, og strømforbruget dermed falder.
ned på maden i skabet. Brug den medfølgende special-flaskerenser, der sidder i afløbshullet ved leveringen. Pause i brug Tag følgende forholdsregler, når apparatet ikke skal bruges i længere tid: • Tag stikket ud af stikkontakten • Tag al maden ud • Afrim (hvis nødvendigt) og rengør apparatet og alt tilbehør • Lad døren/dørene stå på klem for at forebygge ubehagelig lugt.
Fejl Mulig årsag Løsning Der løber vand ned ad bagpladen i køleskabet. Rimen afrimes på bagpladen under den automatiske afrimningsproces. Det er korrekt. Der løber vand ind i køleskabet. Vandafløbet er tilstoppet. Rens vandafløbet. Madvarerne forhindrer vandet i at løbe ned i vandudløbet. Sørg for, at madvarerne ikke rør ved bagpladen. Der løber vand ud af skabet. Afrimningsvandet løber ikke fra afløbet og ned i beholderen over kompressoren. Tilslut smeltevandsafløbet til fordampningsbakken.
TEKNISKE DATA Nichemål Højde 1780 mm Bredde 560 mm Dybde 550 mm Spænding 230-240 V Frekvens 50 Hz De tekniske specifikationer fremgår af typeskiltet indvendig i skabet, på venstre væg, samt af energimærket. INSTALLATION Læs afsnittet "Sikkerhedsoplysninger" grundigt, før apparatet installeres. Dette for at forebygge ulykker og sikre, at apparatet bruges korrekt.
Krav til lufttilførsel Der skal være tilstrækkelig luftstrøm bag apparatet. min. 200 cm2 min. 200 cm2 Installation af apparatet Bemærk Sørg for, at netledningen ikke er i klemme. x Gør så følgende: 1. Klip eventuelt isolerbåndet af, og sæt det på apparatet, som vist på tegningen. x 2. Bor hul i enheden med et Ø 2,5 mm bor (maks. 10 mm dybde).
Sæt vinkelbeslaget på apparatet. 13mm 2,5 mellem apparatet og køkkenskabet er korrekt. Sørg for, at afstanden mellem køleskabet og skabet er 4 mm. Åbn lugen. Sæt det underste hængsels afdækning på plads. 4mm 44mm 5. Fastgør køleskabet til nichen med 4 skruer. 3. Installér køleskabet i nichen. Skub apparatet i retning af pilene (1), indtil den øverste dækliste støder mod køkkenelementet. Skub køleskabet i pilenes retning (2) mod skabet på den modsatte side af hængslet. I 2 1 4.
9. Montér del (Ha) på indersiden af køkkenelementet. ca. 50 mm 21 m m 7. Sæt afdækningerne (C, D) i øskenerne og hængselhullerne. Montér udluftningsristen (B). Sæt hængselafdækningerne (E) på hængslet. D ca. 50 mm 21 m m 10. Tryk del (Hc) fast på del (Ha). Ha C E Hc E B 8. Adskil delene (Ha), (Hb), (Hc) og (Hd). Ha Hb Hc Hd 11. Åbn køleskabets låge og skabslågen i en vinkel på 90°. Sæt den lille firkantede plade (Hb) i skinnen (Ha).
13. Tryk del (Hd) fast på del (Hb). 8 mm Hb Ha Hb 12. Flugt skabslågen og apparatets dør ved at stille på del (Hb). Hd Slut med at kontrollere, at: • Alle skruer er strammet. • isolerbåndet slutter helt tæt til kabinettet. • døren åbner og lukker rigtigt. Hb SKÅN MILJØET Symbolet på produktet eller på pakken angiver, at dette produkt ikke må behandles som husholdningsaffald. Det skal i stedet overgives til en affaldsstation for behandling af elektrisk og elektronisk udstyr.
Service Consommateurs De Dietrich BP 9526 95069 CERGY PONTOISE CEDEX Tel : +33 (0) 892 02 88 04 *0,34 Eur TTC / min à partir d’un poste fixe • Service fourni par FagorBrandt SAS, locataire-gérant, Etablissement de Cergy, • 5/7 avenue des Béthunes, 95 310 Saint Ouen L’Aumône www.dedietrich-electromenager.
FagorBrandt SAS, locataire-gérant - SAS au capital social de 20 000 000 euros RCS Nanterre 440 303 196.