99617431_ML.
99617431_ML.
99617431_ML.qxd 14/02/03 14:27 Page 28 Editorial Dear Customer, Thank you for buying a DE DIETRICH hob. Our research teams have designed a new generation of kitchen appliances. As a result of our unique expertise, we have produced a range of goods whose quality, design and technical advance are unsurpassed. You will find that the clean lines and modern look of your DE DIETRICH hob blends in perfectly with your kitchen décor. It is easy to use and performs to a high standard.
99617431_ML.qxd 14/02/03 14:27 Page 29 Your hob in complete safety Using your hob in complete safety We have designed your hob for private domestic use. With a view to the constant improvement of our products, we reserve the right to make any changes in their technical, functional or aesthetic characteristics as a result of technical evolution. These hobs are designed exclusively for the cooking of drinks and foodstuffs. These products do not contain any asbestos-based component parts.
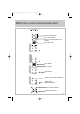
99617431_ML.qxd 14/02/03 14:27 Page 30 What your hob looks like? Semi-fast burner 1,5 kW* Fast burner 2,3 kW* Extra-fast burner 3,1 kW* Semi-fast burner 1,5 kW* (*) These power settings are expressed in G20/20mbar. The control panel for this hob is equipped with touch sensitive controls. To use one of the touch controls you should… Place your finger flat and straight on the chosen button until the display shows the new setting.
99617431_ML.
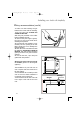
99617431_ML.qxd 14/02/03 14:27 Page 32 Installing your hob in all simplicity Fitting recommendations Model Width Depth Height Cut-out 56 cm 49 cm Depending on cupboard Outside dimensions above the work surface 65 cm 51,8 cm 5 cm Outside dimensions below the work surface. 55 cm 47 cm 5,1 cm This appliance should be installed by a qualified technician / installer.
99617431_ML.qxd 14/02/03 14:27 Page 33 Installing your hob in all simplicity The hob must be built into the worktop of a support cupboard. This worktop must be at least 3 cm thick and heat-resistant or else coated with a heat resistant material. A side-clearance of at least 30 cm should be left to the right and left of the hob. A tall cupboard or partition too close to the hob would hinder free movement of kitchen utensils.
9617431_ML.qxd 14/02/03 14:27 Page 34 Installing your hob in all simplicity Fitting recommendations (cont'd) To make sure that nothing can get between the frame and the worktop, stick the foam seal around the outside of the hob. Affix the joint provided in the folder before installing the hob : 1- Remove the pan support grates, the burner caps and heads after checking their position.
99617431_ML.qxd 14/02/03 14:27 Page 35 Installing your hob in all simplicity Electrical connections ● Gas Hob This hob must be connected to the 220-240 V ~ single phrase mains network using a 2-phase + earth plug connector (CEI 60083 standard) or an all-pole cut-off device with a contact opening distance of at least 3 mm.
99617431_ML.qxd 14/02/03 14:27 Page 36 Installing your hob in all simplicity Gas connections ● Preliminary remarks If the hob is to be installed above an oven or if other nearby heating appliances risk heating and damaging the gas hose then it is essential that a rigid pipe be installed instead. If a flexible hose is used (in the case of butane gas) then it must not be installed in a place where it may be in contact with a moving part of the kitchen unit or a place likely to get cluttered.
99617431_ML.qxd 14/02/03 14:27 Page 37 Installing your hob in all simplicity Gas connections (Cont'd) ● Possible connections TOWN GAS (NATURAL GAS). One of the 3 following connections must be used: - connection with a rigid pipe (gas standard G1/2). The connection should be made at the end of the elbow seal on the appliance, or - connection with a reinforced, braided, flexible gas hose with threaded connectors (fig. A on the preceding page).
99617431_ML.qxd 14/02/03 14:27 Page 38 Installing your hob in all simplicity Gas connections (Cont'd) ● Possible connections BOTTLED OR TANKED GAS (BUTANE/ PROPANE). For the user's safety, we advise the connection to be made with a rigid pipe if this is possible, or with a reinforced, braided, flexible gas hose (maximum length 2 metres) (fig. A).
99617431_ML.qxd 14/02/03 14:27 Page 39 Installing your hob in all simplicity Changing the type of gas supply ● Preliminary remarks Your hob is delivered regulated for natural gas. The injectors for adapting the hob for use with butane or propane are in the wallet containing the instructions, together with the adaptor and the sealing washer. Please see the corresponding paragraph on "Gas Connections".
99617431_ML.qxd 14/02/03 14:27 Page 40 Installing your hob in all simplicity Changing the type of gas supply (cont'd) ● Changing from natural gas to butane/propane gas When carrying out this operation BEFORE CONNECTING UP ANYTHING, you should successively: ➊ Switch over the gas change switch. ❷ Adapt the gas connection. ❸ Change the injectors. ➍ Electrical connections ➊ S WITCH OVER THE GAS CHANGE SWITCH.
99617431_ML.qxd 14/02/03 14:27 Page 41 Installing your hob in all simplicity Changing the type of gas supply (cont'd) ● Changing from natural gas to butane/propane gas (cont'd). • Replace these with the injectors supplied in the wallet, in accordance with the gas rating table at the end of the chapter; to do this: ➪ Screw in the injectors by hand until they are tight. ➪ Put the spanner well onto the injector. ➪ With a pencil draw a line on the hearth plate as indicated (fig. 3).
99617431_ML.qxd 14/02/03 14:28 Page 42 Installing your hob in all simplicity Changing the type of gas supply (cont'd) ● Changing from butane / propane gas to natural gas When carrying out this operation BEFORE CONNECTING UP ANYTHING, you should successively : ➊ Switch over the gas change switch. ❷ Adapt the gas connection. ❸ Change the injectors. ➊ S WITCH OVER THE GAS CHANGE SWITCH.
99617431_ML.qxd 14/02/03 14:28 Page 43 Installing your hob in all simplicity Changing the type of gas supply (cont'd) ● Changing from butane / propane gas to natural gas • Replace these with the injectors supplied in the wallet, in accordance with the gas rating table at the end of the chapter; to do this: ➪ Screw in the injectors by hand until they are tight. ➪ Put the spanner well onto the injector. ➪ With a pencil draw a line on the hearth plate as indicated (fig. 3).
99617431_ML.
99617431_ML.qxd 14/02/03 14:28 Page 45 Using your hob in all simplicity Turning on the hob and adjusting the power setting • Select the burner that you wish to use by pressing on the corresponding button (fig. 1). ➡ The operating indicator for the burner lights up. ➡ The power indicators for this burner will begin flashing. • Choose the heater power setting by selecting and pressing the buttons for the burner power setting (fig. 2). The power indicators stop flashing.
99617431_ML.qxd 14/02/03 14:28 Page 46 Using your hob in all simplicity How to use the timer? • The front left and back left burners are equipped with a timer (maximum duration of 99 min). However, they can operate without using this. • Ignite the burner as indicated in the previous page “Turning on the hob and adjusting the power settings”. • Press the Fig. 1 touch control on the timer.
99617431_ML.qxd 14/02/03 14:28 Page 47 Using your hob in all simplicity Which pans are best adapted for use on the gas burner ? • Recommended pan sizes: Small burners semi-fast Medium burner fast Extra burner extra fast 12 to 20 cm 16 to 22 cm 18 to 28 cm Adjust the flames so that they do not lick up the side of your pan. RIGHT WRONG CONVEX CONCAVE Do not use a pan with a convex or concave bottom. Do not leave the gas on beneath an empty pan.
99617431_ML.qxd 14/02/03 14:28 Page 48 How to look after your hob? Keeping your hob in good condition is easy if you clean it before it is completely cold. Even so, never clean it when it is in use. Put all the control knobs at zero. HOW TO PROCEED ACCESSORIES TO BE USED Injector Nut Sparker thermocouple ➤ Looking after sparkers and injectors ➡ If ever the sparkers get dirty, clean them with a stiff non-metallic brush. ➡ The gas injectors are in the centre of each burner in the form of a "pot".
99617431_ML.qxd 14/02/03 14:28 Page 49 Minor troubleshooting You have doubts about whether your hob is working correctly .... ...... this does not necessarily mean there is a breakdown. Nevertheless, check the following points ERROR CODES IF YOU REALIZE THAT ➤ 2 bleeps followed by the displaying of F1 or F2 or F3 or F... on the timer , then showing A2 or A2 or A… ➡ This is the normal start-up procedure for your hob when the power is turned on.
99617431_ML.qxd 14/02/03 14:28 Page 50 Minor troubleshooting (cont’d) IF YOU REALIZE THAT ➡ Lighting the burners: There are no sparks when pressing the buttons. ➡ When lighting a burner, sparks appear at all of the burners at the same time. WHAT SHOULD YOU DO? ✓ Check the electrical connections on the hob. ✓ Check that the sparkers are clean. ✓ Check that the burners are clean and in position. ✓ This is normal. The lighter system is centralised, and all the burners spark at the same time.
Hollandaise, Bearnaise Bechamel, Aurore Endives, Spinach Peas In Sauce Provence Tomatoes Fried Potatoes SAUCES VEGETABLES Chips Fritters Rice Pudding Stewed Fruit Pancakes Chocolate Custard FRYING DESERTS 3-4 minutes 3-4 minutes 10 minutes 25 minutes 90 minutes 10-12 minutes 10 minutes 25-30 minutes 15-20 minutes 10 minutes 8-10 minutes 8-10 minutes X X X X X X X X X X X X X X X X EXTRAFAST X X X X X FAST X X X X X X SEMIFAST 14:28 Pasta Steack Blanquette, Osso-bucco Fried Escalope
99617431_ML.qxd 14/02/03 14:28 Page 52 Etiquette signalétique Identity label 0 825 06 16 04 à tarif en vigueur à la date d’impression du document * 5 361 Z te E u TAP E /min C T D CO 97 € T *0,1 FR DE DIETRICH 7, rue Henri Becquerel 92584 REUIL MALMAISON CEDEX Tél. : 33 (0) 1 47 16 65 65 S.A.S. au capital de 10.000.000 euros - RCS NANTERRE B 440 303 196 N° SIREN : 440 303 196 - APE 297 A Intec 4 - Wade Road BASINGSTOKE RG24 8NE UK Tel. : 01 256 308 000 Fax : 01 256 325 888 Website :