Better Everyday Get Started This short guide is not intended to explain all the functions of the appliance. Please read all the owner’s instruction booklet before use.
WELCOME Introducing the exclusive world of espresso through the global leaders, De’Longhi. Based in Treviso, Italy, we grew up appreciating the taste and aroma of a good cup of coffee. Discover the barista brewing inside you: now you can make authentic espressos, lattes and cappuccinos to suit your taste, in the comfort of your kitchen.
PUMP ESPRESSO TIPS AND TRICKS Recommendations for producing a better espresso: 1. Use freshly ground espresso. Recommendations for producing a better cappuccino or latte: 2. Store coffee beans in a cool, dark and dry container. Vacuum sealed if possible. 1. Once steam has been selected ‘purge’ the steam nozzle/frother to eliminate any excess water before you start frothing the milk. 3. Pre-heat your espresso and cappuccino cups using the cup warmer storage on the top of the machine. 2.
IN THE BOX A1. A2. A3. A4. A5. A6. A7. A8. Water tank lid Water tank Cup warmer Control panel buttons Steam dial Water spout / frother ON / OFF switch Drip tray B1. Filter-holder with 3 cups B2. Tamper/dispenser measure scoop “Total Hardness Test” Indicator Get Started & Owner’s Instructions Booklets Natural Descaler 100 ml /3.4 oz.
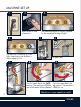
MACHINE SET UP 1 2 3 The machine preforms a self-test signalled by the sequential flashing of lights. Main switch on side of machine. 4 5 The machine is warming up, when lights stop blinking the machine is almost ready for use. 7 8 6 Fill water tank 9 Turn the steam dial to the Turn the steam dial to the position. The machine is position. The machine will prime and a little water will be released. ready for use.
BREWING ESPRESSO Using Pre-Ground Espresso 1 3 2 Use correct filter, marked on bottom of cup. 1 CUP 4 2 CUPS 5A 6A 7A 5B 6B 7B 1 CUP 2 CUPS Brew 1 or 2 Espresso at one time.
BREWING ESPRESSO Using E.S.E. POD Espresso 1 3 2 4 Use correct filter, E.S.E. POD marked on bottom of cup. 5 6 7 E.S.E. (Easy Serving Espresso) Pods can be used to simplify the espresso preparation. Each pre-packed pod contains 7 grams of coffee, already measured and pressed and sealed between 2 fine layers of filter paper.
BREWING CAPPUCCINO or LATTE 1A Refer to previous section BREWING ESPRESSO for the espresso related part. 1B 2 3 5 4 Hot Milk steamed, no foam Fill the pitcher, Cappuccino 3.5 oz. for creates foam Cappuccino, 6 oz. for Latte. 6 7 8 10 9 Be sure frother is immersed in milk, but not beyond the highlighted mark on the spout 11 Froth until desired level of foam is If both coffee buttons reached, then are blinking, you must turn dial to cool down the boiler. Turn dial ON allowing water position.
DELIVERING HOT WATER Delivering hot water 1. Place a container under the spout (as close as possible to avoid splashes). 2. Turn the steam dial to the position. Water runs out of the spout. 3. Turn the dial to the position when the desired amount of water has been delivered. NOTE: You can stop the flow of water by pressing the button. (You should not run off hot water for more than 2 minutes at a time). WATER FILTER Installing the filter* * Optional water filter sold separately. 1.
TEST YOUR WATER Measuring Water Hardness 1. Remove the “total hardness test” indicator paper from the pack. 2. Immerse the paper completely in a glass of water for one second. 3. Remove the paper from the water and shake lightly. After about a minute, 1,2,3, or 4 red squares form, depending on the hardness of the water. Each square corresponds to one level. 1 Press button and hold for 10 seconds. The lights will blink in sequence. You are now in the setting menu.
CLEANING and MAINTENANCE: FROTHER 1 2 Unscrew the frother by rotating counterclockwise and pulling downwards. 5 6 Replace the nozzle by inserting it onto the steam tube. 4 Remove the nozzle Thoroughly clean steam from the steam nozzle with cloth and tube by pulling it warm water. downwards. Clean nozzle with warm running water and use a needle to clean the hole. 7 A 11 3 B 8 C To clean the hole in the frother, pull up the selection ring as in figure C until the hole appears.
CLEANING THE COFFEE FILTERS 1 2 1 CUP 2 CUPS Extract the removable perforated filter 3 4 Clean with a brush POD Clean the hole on the bottom with a toothpick Clean the filter with warm running water 5 Insert the perforating filter pushing it as far as it goes
DESCALING Descale the machine when the orange light comes on. 1. Turn the machine on. 2. Completely empty the water tank (A ) and remove the water filter (if present). 3. Fill the tank with the descaler solution obtained by diluting the descaler (B ) with water (C ): fill the water tank up to the MAX level. 4. Place an empty container (D ) with a minimum capacity of 50 oz under the hot water spout and brewing unit. 5. Press the button and hold for 10 seconds. The lights will blink in sequence.
ACCESSORIES Enjoy our full line of drinkware: an exclusive line of Espresso, Cappuccino, Latte glasses and milk pitcher. Care Kit Line Experience the De’Longhi Care Kit Line to improve the performance of your espresso machine. EcoDecalk Coffee Care Kit EcoDecalk mini Water Filter Milk Clean ... to learn more about the De’Longhi accessories visit: delonghi.
ESPRESSO DRINKS Espresso Italian Macchiato A small 1 or 2 oz. shot of pressure brewed espresso using approximately 1 Tbsp. of finely ground coffee. A single or double espresso topped with a dollop of heated milk and served in a traditional espresso cup. Cappuccino Espresso Lungo A single espresso shot topped with equal parts steamed and frothed milk (in a ratio of 1:1:1) served in a 4 to 6 ounce cup. From 3 oz. up to 4 oz. of brewed espresso using finely ground coffee.
like us: DeLonghi North America – follow us @DeLonghiNA 5713235571_00_0617 - Printed in China www.delonghi.