
User Manual
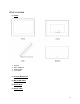
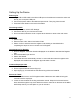

Table Of Contents

Setting Up the Device
Powering On
1. Plug the Micro USB cable in the Micro USB port on the tablet and connect the other end
directly into a computer USB port.
2. Connect the power cable to the tablet and power brick. Then plug it into the wall.
3. Press the Power button on the back of the tablet.
Connecting to WiFi
1. Once powered on, select ‘WiFi Settings’
2. Choose the WiFi of your choice and connect.
3. Once connected, select the circle or square at the bottom to return to the main menu.
Logging In
1. Select ‘Login’
2. Enter the store code ‘456123’ and select ‘Enter’
3. Select ‘Confirm’ and then leave the register code showing on the tablet before
completing the steps on how to connect to a PC Register.
Connecting to a PC Register
1. On a PC Register, follow the directions displayed on the tablet to download the Register
App.
2. Once downloaded, open and run.
3. Select ‘Get Started’
4. If the tablet does not automatically connect in 10 seconds then enter the register code
displayed on the tablet into the Register App and select ‘Connect’
Create an Employee Code
1. Select ‘Create an Account’
2. Fill the required fields and select ‘Sign Up’.
3. Upon signing up, an email will be sent with training videos and material.
Secure the Tablet
1. Place one tablet next to one PC Register station. Make sure each tablet is facing the
customers not the employee.
2. Locate an area to tether the locking mechanism around. Wrap the lock around secure
area, thread through the loop, then attach the node to center slit on the base of the tablet
stand. Keep the key in a safe place so you do not lose it.
3