
Installation Guide


Topside of Drawer
Bottom side of Drawer
Side View
REVISIONS
ZONE
REV.
DESCRIPTION
DATE
D
C
A
B
C
D
3
4
5
6
7
8
8
7
6
5
4
3
2
1
E
F
E
F
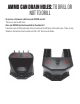
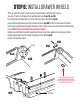
CORRECT:
SPRING ARM FITS
IN HANDLE NOTCH
WRONG:
SPRING ARM OUT
OF HANDLE NOTCH
SPRING ARMS
POINT INWARD
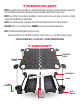
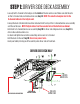
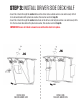
STEP 7: INSTALL DRAWER HANDLES
• Save yourself the headache, watch this short installation video: decked.com/videohandle
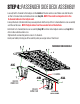
• From the underside of drawer, place the springs between the holes, red spring=right spring; bag 7A.
NOTE: each spring arm should point inward, not outward.
• Install clevis pin through each drawer hole and through spring; bag 7B.
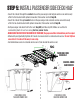
• With DECKED logo facing outward, insert the handle ends behind the spring arms. Rotate the top of the
handle toward the clevis pins, pulling the spring arm downward. When the handle hole is lined up with
the clevis pin, push the pin through the handle hole and through the drawer hole. Repeat on the other
side of the handle.
• Install hair pin through the clevis pin; bag 7B.
• Repeat process for the other drawer; bag 7C & 7D.
HANDLE OVERVIEW
CLEVIS PIN
Topside of Drawer
Bottom side of Drawer
Side View
REVISIONS
ZONE
REV.
DESCRIPTION
DATE
D
C
A
B
C
D
3
4
5
6
7
8
8
7
6
5
4
3
2
1
E
F
E
F
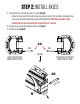
CORRECT:
SPRING ARM IS HERE
(FULLY HORIZONTAL)
WRONG:
SPRING ARM IS HERE
(NOT FULLY HORIZONTAL)
TOP VIEW
HAIR PIN
HELPFUL TIP: MAKE SURE SPRINGS HAVE
THE LONG ARM HORIZONTAL AND SHORT LEG
VERTICAL BEFORE INSERTING HANDLE
SPRING
NOTCHES