Installation Instructions: DG3 CHEVY SILVERADO/GMC SIERRA 5’9” BED LENGTH 2007-CURRENT TOOLS REQUIRED Adjustable wrench (that opens to about 1”), 1/2” open end wrench, Phillips screwdriver, 3/8” socket, 7/16” deep socket, 7/32” Allen wrench Watch short installation videos at www.decked.com/video | Register your system at www.decked.com/warranty FOLLOW US: @DECKEDUSA | #DECKEDUSA VERSION 3 DECKED.COM | SERVICE@DECKED.COM | 208.806.
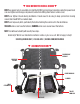
▼ READ BEFORE YOU INSTALL DECKED ▼ DON’T use power tools to assemble or install the DECKED system. Impact wrenches and other power tools can over tighten and damage components (aside from drilling drain holes in ammo cans). DON’T over tighten J-hooks during installation. J-hooks need to be snug to keep system from moving around, but should NOT be cranked down. DON’T over torque any bolts, particularly the bolts attaching the center vert to the deck halves.
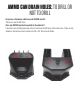
AMMO CAN DRAIN HOLES: TO DRILL OR NOT TO DRILL • Do you use a Tonneau or shell over your DECKED system? There is no need to drill holes. • Does your DECKED system live outside in the elements? The ammo cans will likely get water in them. You’ll need to drill holes in the ammo cans. There are two dimples in the bottom of each ammo can. Drill a 3/8” hole at each dimple.
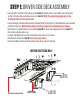
STEP 1: DRIVER SIDE DECK ASSEMBLY • Loosely bolt C-channel to the ledges on the inside of the two ammo cans. Make sure bolt head is on the C-channel side, not inside ammo can; bag 1A. NOTE: The small rectangular slot in the C-channel indicates the tailgate end. • Line up the deck (sticker indicates driver side deck half) on top of the C-channel/ammo can assembly and the vert bosses. NOTE: Tailgate side of vert has an axle hole at the bottom (see below).
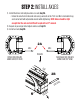
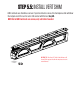
STEP 2: INSTALL AXLES 11 1). Install the driver side tailgate ammo can axle; bag 2A. • Rotate the axle from its inbound side using a wrench on the “flat” end. Nut is included in bag and can be held with adjustable wrench while tightening. NOTE: Axles should be tight enough that the axle end is difficult to spin with a 1/2” wrench. 2). Repeat on passenger side tailgate ammo can; bag 2A. 3). Install vert axle; bag 2B.
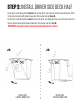
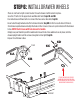
STEP 3: INSTALL DRIVER SIDE DECK HALF • Insert the J-hook through the cabside hole on the driver side cabside ammo can and loosely affix it to tie-down bracket with spherical washer, flat washer and nut; bag J6. • Insert the J-hook through the center hole on the driver side tailgate ammo can and loosely affix it to the tie-down bracket with spherical washer, flat washer and nut; bag J6. IMPORTANT: Leave all J-hook screws loose until entire deck is in place.
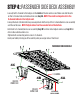
STEP 4: PASSENGER SIDE DECK ASSEMBLY • Loosely bolt C-channel to the ledges on the inside of the two ammo cans. Make sure bolt head is on the C-channel side, not inside ammo can; bag 4A. NOTE: The small rectangular slot in the C-channel indicates the tailgate end. • Line up the deck (sticker indicates passenger deck half) on top of the C-channel/ammo can assembly and the vert bosses. NOTE: Tailgate side of vert has an axle hole at the bottom.
STEP 5: INSTALL PASSENGER SIDE DECK HALF • Insert the J-hook through the center hole on the passenger side tailgate ammo can and loosely affix it to the bracket with spherical washer, flat washer and nut; bag J6. • Insert the J-hook through cabside side hole on the passenger side cabside ammo can and loosely affix it to tie-down bracket with spherical washer, flat washer and nut; bag J6. • Bolt passenger side deck half to the vert; bag 5C (just like step 1D).
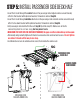
STEP 5.5: INSTALL VERT SHIM • GM truck beds are oftentimes convex. If your truck bed is convex, this Santoprene shim will allow the tailgate end of the vert to rest in full contact with the bed; bag 5D. NOTE: Not all GM truck beds are convex, only add shim if needed. 8 6 7 5 4 2 3 1 D D C C B B GENERAL NOTES: A HELPFUL TIP: The shim is 1/8” thick. If that thickness still doesn’t fill the gap, cut the shim into two pieces to create more thickness.
STEP 6: INSTALL DRAWER WHEELS • There is a left and a right corner bracket for each drawer–bolt brackets in place. (use the 2” bolts for the upper back wall bracket hole); bags 6A and 6B. • Use tube brace with two bolts to connect the two corner brackets; bag 6C. • Insert axle through wheel and affix to drawer bracket; bag 6D. Do this for each wheel (4 times). • Turn drawer upside down and align the holes in the L-braces (loose in system box) with the drawer holes.
6 4 2 STEP 7: INSTALL DRAWER HANDLES 5 3 ZONE REV. • Save yourself the headache, watch this short installation video: decked.com/videohandle • From the underside of drawer, place the springs between the holes, red spring=right spring; bag 7A. NOTE: each spring arm should point inward, not outward. • Install clevis pin through each drawer hole and through spring; bag 7B. • With DECKED logo facing outward, insert the handle ends behind the spring arms.
STEP 8: INSTALL DRAWERS • Save yourself the headache, watch this short installation video: decked.com/videotailgatewheels. • Install optional drawer braces (instructions included in bag); bag 8A. • Install drawer by sliding wheels into their two channels (C-channel and vert). • Install remaining tailgate side wheels onto their axles; bag 8B. NOTE: Placing a spacer under the drawer to raise it into position makes this easier (ammo can lids work well).
STEP 9: THE FUN STUFF CAUTION: These are small gauge screws–light, hand-tightening is all that is required. • Center and screw on the ruler/edge guard; bag 9A. • Screw on the bottle opener; bag 9A. • Using your favorite beverage, test the bottle opener, and think about how jealous your friends are going to be.