Installation Instructions: DN3 NISSAN TITAN 5’7” BED LENGTH 2016-CURRENT TOOLS REQUIRED Adjustable wrench (that opens to about 1”), 1/2” open end wrench, Phillips screwdriver, 3/8” socket, 7/16” deep socket, 7/32” Allen wrench Watch short installation videos at www.decked.com/video | Register your system at www.decked.com/warranty follow us: VERSION 3 DECKED.COM | SERVICE@DECKED.COM | 208.806.
▼ THIS IS A TEST - Are you reading these BEFORE you install DECKED? ▼ • Parts are labeled by step sequence. • The tailgate ammo cans have flat bottoms. • The cabside ammo cans are narrow at the bottom. • Get bolts good and tight, BUT DON’T USE POWER TOOLS. • You’ll need a buddy for exactly two steps. Don’t go super-human on us and hurt yourself! Need Help? Watch our detailed installation video or give us a call. We’re happy to troubleshoot any issues. SERVICE@DECKED.COM 208.806.
PREPARE BED: INSTALL SHIMS • There are 4 DOUBLE STACKED shims provided: • Using the information in the respective circular detail views: a) Clean the surfaces thoroughly where the shims will be located. b) Remove the layer of tape on the bottom of the shim to expose the adhesive surface. c) Place the shim and apply with pressure. DETAIL A Align shim to seam in floor (blue). Place shim 2” from cabside panel of bed. Repeat on passenger side. DETAIL B Place shim 1 1/2” from seam in floor (blue).
STEP 1: DRIVER SIDE DECK ASSEMBLY • Loosely bolt C-channel to the ledges on the inside of the two ammo cans; bag 1A. Note: The small rectangular hole in the C-channel indicates the tailgate side. • Before bolting anything else together, line up the deck on top of the C-channel/ammo can assembly and the bosses on the vert, fully assembled in position. This will make everything level and easier to bolt in place. Note: Tailgate side of vert has an axle hole at the bottom (see diagram below).
STEP 2: INSTALL AXLES 1). Install the driver side tailgate ammo can axle; bag 2A. • Simply rotate the axle from its inbound side using a wrench on the “flat” end (the flat is 1/2”) nut included in bag. 2). Repeat on passenger side tailgate ammo can; bag 2A. 3). Install vert axle; bag 2B.
STEP 3: INSTALL DRIVER SIDE DECK HALF • Get a buddy to help you place the driver side deck assembly into your truck bed and slide it up against the driver side sidewall. • Insert the J-hook through the cabside hole on the driver side cabside ammo can and loosely affix it to tie-down bracket (hook at bottom); bag J5. • Insert the J-hook through the tailgate side hole on the driver side tailgate ammo can and loosely affix it to the tie-down bracket (hook at bottom); bag J5.
STEP 4: PASSENGER SIDE DECK ASSEMBLY • Loosely bolt C-channel to the ledges on the “inside” of the two ammo cans; bag 4A. Note: The small rectangular hole in the C-channel indicates placement at tailgate end. • Bolt deck to C-channel/ammo can assembly; bag 4B for tailgate ammo can, bag 4C for cabside ammo can. • Tighten bolts connecting ammo cans to C-channel.
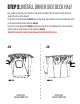
STEP 5: INSTALL PASSENGER SIDE DECK HALF • Wake up your buddy to help you place the passenger side deck assembly into the bed so it overlaps the driver side deck section. Slide until inside edge of the deck rests on the round bosses of the vert. • Insert the J-hook through cabside side hole on the passenger side cabside ammo can and loosely affix it to tie-down bracket (hook pointing upward); bag J5.
STEP 6: INSTALL DRAWER WHEELS • There is a left and a right corner bracket for each drawer–bolt brackets in place. (use the 2” bolts for the upper back wall bracket hole); bags 6A and 6B. • Use tube brace with two bolts to connect the two corner brackets; bag 6C. • Insert axle through wheel and affix to drawer bracket; bag 6D. Do this for each wheel (4 times). • Turn drawer upside down and align the L-braces (loose in system box) with holes in drawer. Secure round L-brace holes first.
4 2 STEP 7: INSTALL DRAWER HANDLES 6 5 3 ZONE REV. • Save yourself the headache, watch this short installation video: decked.com/videohandle • From the underside of drawer, place the springs between the holes, red spring=right spring; bag 7A. Note: each spring arm should point inward, not outward. • Install clevis pin through each drawer hole and through spring; bag 7B. • With DECKED logo facing outward, insert the handle ends behind the spring arms.
STEP 8: INSTALL DRAWERS • Save yourself the headache, watch this short installation video: decked.com/videotailgatewheels • Install drawer braces (packed separately); bag 8A. • Slide the tailgate side drawer wheels into their two channels (C-channel and vert). • Install remaining tailgate side wheels onto their axles; bag 8B. Note: Placing a spacer under the drawer to raise it into position makes this easier (ammo can lids work well).
STEP 9: THE FUN STUFF Caution: These are small gauge screws–light, hand-tightening is all that is required. • Center and screw on the edge guard/ruler; bag 9A. • Screw on the bottle opener; bag 9A. • Using your favorite beverage, test the bottle opener, and think about how jealous your buddies are going to be.